Routing: Unterschied zwischen den Versionen
FBO (Diskussion | Beiträge) |
JBO (Diskussion | Beiträge) |
||
| (29 dazwischenliegende Versionen von 3 Benutzern werden nicht angezeigt) | |||
| Zeile 1: | Zeile 1: | ||
This | [[File:Pro40px.PNG|This function is available in OCAD 11 Professional.|link=https://www.ocad.com/en/products/ocad-for-cartography]] | ||
Dieser Befehl kann nur verwendet werden, wenn die Karte georeferenziert und ein '''[[Create_a_New_Map#Massstab und Koordinatensystem|Koordinatensystem]]''' eingestellt ist.<br /> | |||
Diese Funktion kann benutzt werden, um den schnellsten Weg mit dem Auto zwischen zwei beliebigen Punkten durch den Download und Import von Vektordaten von Google Maps zu berechnen. | |||
<br /> | <br /> | ||
Routing | === Routing nach Ort === | ||
1. Wählen Sie '''Routing''' im '''Karte'''-Menü, um den '''Routing'''-Dialog zu öffnen.<br /> | |||
2. Geben Sie den Namen des Start- und Endpunktes ein.<br /> | |||
[[File:Routing1.png|none|500px]]<br /> | |||
=== Routing nach Koordinaten === | |||
Alternativ zur Eingabe von Namen können Sie auch einfach auf Start- und Endpunkt in der Karte klicken.<br /> | |||
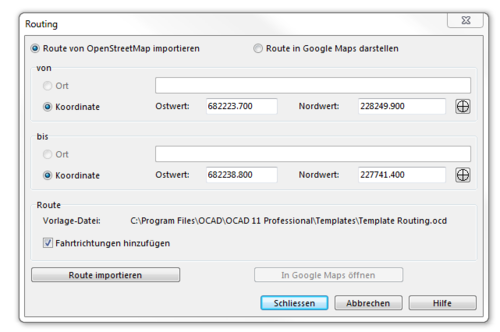
1. Aktivieren Sie die Option '''Koordinate''' im '''Routing'''-Dialog.<br /> | |||
2. Wählen Sie '''Koordinate von Zeichenfläche holen''' [[File:routing8.png]] und klicken Sie in der Karte auf den Startpunkt. OCAD zeigt die Koordinate im '''Routing'''-Dialog an. Sie können die Koordinaten auch manuell eingeben.<br /> | |||
3. Wiederholen Sie den Vorgang für den Endpunkt.<br /> | |||
[[File:Routing6.png|none|500px]]<br /> | |||
<br /> | <br /> | ||
[[File:Hint.jpg|hint]] Bitte beachten Sie, dass die Funktion '''KML-Datei importieren''' nicht mehr funktioniert. | |||
=== Route in Google Maps anzeigen === | |||
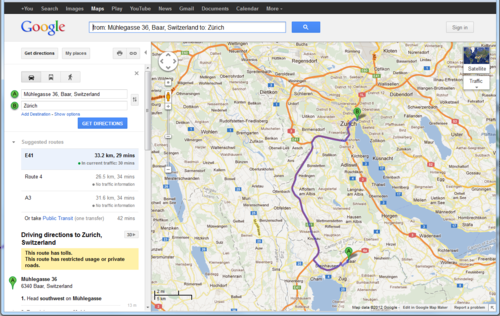
[[File: | Wählen Sie '''In Google Maps öffnen''', um die Route in Google Maps anzuzeigen. <br /> | ||
[[File:Routing5.png|none|500px]]<br /> | |||
=== Vorlage-Datei === | |||
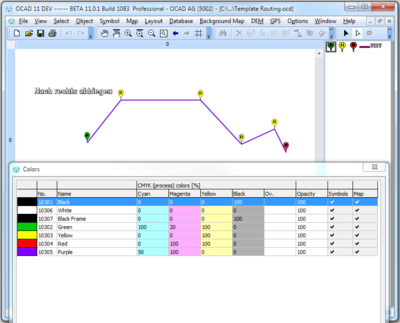
Die Symbole und Farben für das Routing sind in einer Vorlage-Datei gespeichert (normalerweise ''C:\Program Files\OCAD\OCAD 11\Templates\Template Routing.ocd'') und können dort auch manuell bearbeitet werden. <br /> | |||
[[File:Routing9.png|400px]] <br /> | |||
[[File: | |||
---- | |||
Zurück zur '''[[Karte]]'''-Seite. | |||
=== | |||
[[File: | |||
[[ | |||
Aktuelle Version vom 16. Juli 2013, 10:44 Uhr
Dieser Befehl kann nur verwendet werden, wenn die Karte georeferenziert und ein Koordinatensystem eingestellt ist.
Diese Funktion kann benutzt werden, um den schnellsten Weg mit dem Auto zwischen zwei beliebigen Punkten durch den Download und Import von Vektordaten von Google Maps zu berechnen.
Routing nach Ort
1. Wählen Sie Routing im Karte-Menü, um den Routing-Dialog zu öffnen.
2. Geben Sie den Namen des Start- und Endpunktes ein.
Routing nach Koordinaten
Alternativ zur Eingabe von Namen können Sie auch einfach auf Start- und Endpunkt in der Karte klicken.
1. Aktivieren Sie die Option Koordinate im Routing-Dialog.
2. Wählen Sie Koordinate von Zeichenfläche holen ![]() und klicken Sie in der Karte auf den Startpunkt. OCAD zeigt die Koordinate im Routing-Dialog an. Sie können die Koordinaten auch manuell eingeben.
und klicken Sie in der Karte auf den Startpunkt. OCAD zeigt die Koordinate im Routing-Dialog an. Sie können die Koordinaten auch manuell eingeben.
3. Wiederholen Sie den Vorgang für den Endpunkt.
![]() Bitte beachten Sie, dass die Funktion KML-Datei importieren nicht mehr funktioniert.
Bitte beachten Sie, dass die Funktion KML-Datei importieren nicht mehr funktioniert.
Route in Google Maps anzeigen
Wählen Sie In Google Maps öffnen, um die Route in Google Maps anzuzeigen.
Vorlage-Datei
Die Symbole und Farben für das Routing sind in einer Vorlage-Datei gespeichert (normalerweise C:\Program Files\OCAD\OCAD 11\Templates\Template Routing.ocd) und können dort auch manuell bearbeitet werden.

Zurück zur Karte-Seite.


