Dateien importieren
Wählen Sie diesen Befehl im Datei-Menü, um externe Dateien der aktuellen Karte hinzuzufügen. Der Importieren-Dialog erscheint. Es werden alle importierbaren Dateien angezeigt. Dies sind die folgenden Dateiformate:
- OCAD Kartendateien (*.ocd)
- Adobe Illustrator Dateien (*.ai) (nur Vektordaten)
- DXF Dateien (*.dxf)
- Enhanced Meta Dateien (*.emf) (nur Vektordaten)
- GPX Dateien (*.gpx)
- OpenStreetMap Dateien (*.osm)
- NMEA Dateien (*.nmea)
- PDF Dateien (*.pdf) (nur Vektordaten)
- Freehand XML Dateien (*.rcw)
- Shape Dateien (*.shp)
- SVG Dateien (*.svg)
- Windows Meta Dateien (*.wmf) (nur Vektordaten)
- xyz Dateien (*.xyz)
![]() Es besteht die Möglichkeit, mehrere dxf-, gpx-, nmea-, shp- und xyz-Dateien miteinander zu selektieren und zu importieren.
Es besteht die Möglichkeit, mehrere dxf-, gpx-, nmea-, shp- und xyz-Dateien miteinander zu selektieren und zu importieren.
OCAD-Karte importieren 


Wählen Sie eine OCAD-Datei (*.ocd) im Importieren-Dialog und wählen Sie Öffnen. Der Dialog OCAD-Karte importieren erscheint mit den folgenden Optionen:
Position
- Mit der Maus platzieren: Wählen Sie diese Option, um zum Beispiel ein Logo zu importieren. Die importierte Karte wird in der Mitte des Bildschirmes angezeigt und alle Objekte werden selektiert. Dadurch können Sie die Objekte mit der Maus an der gewünschten Stelle platzieren.
- Mit Verschiebung platzieren: Wählen Sie diese Option, wenn Sie verschiedene Teile der Karte kombinieren wollen. Geben Sie eine Verschiebung in mm ein, wo die Mitte der Karte (0, 0) platziert werden soll.
- Landeskoordinaten verwendet: Wählen Sie diese Option, um eine georeferenzierte Karte zu importieren. Die Karte wird automatisch an der richtigen Position platziert.
Symbole
- Keine Symbole und Farben importieren: Wählen Sie diese Option, um weder Symbole noch Farben zu importieren.
- Symbole nur importieren wenn diese Symbolnummern nicht existieren: Wählen Sie diese Option, um Symbole nur dann zu importieren, wenn deren Symbolnummer noch nocht verwendet wird. Die Symbolbeschreibung wird nicht verglichen. OCAD wird kein neues Symbol erstellen, wenn bereits ein Symbol mit der gleichen Symbolnummer, jedoch einer anderen Symbolbeschreibung vorhanden ist. Es werden keine Farben importiert.
- Import symbols that do not exist. If the imported symbol number exists then a new symbol number is applied: Choose this option to import symbols if they do not exist. OCAD will produce a new symbol if there is a symbol with an equal number but a different signature. The new symbol number gets the next unused decimal (e.g. 102.001 becomes 102.002). Colors will not be imported. This option accords with the data import function of OCAD 8.
- Import symbols and colors: Choose this option to import symbols and colors completely (for example to print 2 maps with different symbol sets and color tables). ToDo
- Change symbol status from Normal to Protect: Check this option to change to symbol status off the imported symbols from Normal to Protect. This option is recommanded for importing an ocd map into a course setting project.
- Rotate objects with symbols orientated to north: ToDo
- Use CRT file: Activate this button to use a CRT converting table. This table consists of two columns, which are separated by a blank. In the first column there is the symbol number of the OCAD symbol in the map which is to be imported. In the second column there is the symbol number of the opened OCAD file. Visit the Cross Reference Table page to get more information about CRT-Files.
- Example:
526.0 813.1
- That means that all objects with the symbol number 526.000 will get the number 813.001 after the import.
- Load: Click this button to load a CRT file.
Database
- Import existing database connections: ToDo
![]() Please note that this CRT file is not compatible with the CRT files created in
Convert Layers dialog! A list of all CRT-Files which can be used with OCAD can be found on the Cross Reference Table page.
Please note that this CRT file is not compatible with the CRT files created in
Convert Layers dialog! A list of all CRT-Files which can be used with OCAD can be found on the Cross Reference Table page.
![]() The error message: "Cannot import symbol" appears if OCAD could not import a symbol. The import is aborted.
The error message: "Cannot import symbol" appears if OCAD could not import a symbol. The import is aborted.
Adobe Illustrator Datei importieren 


Choose an Adobe Illustrator file (*.ai) in the Import dialog and click the open button. Files from Illustrator version 4 and later can be imported.
The objects from an Adobe Illustrator file are imported into OCAD as image objects. The layer names are imported with the objects. The layer name is displayed in the left part of the status bar if an image object is selected.
![]() Use Convert Imported Layers to Symbol from the Map menu to convert the imported objects from image objects to symbolized OCAD objects.
Use Convert Imported Layers to Symbol from the Map menu to convert the imported objects from image objects to symbolized OCAD objects.
DXF-Datei importieren 


DXF stands for Drawing Exchange Format and is a CAD data file format developed by Autodesk made for data exchange between AutoCAD and other programs (Read more in the Wikipedia Article).
Choose a DXF-File (*.dxf) in the Import dialog and click the open button.
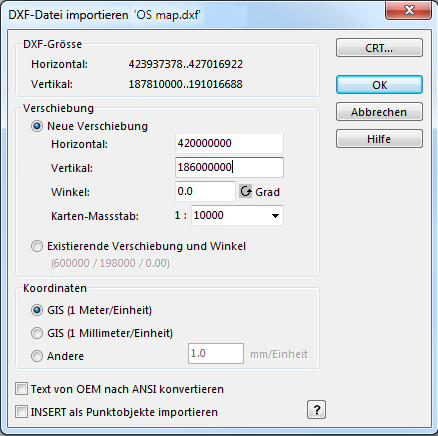
The Import DXF-File dialog appears with the following options and information:
- DXF size: This box shows the range of the coordinates in the DXF file.
- Offset: Choose here whether you want to change the OCAD real world coordinates or to keep the existing ones.
- New offset: Choose this option if no real world coordinates are defined for the map. If you leave the proposed offset unchanged, the imported objects will be placed in the center of the OCAD drawing area. In addition, you can set the desired scale of the OCAD map here.
- Existing offset and angle: Choose this option if the map already has real world coordinates and you want to fit the imported DXF file to the existing coordinates.
- Coordinates: Define here how the coordinates of the DXF file should be interpreted.
- GIS (1 meter/unit): Choose this option when importing DXF files from Geographic Information Systems (GIS), where 1 unit in the DXF-File corresponds to 1 meter in the real world. The map scale is used for the transformation. Choose Scale and Coordinate System from the Map menu to set the map scale.
- GIS (1 millimeter/unit): Choose this option when importing DXF files from Geographic Information Systems (GIS), where 1 unit in the DXF-File corresponds to 1 millimeter in the real world. Usually GIS data uses the unit meter. Please check the unit of the dxf data before importing the data into OCAD.
This example is from British Ordnance Survey data. The dxf size and the proposed new offset is in millimeter.
- Other: Choose this option when importing DXF files from graphic programs. Enter the size in millimeters of one DXF unit on the map (e.g. if the DXF units are inches, enter 25.4).
- Convert text Objects from OEM to Unicode: Activate this box if the text in the DXF file is encoded in the OEM character set. OEM character set is used by old DOS programs and concerns only accented characters (ä, à, å etc.). Windows programs normally produce text in the ANSI character set. If accented characters are not imported correctly, try this option.
- Import INSERT as point object: Activate this option to import INSERT objects in the DXF file as point objects in OCAD. Otherwise the definition of INSERT objects is imported.
- CRT: Click this button if you have converted a similar DXF file before using Convert layers. A file dialog box appears. Choose the CRT file created with the Convert layers command. Read more about CRT-Files on the Cross Reference Table page. You will find examples there, too.
![]() If you do not use a CRT-File for importing a DXF-File, the DXF objects are imported as Unsymbolized Objects. Use the Convert Imported Layers to Symbol function in the Map menu to assign the objects to a symbol later on.
If you do not use a CRT-File for importing a DXF-File, the DXF objects are imported as Unsymbolized Objects. Use the Convert Imported Layers to Symbol function in the Map menu to assign the objects to a symbol later on.
EMF-Datei importieren 


Choose this function import Windows Enhanced Metafile.
This import file format is obsolete.
GPX-Datei importieren 


Choose the .gpx file format in the Import File dialog. Read more about importing GPX files in the GPS - Aus Datei importieren article.
This function is also available for the OCAD 11 Starter and the
OCAD 11 Course Setting Edition. For this purpose, choose the Aus Datei importieren command in the GPS menu.
OSM-Datei importieren 

A description of this function with an example can be found on the Open Street Map Dateien importieren page.
NMEA-Datei importieren 


Choose the .nmea file format in the Import File dialog. Read more about importing NMEA files in the GPS - Aus Datei importieren article.
This function is also available for the OCAD 11 Starter Edition. For this purpose, choose the GPS - Aus Datei importieren command in the GPS menu.
PDF-Datei importieren 


Choose a PDF-File in the Import dialog and click the Open button. The Save Cross Reference Table dialog appears. If you want to save a CRT-File, click the Save button. If you want to continue without saving a CRT-File, click the Cancel button. Learn more about CRT-Files on the Übersetzungstabelle page.
The PDF-File is displayed in the middle of the current view of the map. All objects are selected, hence, it can be easily moved to the desired position.
Please note, that it is only possible to import vector PDF-Files. If the PDF-File contains raster images, they are displayed as a grey area on the map.
![]() Vector objects in PDF-Files are imported as Bildobjekte and can be converted to symbols using the Importierte Ebenen in Symbole umwandeln function. Learn how to make a point symbol out of a vector graphic by reading the Ein Punktsymbol aus Vektordaten erstellen article.
Vector objects in PDF-Files are imported as Bildobjekte and can be converted to symbols using the Importierte Ebenen in Symbole umwandeln function. Learn how to make a point symbol out of a vector graphic by reading the Ein Punktsymbol aus Vektordaten erstellen article.
Freehand XML importieren

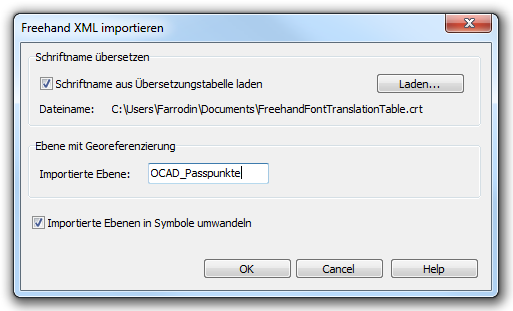
Choose a Freehand XML File (*.rcw) in the Import dialog and click the open button. The Import Freehand XML dialog appears with the following options:
Font name translation:
- Select the load font name translation table option if the Macintosh font names used in the Freehand XML file should be translated to the Windows font names. This translation is defined in a cross reference table (*.crt).
- Example:
NicV-Normal;NicV
- That means the font of all objects that used the NicV-Normal in Freehand will be changed to NicV after the import.
- Load: Click this button to load a CRT file.
- File name: The file name of the loaded CRT file is shown here.
Geo-referenceing layer:
- Imported layer: OCAD offers a coarse georeferecing for Freehand XML files if the Freehand XML file contains a layer with coordinate values. This layer must be entered in the imported layer text box.
Convert imported layers to symbols:
- Select this option if the imported layers should be converted to OCAD symbols. This step can be done also after the import by using Importierte Ebenen in Symbole umwandeln from the Karte menu.
Shape-Datei importieren 

Mehr Informationen über das Shape-Format auf Wikipedia (englisch).
Wenn Sie im Import-Dialog eine Datei vom Typ Shape-Dateien (*.shp) auswählen, erscheint anschliessend der Dialog Shape-Datei importieren. Dieser enthält folgende Optionen:
Shape Grösse:
- In dieser Box wird der Perimeter der Daten in der Shape-Datei angezeigt.
Koordinatensystem:
- Diese Box ermöglicht die Transformation der importierten Shape-Daten ins Koordinatensystem der Karte. Klicken Sie auf die Schaltfläche Auswählen um das Koordinatensystem der Shape-Datei auszuwählen, falls diese ein anderes Koordinatensystem hat als die Karte.
Verschiebung:
- Neue Verschiebung: Wählen Sie diese Option beim Import der ersten Shape-Datei und falls die Karte noch nicht georeferenziert ist. OCAD schlägt aufgrund der Daten Werte für die Verschiebung Ostwert und Verschiebung Nordwert sowie den Karten-Massstab, damit die alle Daten auf die Zeichnungsfläche von OCAD passen.
- Existierende Verschiebung und Winkel: Wählen Sie diese Option beim Import der zweiten oder nachfolgenden Shape-Datei oder wenn die Karte bereits georeferenziert ist. Die Daten der neuen Shape-Datei werden aufgrund der Georeferenzierung korrekt platziert.
Datenbanktyp:
- Seit OCAD 11 können Sie zwischen den Datenbanktypen dBase, Microsoft Access 2007 accdb und Microsoft Access 2003/2010 mdb wählen. Zudem haben Sie die Möglichkeit keine Datenbank zu erstellen.
- Falls eine der Microsoft Access Optionen gewählt wurde, kann die code page definiert werden. Das ist wichtig für die korrekte Textzeichen-Konvertierung von dBase (Ansi) zu Microsoft Access (Unicode).
Schlüssel-Feld in Datenbank: OCAD erzeugt während dem Import eine Kopie der zur Shape-Datei gehörenden dBase-Datei. OCAD kann optional ein Schlüssel-Feld zur kopierten dBase-Datei hinzufügen.
- Neues Schlüssel-Feld hinzufügen: Wählen Sie diese Option wenn die dBase-Datei kein eindeutiges Schlüssel-Feld enthält oder wenn Sie nicht sicher sind ob eines existiert.
- Existierendes Schlüssel-Feld verwenden: Wählen Sie diese Option wenn die dBase-Datei bereits ein Schlüssel-Feld enthält und Sie sicher sind, dass dieses einen eindeutigen Wert für jedes Objekt enthält. Wählen Sie das Schlüssel-Feld aus der Liste aus.
Importierte Ebene:
- Keine Ebenen-Informationen verwenden: Wählen Sie diese Option wenn keine Ebenen-Informationen importiert werden sollen. In diesem Fall müssen die Symbole über die Funktion Symbole anhand Datenbankeinträgen zuordnen im Menü Datenbank zugeordnet werden. Dies kann insbesondere bei Verwendung des Datenbanktyps dBase lange dauern.
- Ebenen-Informationen aus Datenbank-Feld verwenden: Wählen Sie diese Option wenn Sie die Ebenen-Informationen (z.B. See, Wald usw.) vom einem dBase-Feld importieren möchten. Dies erlaubt Ihnen nach dem Import den Objekten über die Funktion Importierte Ebenen in Symbole umwandeln im Menü Karte die Symbole zuzuordnen.
Import Text Objects
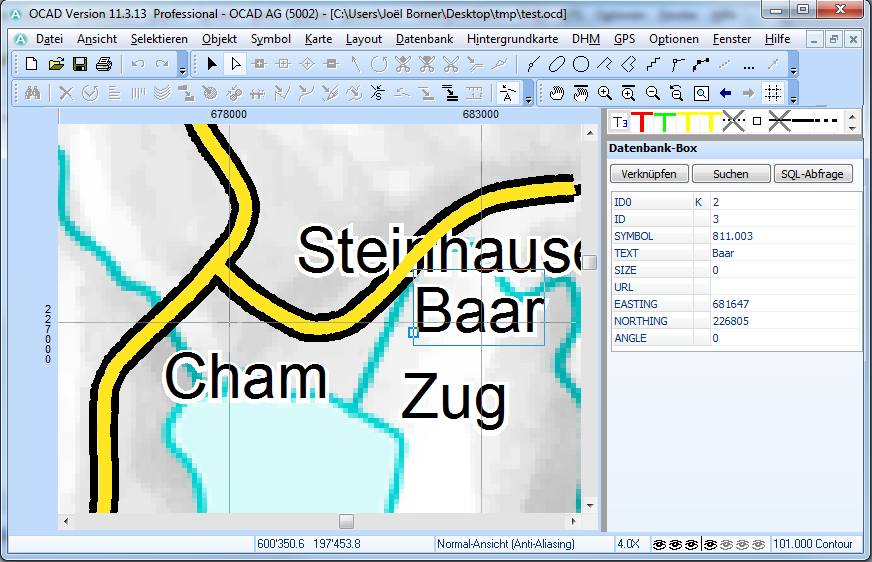
The text objects are stored as points in Shape file. The name is stored as attribute in the database file.
After importing the Shape file the points appears in OCAD as unsymbolized point objects. The label of the selected point object is stored in the according database record ('Baar' in the field 'TEXT').
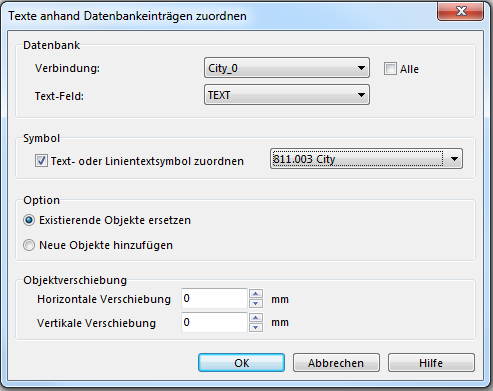
Click Add Texts by Records... in Database menu to create the text objects. The Add Texts by Records dialog appears.
Choose the option Replace existing objects and click OK to create the text objects.
SVG-Datei importieren 

[SVG] stands for Scalable Vector Graphics, an XML-based file format for two-dimensional vector graphics. Choose an SVG file (*.svg) in the Import dialog and click the open button.
The objects from the SVG file are imported into OCAD as Bildobjekte. The layer names are imported with the objects. The layer name is displayed in the left part of the status bar if an image object is selected.
![]() Use Importierte Ebenen in Symbole umwandeln from the Karte menu to convert the imported objects from image objects to symbolized OCAD objects.
Use Importierte Ebenen in Symbole umwandeln from the Karte menu to convert the imported objects from image objects to symbolized OCAD objects.
WMF-Datei importieren 


Choose this function import Windows Metafile.
This import file format is obsolete.
XYZ-Datei importieren 

These files contain 3d coordinate values.
 Real world coordinates must be chose in Scale and Coordinate System dialog from the Map menu and map offset must be set that the imported points are within the drawing area.
 To import the xyz file for a dem please choose Import in the DEM menu.
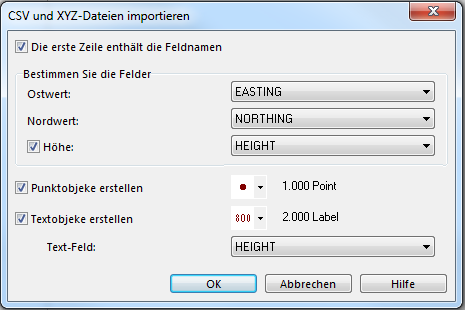
Choose a point symbol that should be assigned to the imported objects. OCAD will create point objects with x/y coordinates. z values are assigned to the objects' height property. Select an object and show Object Information to see height value of the selected object.
After the import OCAD shows a summery about the imported points.
XYZ-Datei Beispiel
579609.39 335648.46 701.00
579609.40 335627.71 698.79
579609.40 335659.36 702.60
579609.40 335729.36 711.52
579609.40 335766.15 715.91
579609.41 335674.01 704.39
Beispiel
Das folgende Beispiel zeigt das Ergebnis einer importierten XYZ-Datei eines DTM's.
OCAD erzeugte für jeden Datenpunkt ein Punktobjekt mit einem Punktsymbol (schwarzer Punkt).
Eine Ebene manuell umwandeln
When importing a file which is not an OCAD file, Unsymbolisierte Objekte are created. They appear in the color specified in OCAD Präferenzen. When you select such an object, a layer name will appear on the left side of the Statusleiste. To get a real map, the layers have to be converted to OCAD symbols.
Normally you convert layers using the Importierte Ebenen in Symbole umwandeln command from the Map menu. You can also convert a layer manually:
- Select an imported unsymbolized object. On the left side of the Status Bar the layer name is shown.
- Select the corresponding OCAD symbol in the symbol box.
- Choose the Symbol wechseln (Alle Objekte mit entsprechendem Symbol)) function in the Object menu or in the Edit Functions Toolbar.
- Leave the preset values unchanged and click the OK button.
Previous Chapter: Background Map
Next Chapter: Drawing an Object
Back to the Main Page.

