Bahnlegung für den Orientierungslauf: Unterschied zwischen den Versionen
FBO (Diskussion | Beiträge) |
FBO (Diskussion | Beiträge) |
||
| Zeile 40: | Zeile 40: | ||
== Edit Course Setting Objects == | == Edit Course Setting Objects == | ||
Informationen, welche die Bahnlegungsbox auf der rechten Seite des OCAD Fensters betreffen, finden Sie auf der '''[[Bahnlegungsobjekte bearbeiten]]''' Seite. | |||
Die wichtigsten Funktionen:<br /> | |||
'''[[ | '''[[Bahnlegungsobjekte_bearbeiten#Code_ändern|Change Code of Course Objects]]'''<br /> | ||
'''[[ | '''[[Bahnlegungsobjekte_bearbeiten#Textblock|Insert a Text Block]]'''<br /> | ||
'''[[ | '''[[Bahnlegungsobjekte_bearbeiten#Sperren_und_Entsperren_der_Position_von_Bahnlegungsobjekten|Sperren und Entsperren der Position von Bahnlegungsobjekten]]'''<br /> | ||
'''[[ | '''[[Bahnlegungsobjekte_bearbeiten#Textpostenberschreibung|Postenbeschreibung bearbeiten]]'''<br /> | ||
'''[[ | '''[[Bahnlegungsobjekte_bearbeiten#Bahn|Bahnobjekte zur Bahn hinzufügen, ändern oder entfernen]]'''<br /> | ||
'''[[ | '''[[Bahnlegungsobjekte_bearbeiten#Vorschau|Vorschaumodus]]'''<br /> | ||
== Controls == | == Controls == | ||
Version vom 9. Januar 2013, 11:40 Uhr
Bahnlegungsfunktionen sind nur in Bahnlegungsprojekten verfügbar!
OCAD verfügt über viele Funktionen, um Bahnen für den Orientierungslauf effizient und übersichtlich zu legen.
Ein neues Bahnlegungsprojekt erstellen
Ein Bahnlegungsprojekt ist eine spezielle OCAD Datei. Wie alle anderen OCAD Dateien besitzt auch ein Bahnlegungsprojekt die Endung .ocd, jedoch zusätzlich eine spezielle interne Kennzeichnung, um die Datei als Bahnlegungsprojekt zu identifizieren. Wenn Sie ein Bahnlegungsprojekt erstellen möchten, müssen Sie eine neue Datei kreieren.
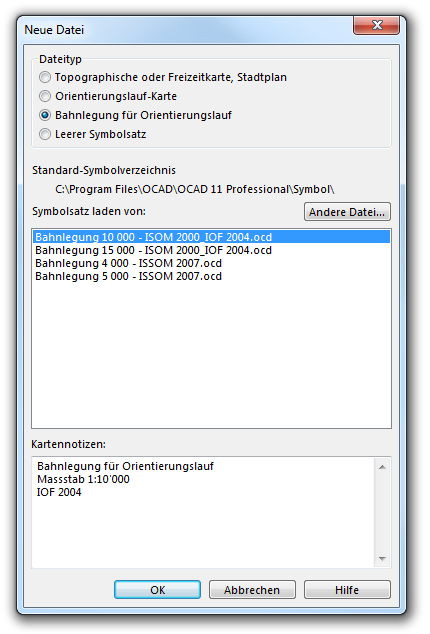
- Wählen Sie das Register Neu aus dem Menü Datei oder klicken Sie auf die Schaltfläche Neu in der Standard Werkzeugleiste. Das Dialogfenster Neue Datei erscheint.
- Selektieren Sie Bahnlegung für Orientierungslauf in der Box Dateityp.
- Selektieren Sie einen Symbolsatz aus der Symbolsatz laden von Box. Um ein Bahnlegungsprojekt in einem Massstab zu erstellen, welcher als Symbolsatz nicht verfügbar ist, suchen Sie sich denjenigen aus, der am Besten passt. Sie können den Massstab später noch ändern.
- Klicken Sie auf die OK Schaltfläche.
- Wählen Sie Massstab und Koordinatensystem aus dem Karte Menü, um den Massstab zu korrigieren. Es ist wichtig, dass Sie dies tun, bevor Sie mit der Bahnlegung beginnen, da die Berechnung der Streckenlänge vom Massstab abhängt.
- Wählen Sie Speichern im Datei Menü oder klicken Sie auf die
Speichern Schaltfläche. Der Speichern unter Dialog erscheint, worauf Sie einen Namen für ihr Bahnlegungsprojekt eingeben können.
- Wählen Sie Öffnen aus dem Hintergrundkarten Menü, um eine Hintergrundkarte zu öffnen.
- Wählen Sie die Ganze Karte anzeigen Schaltfläche des Menüs Ansicht, um die ganze Karte am Bildschirm anzuzeigen.
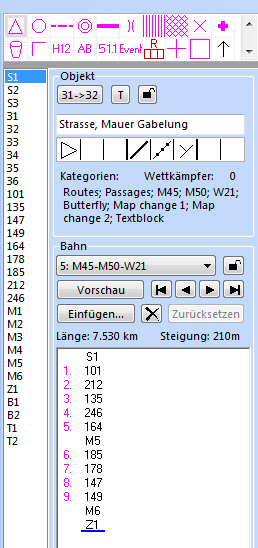
Die Bahnlegungsbox wird auf der rechten Seite des Fensters angezeigt. Diese Box enthält viele Funktionen und Optionen. Besuchen Sie die Bahnlegungsobjekte bearbeiten Seite für weitere Informationen.
Bahnlegungsobjekte hinzufügen
Besuchen Sie die Bahnlegungsobjekte hinzufügen Seite mit den folgenden Artikeln, um Hilfe über das Hinzufügen von Bahnlegungsobjekten zu erhalten:
- Start, Posten und Ziel hinzufügen
- Markierte Route hinzufügen
- Postenbeschreibung hinzufügen
- Bahntitel hinzufügen
- Gabelungen für Staffelbahnen hinzufügen. Lernen Sie, wie man Staffelbahnen legt, auf der Staffelbahnen erstellen Seite.
- Startnummern für Staffelbahnen hinzufügen. Lernen Sie, wie man Staffelbahnen legt, auf der Staffelbahnen erstellen Seite.
- Andere Objekte hinzufügen, wie zum Beispiel der Titel des Anlasses, Logos, Korrekturen auf der Karte usw.
- Bahnlegung Dialogfenster
Edit Course Setting Objects
Informationen, welche die Bahnlegungsbox auf der rechten Seite des OCAD Fensters betreffen, finden Sie auf der Bahnlegungsobjekte bearbeiten Seite.
Die wichtigsten Funktionen:
Change Code of Course Objects
Insert a Text Block
Sperren und Entsperren der Position von Bahnlegungsobjekten
Postenbeschreibung bearbeiten
Bahnobjekte zur Bahn hinzufügen, ändern oder entfernen
Vorschaumodus
Controls
The following two functions can be found in the Controls submenu of the Course Setting menu:
Renumber all Controls
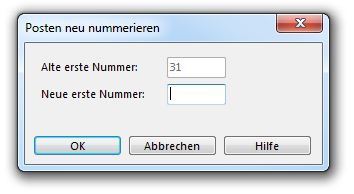
Choose the Renumber all Controls command in the Controls submenu of the Course Setting menu to display the following dialog:
Enter a New first code to shift all control codes. All codes are shifted with the difference between the New first code and the Old first code. Click the OK button when finished.
This function can be useful if you come to know the available control numbers not before setting the courses.
Control Elevation
Visit the Control Elevation page to find more information about this function.
Courses
As a next step you can Create a New Course. A course is basically a list of the start, controls, marked route(s) and the finish. You may want to Insert Other Course Objects like mandatory crossing point, mandatory passage through out of bound area, map exchange, relay team or leg variation.
OCAD supports:
- Individual Courses with symbol sets for foot-o, ski-o, mtb-o and trail-o
- Relay Courses
- One-Man Relay Courses
- Score Orienteering
All information about courses can be found on the Create a New Course page.
Classes
In OCAD you can either work with courses only or you can use classes and courses. Different classes may use the same course. Visit the Create a New Class page for more information.
Insert Course Object to Courses
Choose this function from the Course Setting menu. Learn more about this function on the Add a Course Object to Courses page.
Delete Course Object from Courses
This is the inverse function of the Insert Course Object to Courses function.
Read more about this function on the Delete Course Object from Courses page.
Make Graphic Modifications
Often it is necessary to Make Graphic Modifications to the courses generated by OCAD.
Move Control Number for All Courses
To move the control number for all courses (for example if it covers important map information):
- Change to Preview mode.
- Move a control number and keep it selected.
- Choose the Move Control Number for all Courses command from the Course Setting menu.
- The control number is moved for all other courses, too.
Edit Connection Line for All Courses
To edit a connection line for all courses (for example if it covers important map information):
- Change to Preview mode.
- Edit the connection line and keep it selected.
- Choose the Edit Connection Line for all Courses command from the Course Setting menu.
- The connection line is edited in all other courses which use it, too.
Edit Text Control Description
Choose the Edit Text Control Description command in the Course Setting menu to edit the text control description. Visit the Edit Text Control Description page for more information.
Punching Unit IDs
Choose the Punching Unit IDs command in the Course Setting menu to enter the punching unit IDs. Visit the Punching Unit IDs page for more information.
Auto Control Description
OCAD provides an Auto Control Description tool that recognizes map objects, where controls are placed, and sets the corresponding IOF symbol to the control description. Visit the Auto Control Description page for more information.
Course Statistic and Event Statistic
Choose the Course Statistic and Event Statistic command from the Course Setting menu to display a course and event statistic. Visit the Course Statistic and Event Statistic page for more information.
In the Print submenu of the Course Setting menu you have the option to print the Courses or the Control Descriptions.
Courses can be printed together with the map or on an already printed map. OCAD provides adjustment functions to adjust the course to the already printed map. In addition EPS files can be created to make films for offset printing. Visit the Print Courses page for more information.
To get more information about printing control descriptions, visit the Print Control Descriptions page.
Control descriptions can printed together with the course on the map: Add a Control Description Object.
Import
At the moment importing courses from ORware is the only option for an import. Visit the Course Setting Import page for more information.
Export
OCAD provides different export options of course data for event software, courses as gpx file, course maps etc.
Visit the Course Setting Export page for more information.
Options
Choose the Options command from the Course Setting menu to get some Course Setting Options.
Previous Chapter: XML Script
Next Chapter: Server Client
Back to the Main Page.


