WMS: Difference between revisions
No edit summary |
|||
| (13 intermediate revisions by 3 users not shown) | |||
| Line 1: | Line 1: | ||
'''WMS (Web Map Service)''' and '''WMTS (Web Map Tile Service)''' are interfaces for retrieving geodata as raster data over the internet. | |||
These images can be used as background maps in OCAD. The images are generated by a map server using data from a GIS database. | |||
With WMTS the maps are divided into pre-generated "tiles". The background maps are thus loaded significantly faster by a WMTS service than by a WMS service. | |||
[[File:Hint.jpg]] WMS requires a georeferenced map. Choose the '''[[Create_a_New_Map#Set_Scale_and_Coordinate_System|Scale and Coordinate System]]''' command from the '''Map''' menu to set the map scale and a coordinate system. Real world coordinates do not have to be necessarily defined. They can be left at (0/0) for example. | [[File:Hint.jpg]] WMS requires a georeferenced map. Choose the '''[[Create_a_New_Map#Set_Scale_and_Coordinate_System|Scale and Coordinate System]]''' command from the '''Map''' menu to set the map scale and a coordinate system. Real world coordinates do not have to be necessarily defined. They can be left at (0/0) for example. | ||
To set up a map from a WMS server choose the '''WMS | To set up a map from a WMS / WMTS server choose the '''WMS / WMTS''' command from the '''[[Background Map]]''' menu. The '''WMS / WMTS''' dialog appears. | ||
[[File: | [[File:WMS.gif]] | ||
== WMS Server == | == WMS Server [[File:Space.PNG]][[File:Mas40px.PNG|This function is available in OCAD Mapping Solution.|link=https://www.ocad.com/en/products/ocad-for-cartography]][[File:Ori40px.PNG|This function is available in OCAD Orienteering.|link=https://www.ocad.com/en/products/ocad-for-orienteering]]== | ||
The WMS servers are listed in the upper box of the '''WMS - Web Map Service''' dialog. | The WMS servers are listed in the upper box of the '''WMS - Web Map Service''' dialog. | ||
=== Add a WMS Server === | : [[File:WmsDialog1.png|700px]] | ||
=== Add a WMS / WMTS Server === | |||
# Click the '''Add''' button. | # Click the '''Add''' button. | ||
# The ''' | # The '''Edit WMS / WMTS Properties''' dialog appears. | ||
# Enter the '''Name''' of the server, the '''URL''', the '''Version''' and, if required, a '''Login''' with '''Password''', the '''Token Server URL''' and a '''Key'''. | # Enter the '''Name''' of the server, the '''URL''', the '''Version''' and, if required, a '''Login''' with '''Password''', the '''Token Server URL''' and a '''Key'''. | ||
#: [[File: | #: [[File:EditWMSServerProperties.PNG|500px]] | ||
# For WMTS additional information will be shown in the '''WMTS memory cache'''. | |||
# Click the '''OK''' button when finished. | # Click the '''OK''' button when finished. | ||
# The WMS server appears in the WMS server box. | # The WMS server appears in the WMS server box. | ||
=== Connect to a WMS / WMTS Server === | |||
Select a WMS / WMTS server from the list and click '''Connect'''. If the connection was successful, OCAD gets a list from the server with the available layers. These layers are listed in the WMS / WMTS layer table of the '''WMS / WMTS''' dialog. Read the '''[[WMS#WMS / WMTS_Layer|WMS / WMTS Layer]]''' article to learn how to use layers as '''[[Background Map|Background Maps]]'''. | |||
[[File:WMSDialog2.PNG|700px]] | |||
=== | === Edit WMS / WMTS Server Properties === | ||
Select a WMS / WMTS server and click the '''Edit''' button to edit its properties. The '''Edit WMS / WMTS Properties''' dialog appears which is equal to the '''[[WMS#Add a WMS Server|Add WMS / WMTS Server]]''' dialog. | |||
: [[File:EditWMSServerProperties.PNG|500px]] | |||
=== Remove a WMS / WMTS Server === | |||
Click the '''Remove''' button to remove the selected WMS / WMTS server from the list. | |||
== WMS / WMTS Layer == | |||
After connecting to a WMS / WMTS server the available WMS / WMTS layers are listed in the WMS / WMTS layer box. | |||
: [[File:WMSDialog3.PNG|700px]] | |||
# Select a WMS / WMTS layer in the list and choose an '''Image format''' from dropdown list (those formats are provided by the WMS / WMTS server). | |||
# Choose an option how to add the selected layers: | |||
Select a WMS layer in the list | #* '''Add Selected Layers as WMS / WMTS Layers to Background Maps (Online)''' | ||
: [[File: | #:: [[File:WmsAddLayerOnline.png|500px]] | ||
#:: This is an online '''[[Background Map]]''' . It is updated by the WMS / WMTS Server by each change of the map view. This can take a moment. Choose the ''online'' option only if you are using a fast WMS / WMTS server and work woth high speed internet connection. As an alternative, you can add the layer as an offline background map. | |||
#* '''Add current view of selected layers to background maps (Offline)''' | |||
#:: [[File:WmsAddCurrentViewOffline.png|500px]] <br> | |||
This is an online '''[[Background Map]]'''. | #::* Define the '''Offline folder'''. The current map folder is set as default. | ||
#:: With this offline option an image of the chosen WMS / WMTS layer of the current view is downloaded from the WMS / WMTS server and added as a custom background map to the map. It does not get updated when changing the view. | |||
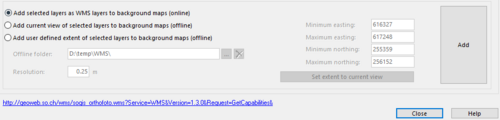
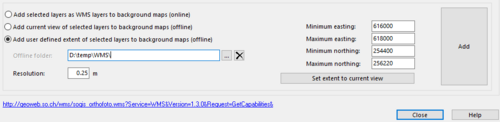
#* '''Add User Defined Extent of Selected Layers to Background Maps (Offline)''' | |||
[[File: | #:: [[File:WmsAddUserDefinedExtentOffline.png|500px]] <br> | ||
#::* Define the '''Offline folder'''. The current map folder is set as default. | |||
#::* Define the '''Resolution'''. | |||
#::* Define the '''Extent''' (minimum easting, maximum easting, minimum northing, maximum northing). The current view extent is set as a default when opening the WMS / WMTS dialog but the entries are not updated automatically by changing the view. The extent can be updated by clicking the '''Set extent to current view''' button. | |||
The WMS layer appears in the table of the '''[[Background_Map#Manage_Background_Maps|Manage Background Map]]''' dialog which can be displayed in the '''[[Background Map]]''' menu. | #:: With this offline option an image of the chosen WMS / WMTS layer of the defined extent is downloaded from the WMS / WMTS server and added as a custom background map to the map. It does not get updated when changing the view. | ||
# Click the '''Add''' button. | |||
#:: The WMS / WMTS layer appears in the table of the '''[[Background_Map#Manage_Background_Maps|Manage Background Map]]''' dialog which can be displayed in the '''[[Background Map]]''' menu. | |||
#:: [[File: hint.jpg]] The '''Background map (Geo-Referenced)''' dialog appears if no real world coordinates offset is set. Choose an offset and click the '''OK''' button. | |||
<br><br> | |||
[[File:Hint.jpg]] Web Map Services generally provide their images in multiple spatial reference systems. OCAD can only access to WMS / WMTS if the OCAD maps' coordinate system (ex. Swiss Grid CH1903+/LV95) is supported by the WMS / WMTS. Then the '''Spatial reference system''' is automatically set to the corresponding EPSG code. If the chosen coordinate system is not compatible with the WMS / WMTS, the '''Spatial reference system''' caption in the WMS / WMTS dialog remains empty. | |||
Click the '''Close''' button when finished. | <br><br> | ||
Click the '''Close''' button when finished.<br><br> | |||
[[File:Hint.jpg]] Manage the view or remove the WMS maps by choosing the '''[[Background_Map#Manage_Background_Maps|Manage]]''' command from the '''[[Background Map]]''' menu:<br> | |||
[[File:WMSBackGroundMap.PNG|700px]] | |||
[[File: | |||
'''WMS Examples''':<br /> | |||
[[File:WMSExample.PNG|700px]]<br /><br /> | |||
[[File:WMS4.png|700px]] | |||
Revision as of 17:46, 4 November 2020
WMS (Web Map Service) and WMTS (Web Map Tile Service) are interfaces for retrieving geodata as raster data over the internet.
These images can be used as background maps in OCAD. The images are generated by a map server using data from a GIS database.
With WMTS the maps are divided into pre-generated "tiles". The background maps are thus loaded significantly faster by a WMTS service than by a WMS service.
![]() WMS requires a georeferenced map. Choose the Scale and Coordinate System command from the Map menu to set the map scale and a coordinate system. Real world coordinates do not have to be necessarily defined. They can be left at (0/0) for example.
WMS requires a georeferenced map. Choose the Scale and Coordinate System command from the Map menu to set the map scale and a coordinate system. Real world coordinates do not have to be necessarily defined. They can be left at (0/0) for example.
To set up a map from a WMS / WMTS server choose the WMS / WMTS command from the Background Map menu. The WMS / WMTS dialog appears.

WMS Server 


The WMS servers are listed in the upper box of the WMS - Web Map Service dialog.

Add a WMS / WMTS Server
- Click the Add button.
- The Edit WMS / WMTS Properties dialog appears.
- Enter the Name of the server, the URL, the Version and, if required, a Login with Password, the Token Server URL and a Key.
- For WMTS additional information will be shown in the WMTS memory cache.
- Click the OK button when finished.
- The WMS server appears in the WMS server box.

Connect to a WMS / WMTS Server
Select a WMS / WMTS server from the list and click Connect. If the connection was successful, OCAD gets a list from the server with the available layers. These layers are listed in the WMS / WMTS layer table of the WMS / WMTS dialog. Read the WMS / WMTS Layer article to learn how to use layers as Background Maps.

Edit WMS / WMTS Server Properties
Select a WMS / WMTS server and click the Edit button to edit its properties. The Edit WMS / WMTS Properties dialog appears which is equal to the Add WMS / WMTS Server dialog.
Remove a WMS / WMTS Server
Click the Remove button to remove the selected WMS / WMTS server from the list.
WMS / WMTS Layer
After connecting to a WMS / WMTS server the available WMS / WMTS layers are listed in the WMS / WMTS layer box.

- Select a WMS / WMTS layer in the list and choose an Image format from dropdown list (those formats are provided by the WMS / WMTS server).
- Choose an option how to add the selected layers:
- Add Selected Layers as WMS / WMTS Layers to Background Maps (Online)
- This is an online Background Map . It is updated by the WMS / WMTS Server by each change of the map view. This can take a moment. Choose the online option only if you are using a fast WMS / WMTS server and work woth high speed internet connection. As an alternative, you can add the layer as an offline background map.
- Add current view of selected layers to background maps (Offline)

- Define the Offline folder. The current map folder is set as default.
- With this offline option an image of the chosen WMS / WMTS layer of the current view is downloaded from the WMS / WMTS server and added as a custom background map to the map. It does not get updated when changing the view.
- Add User Defined Extent of Selected Layers to Background Maps (Offline)
- Define the Offline folder. The current map folder is set as default.
- Define the Resolution.
- Define the Extent (minimum easting, maximum easting, minimum northing, maximum northing). The current view extent is set as a default when opening the WMS / WMTS dialog but the entries are not updated automatically by changing the view. The extent can be updated by clicking the Set extent to current view button.
- With this offline option an image of the chosen WMS / WMTS layer of the defined extent is downloaded from the WMS / WMTS server and added as a custom background map to the map. It does not get updated when changing the view.
- Click the Add button.
- The WMS / WMTS layer appears in the table of the Manage Background Map dialog which can be displayed in the Background Map menu.
 The Background map (Geo-Referenced) dialog appears if no real world coordinates offset is set. Choose an offset and click the OK button.


![]() Web Map Services generally provide their images in multiple spatial reference systems. OCAD can only access to WMS / WMTS if the OCAD maps' coordinate system (ex. Swiss Grid CH1903+/LV95) is supported by the WMS / WMTS. Then the Spatial reference system is automatically set to the corresponding EPSG code. If the chosen coordinate system is not compatible with the WMS / WMTS, the Spatial reference system caption in the WMS / WMTS dialog remains empty.
Web Map Services generally provide their images in multiple spatial reference systems. OCAD can only access to WMS / WMTS if the OCAD maps' coordinate system (ex. Swiss Grid CH1903+/LV95) is supported by the WMS / WMTS. Then the Spatial reference system is automatically set to the corresponding EPSG code. If the chosen coordinate system is not compatible with the WMS / WMTS, the Spatial reference system caption in the WMS / WMTS dialog remains empty.
Click the Close button when finished.
![]() Manage the view or remove the WMS maps by choosing the Manage command from the Background Map menu:
Manage the view or remove the WMS maps by choosing the Manage command from the Background Map menu:

WMS Examples:

