Printing Maps: Difference between revisions
No edit summary |
|||
| (33 intermediate revisions by 5 users not shown) | |||
| Line 1: | Line 1: | ||
[[File:Mas40px.PNG|This function is available in OCAD Mapping Solution.|link=https://www.ocad.com/en/products/ocad-for-cartography]][[File:Ori40px.PNG|This function is available in OCAD Orienteering.|link=https://www.ocad.com/en/products/ocad-for-orienteering]][[File:Sta40px.PNG|This function is available in OCAD Starter.|link=https://www.ocad.com/en/products/ocad-for-orienteering]][[File:View40px.PNG|This function is available in OCAD Viewer.|link=https://www.ocad.com/en/downloads/ocad-viewer]][[File:CS40px.PNG|This function is available in OCAD Course Setting.|link=https://www.ocad.com/en/products/ocad-for-orienteering]] | |||
==Print a map== | |||
# Select '''Print''' in the '''File''' menu, press Ctrl+P or click on the '''Print''' icon [[File:Icon_Print.PNG]] in the standard toolbar. The '''Print''' dialog appears on the right hand side of the window. | # Select '''Print''' in the '''File''' menu, press Ctrl+P or click on the '''Print''' icon [[File:Icon_Print.PNG]] in the standard toolbar. The '''Print''' dialog appears on the right hand side of the window. | ||
#:[[File:Print.PNG]] | #:[[File:Print.PNG]] | ||
# Select | # Select the printer to print the map. In the box you can select one of the installed Windows printer drivers. Click the '''Properties''' button [[File: Properties.PNG]] to change printing options. | ||
# In the '''Page handling''' box you can set the page orientation and the number of copies you would like to print. | # In the '''Page handling''' box you can set the page orientation ('''Portrait''' or '''Landscape''') and the number of copies you would like to print. | ||
# Select the | # Decide between '''Color printing''' or '''Spot color separations (Black & White printing)''' in the next box. Select the second option to print black and withe spot color separations. Choose '''[[Define Spot Colors]]''' from the '''Map''' menu to define spot colors. When this radio button is activated and spot colors are defined, you can select one or more of the defined spot colors in the '''Spot colors''' list box. | ||
# Define the print scale in the '''Scale''' box. You can enter the scale on the keyboard, or choose one of the predefined scales. If the print scale is different from the map scale, the map and the symbols are enlarged/reduced according to the ratio of the map and print scales. | |||
# In the '''Print map size''' box you have the following options: | |||
:*'''Entire map''': The entire map will be printed. Gray frames show a print preview on the basis of the defined paper size in the printer settings. If the map is too large for one page, it will be printed on several pages. Click on the '''Setup''' icon [[File:Properties.PNG]] to make more adjustments. | |||
:*'''Part of map''': Print a part of the map. If you choose this option a thin black and a grey frame appear. The thin black frame shows the area which is to be printed, the grey frame shows the paper size. Adjust the thin black frame to your desired map part. More information about setting up '''Part of the Map''' can be found further down on this page. | |||
:*'''One page''': Select this option to print one page of paper of the map. Click the '''Setup''' [[File:Properties.PNG]] button to define the region to be printed. More information about setting up '''One Page''' can be found further down on this page. | |||
:*If you cannot see the frame, click '''Zoom out''' in the '''View''' menu until the frame becomes visible. | |||
:*Move the mouse pointer inside the rectangle to drag the entire rectangle. Drag a corner or one side to resize the rectangle.<br /> | |||
:7. In the '''Options''' box you can make the following adjustments: | |||
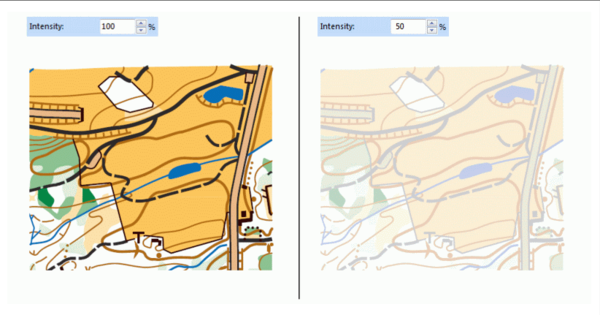
:* '''Intensity:''' For older ink jet printers you can reduce the color intensity here. This reduces the amount of ink applied. | |||
:[[File:PrintIntensity.PNG|600px]] | |||
:* '''Line width:''' For older ink jet printers you can reduce the line width here. This reduces the amount of ink applied. | |||
:[[File:PrintLineWidth.PNG|600px]] | |||
:* '''Print screen grid:''' Check this box to print a grid on the map. Choose the color of the grid in the drop-down list. | |||
:[[File:PrintGrid.PNG|600px]]<br /> | |||
:8. Click '''Print''' to print out the respective area. | |||
: Click '''Save XML''' to save an XML file with the print settings (Same filename and path as OCAD map). Use '''[[XML Script|Execute XML Script]]''' command in '''File''' menu to print the map with the settings saved in the XML file. | |||
Hide the background map before printing the map, if you do not want this to be printed out as well. | |||
If you are still in '''Draft mode''', select '''Normal Mode''' in the '''View''' menu. | |||
[[File:Hint.jpg|hint]] The error message: "Paper size is not defined" appears if a paper size is defined that is not available for the selected printer. | |||
==Setup Part of Map== | |||
Choose the '''Part of map''' option as the print map size and click the [[File:Properties.PNG]] '''Setup''' button to define the printing area. The '''Setup Part of Map (Printing)''' dialog appears. | |||
[[File:SetupPartOfTheMap.PNG]] | |||
===Coordinates=== | |||
Choose between '''Paper''' or '''Real World Coordinates'''. | |||
=== Export map size=== | |||
'''Reference point, width and height''': | |||
: Choose the point of the map which you want to define as the reference point (e.g. upper left corner). Click one of the nine squares. | |||
: Enter the coordinate of the chosen point. | |||
: Enter the dimension ('''Width''' and '''Height''') of the map to be printed in m (real world coordinates) or mm (paper coordinates). | |||
'''Rectangle''' | |||
:Enter the coordinate of the bottom left and the top right corner of the rectangle to be exported in m (real world coordinates) or mm (paper coordinates). | |||
'''Overlap''' | |||
: If the map does not fit to one page, the given '''vertical and horizontal overlap''' is printed on both pages, therefore the maps are overlapping. | |||
If you | :[[File:Hint.jpg]] The overlap values can be negative. This can be useful when printing the courses for relays in orienteering. Place the start number and or advertisement to be printed on the back side beside the map. With a negativ overlap a gap between the two pages is created.<br /> | ||
'''Save''' | |||
: You can name the adjustments/rectangles and save them by clicking the '''Save''' button. | |||
'''Load''' | |||
: If there are saved settings, you can load them using the '''Load''' button or delete them using the '''Delete''' button. | |||
'''Set to entire map''' | |||
: Click the '''Set to map''' to set the values given in the '''Export map size''' part of the dialog to the entire map | |||
'''Import''' | |||
: You can import export-rectangles from another ocd file. | |||
'''Set from selected objects''' | |||
: Click this option and the rectangle will be adapted to the selected objects. | |||
==Setup One Page== | |||
Choose the '''One page''' option as the print map size and click the [[File:Properties.PNG]] '''Setup''' button to define the printing area. The '''Setup One Page''' dialog appears. | |||
[[File:SetupOnePage.PNG]] | |||
In this dialog you have to set the bottom left corner of the page to be printed in mm (paper coorinates) or m (when you have '''[[Create a New Map#Set Scale and Coordinate System|Set a Coordinate System]]'''). Click the '''OK''' button when finished. | |||
[[File:Hint.jpg]] A preview is given in the drawing area. | |||
==Color Display== | |||
Due to color display, we recommend you to always create a PDF first out of OCAD and print this PDF afterwards. OCAD works with CMYK Colors and they will only be displayed correctly this way. What you see on your screen are RGB-Colors from the Windows Graphics Device Interface (GDI). When you print maps directly out of OCAD, the Windows GDI converts the CMYK values first in RGB values and your printer driver back to CMYK values. This way it may come to changes in the color values. | |||
[[File:ColorDisplay.png|800px]] | |||
---- | |||
Back to [[Main Page]] | Back to [[Main Page]] | ||
Revision as of 15:00, 6 November 2019
![]()
![]()
![]()
![]()
![]()
Print a map
- Select Print in the File menu, press Ctrl+P or click on the Print icon
 in the standard toolbar. The Print dialog appears on the right hand side of the window.
- Select the printer to print the map. In the box you can select one of the installed Windows printer drivers. Click the Properties button
 to change printing options.
 - In the Page handling box you can set the page orientation (Portrait or Landscape) and the number of copies you would like to print.
- Decide between Color printing or Spot color separations (Black & White printing) in the next box. Select the second option to print black and withe spot color separations. Choose Define Spot Colors from the Map menu to define spot colors. When this radio button is activated and spot colors are defined, you can select one or more of the defined spot colors in the Spot colors list box.
- Define the print scale in the Scale box. You can enter the scale on the keyboard, or choose one of the predefined scales. If the print scale is different from the map scale, the map and the symbols are enlarged/reduced according to the ratio of the map and print scales.
- In the Print map size box you have the following options:

- Entire map: The entire map will be printed. Gray frames show a print preview on the basis of the defined paper size in the printer settings. If the map is too large for one page, it will be printed on several pages. Click on the Setup icon to make more adjustments.
- Part of map: Print a part of the map. If you choose this option a thin black and a grey frame appear. The thin black frame shows the area which is to be printed, the grey frame shows the paper size. Adjust the thin black frame to your desired map part. More information about setting up Part of the Map can be found further down on this page.
- One page: Select this option to print one page of paper of the map. Click the Setup button to define the region to be printed. More information about setting up One Page can be found further down on this page.
- If you cannot see the frame, click Zoom out in the View menu until the frame becomes visible.
- Move the mouse pointer inside the rectangle to drag the entire rectangle. Drag a corner or one side to resize the rectangle.
- Entire map: The entire map will be printed. Gray frames show a print preview on the basis of the defined paper size in the printer settings. If the map is too large for one page, it will be printed on several pages. Click on the Setup icon
- 7. In the Options box you can make the following adjustments:
- Intensity: For older ink jet printers you can reduce the color intensity here. This reduces the amount of ink applied.
- Line width: For older ink jet printers you can reduce the line width here. This reduces the amount of ink applied.

- Print screen grid: Check this box to print a grid on the map. Choose the color of the grid in the drop-down list.

- 8. Click Print to print out the respective area.
- Click Save XML to save an XML file with the print settings (Same filename and path as OCAD map). Use Execute XML Script command in File menu to print the map with the settings saved in the XML file.


Hide the background map before printing the map, if you do not want this to be printed out as well. If you are still in Draft mode, select Normal Mode in the View menu.
![]() The error message: "Paper size is not defined" appears if a paper size is defined that is not available for the selected printer.
The error message: "Paper size is not defined" appears if a paper size is defined that is not available for the selected printer.
Setup Part of Map
Choose the Part of map option as the print map size and click the ![]() Setup button to define the printing area. The Setup Part of Map (Printing) dialog appears.
Setup button to define the printing area. The Setup Part of Map (Printing) dialog appears.

Coordinates
Choose between Paper or Real World Coordinates.
Export map size
Reference point, width and height:
- Choose the point of the map which you want to define as the reference point (e.g. upper left corner). Click one of the nine squares.
- Enter the coordinate of the chosen point.
- Enter the dimension (Width and Height) of the map to be printed in m (real world coordinates) or mm (paper coordinates).
Rectangle
- Enter the coordinate of the bottom left and the top right corner of the rectangle to be exported in m (real world coordinates) or mm (paper coordinates).
Overlap
- If the map does not fit to one page, the given vertical and horizontal overlap is printed on both pages, therefore the maps are overlapping.
 The overlap values can be negative. This can be useful when printing the courses for relays in orienteering. Place the start number and or advertisement to be printed on the back side beside the map. With a negativ overlap a gap between the two pages is created.
Save
- You can name the adjustments/rectangles and save them by clicking the Save button.
Load
- If there are saved settings, you can load them using the Load button or delete them using the Delete button.
Set to entire map
- Click the Set to map to set the values given in the Export map size part of the dialog to the entire map
Import
- You can import export-rectangles from another ocd file.
Set from selected objects
- Click this option and the rectangle will be adapted to the selected objects.
Setup One Page
Choose the One page option as the print map size and click the ![]() Setup button to define the printing area. The Setup One Page dialog appears.
Setup button to define the printing area. The Setup One Page dialog appears.

In this dialog you have to set the bottom left corner of the page to be printed in mm (paper coorinates) or m (when you have Set a Coordinate System). Click the OK button when finished.
![]() A preview is given in the drawing area.
A preview is given in the drawing area.
Color Display
Due to color display, we recommend you to always create a PDF first out of OCAD and print this PDF afterwards. OCAD works with CMYK Colors and they will only be displayed correctly this way. What you see on your screen are RGB-Colors from the Windows Graphics Device Interface (GDI). When you print maps directly out of OCAD, the Windows GDI converts the CMYK values first in RGB values and your printer driver back to CMYK values. This way it may come to changes in the color values.

Back to Main Page