Edit Course Setting Objects: Difference between revisions
(→Add) |
(→Reset) |
||
| (19 intermediate revisions by the same user not shown) | |||
| Line 5: | Line 5: | ||
[[File:CourseSettingDialog.PNG]] | [[File:CourseSettingDialog.PNG]] | ||
==Change Code== | |||
Change the code of the selected course setting object by clicking the corresponding button | ==Course Object List== | ||
To edit an Course object, you have to select it first in the '''Course Object List''' or in the map window. | |||
==Course Object Box== | |||
===Change Code=== | |||
Change the code of the selected course setting object by clicking the corresponding button [[File:ChangeCode.png]]. The '''[[Add_Course_Setting_Objects#Course_Object_Dialog_Box|Course Object Dialog Box]]''' appears. Enter a arbitrary new code (no restrictions) or click the arrows to find the first [[File:FirstFreeCode.png]] or the next [[File:NextFreeCode.png]] free code. Click the '''OK''' button when finished. | |||
If you want to renumber all controls, use the '''[[Course_Setting_for_Orienteering#Renumber_all_Controls|Renumber all controls]]''' function in the '''Controls''' submenu of the '''Course Setting''' menu. | If you want to renumber all controls, use the '''[[Course_Setting_for_Orienteering#Renumber_all_Controls|Renumber all controls]]''' function in the '''Controls''' submenu of the '''Course Setting''' menu. | ||
==Text Block== | ===Text Block=== | ||
Click this button | Click this button [[File:Textblock.png]] to add a text block to the control description. The '''Course Object''' dialog appears. Enter a code for the text block and click the '''OK''' button. The text block appears in the list of all course objects to the left of the '''Object''' box. Select it and type a text in the field standing for the text control description. Now the text block has to be added to a course. For this reason, select the course, mark the correct position in the course (e.g. after control number 38) and double-click the text block in the course object list. The inserted text appears in the control description of the chosen course. | ||
[[File:TextBlockExample.PNG|200px]] | [[File:TextBlockExample.PNG|200px]] | ||
==Lock or Unlock Objects== | ===Lock or Unlock Objects=== | ||
Click the '''Lock''' button | Click the '''Lock''' button [[File:LockObjects.png]] to lock or unlock course setting objects. If the course setting objects are locked, they cannot be moved in the drawing area. This can be useful if you add controls to the course by double-clicking on them. There it can happen that you shift the control accidently when double-clicking on it. When locking the controls before, this can not happen. | ||
==Text Control Description== | ===Text Control Description=== | ||
Enter a text in this field | Enter a text in this field [[File:TextControlDescription.png]] for the text control description. Alternatively, the text control description can be edited using the '''[[Edit Text Control Description]]''' function in the '''Course Setting''' menu. Defining a text for the text control description is possible for '''Starts''', '''Controls''', '''Marked Routes''' and '''Text Blocks''' (displayed also in the symbol control description). | ||
==IOF Symbol Control Description== | ===IOF Symbol Control Description=== | ||
[[File:ControlDescriptionHowTo.PNG]] | [[File:ControlDescriptionHowTo.PNG]] | ||
| Line 49: | Line 55: | ||
H: '''Other Information''': Other information can be given in this field (e.g. radio control or refreshments). | H: '''Other Information''': Other information can be given in this field (e.g. radio control or refreshments). | ||
[[File:Hint.jpg]] - Sources and additional information to the IOF control description can be found here: '''[ | [[File:Hint.jpg]] - Sources and additional information to the IOF control description can be found here: '''[https://orienteering.org/wp-content/uploads/2010/12/control-description-a4-pages_copy.pdf IOF Control Descriptions 2018.pdf]''' | ||
: - Editing the symbol control description is possible for '''Starts''' and '''Controls'''. | : - Editing the symbol control description is possible for '''Starts''' and '''Controls'''. | ||
: - It is not possible to edit the control description for the finish. The control description is defined by the marked route between the last control and the finish. | : - It is not possible to edit the control description for the finish. The control description is defined by the marked route between the last control and the finish. | ||
===Add an Own Symbol to the Control Description=== | ====Add an Own Symbol to the Control Description==== | ||
It is possible to add an own symbol to the control description. | It is possible to add an own symbol to the control description. | ||
# Create a new point symbol with the correct appearance and dimensions for the control description. Learn how to create a new point symbol on the '''[[Create a New Symbol]]''' page. | # Create a new point symbol with the correct appearance and dimensions for the control description. Learn how to create a new point symbol on the '''[[Create a New Symbol]]''' page. | ||
# Unlike the '''[[ | # Unlike the '''[[Create_a_New_Point_Symbol#Point_Symbol_Dialog|Point Symbol Dialog]]''' in a normal map project, the '''Point Symbol Dialog''' of '''Course Setting''' projects have an additional part, namely the '''Course setting project for orienteering''' part. | ||
# Check the '''Control description symbol''' option. | # Check the '''Control description symbol''' option. | ||
# Check the fields (B-H), which you want OCAD to propose your own symbol. | # Check the fields (B-H), which you want OCAD to propose your own symbol. | ||
# Click the '''OK''' button when finished. | # Click the '''OK''' button when finished. | ||
==Classes and Runners== | ===Classes and Runners=== | ||
In this part of the dialog all '''[[Create_a_New_Class|Classes]]''' using the selected course setting objects are listed. In addition, the total number of runners visiting this object is given. Define the number of runners per class in the '''[[Create_a_New_Class|Classes]]''' dialog. | In this part of the dialog all '''[[Create_a_New_Class|Classes]]''' using the selected course setting objects are listed. In addition, the total number of runners visiting this object is given. Define the number of runners per class in the '''[[Create_a_New_Class|Classes]]''' dialog. | ||
==Course== | ==Course Box== | ||
Select a course in the dropdown list | |||
===Course=== | |||
Select a course in the dropdown list [[File:CourseDropdownList.png]]. The course is now selected. You can add course objects to it by double clicking them on the map or on the list with all objects. There are three special items in this list: | |||
* '''All courses''': Select this item and click on '''[[Edit Course Setting Objects#Preview|Preview]]''' to display all courses. | |||
* '''Runners''': Select this item to display all controls. In the '''[[Edit Course Setting Objects#Preview|Preview]]''' mode the total number of runners visiting this control is given in brackets behind each control code. Define the number of runners per class in the '''[[Create_a_New_Class|Classes]]''' dialog. | * '''Runners''': Select this item to display all controls. In the '''[[Edit Course Setting Objects#Preview|Preview]]''' mode the total number of runners visiting this control is given in brackets behind each control code. Define the number of runners per class in the '''[[Create_a_New_Class|Classes]]''' dialog. | ||
* '''All controls''': Select this item to display all controls on the map. In the '''[[Edit Course Setting Objects#Preview|Preview]]''' mode each control is displayed with its code. | * '''All controls''': Select this item to display all controls on the map. In the '''[[Edit Course Setting Objects#Preview|Preview]]''' mode each control is displayed with its code. | ||
===Add === | ===Add === | ||
Click the '''Add''' icon to add a new course. The [[Create a New Course|Courses dialog]] opens with the added course listed in the last row. | Click the '''Add''' icon [[File:AddCourseIcon.png]] to add a new course. The '''[[Create a New Course|Courses dialog]]''' opens with the added course listed in the last row. | ||
===Lock or Unlock Courses=== | ===Lock or Unlock Courses=== | ||
Click the '''Lock''' icon to lock or unlock all courses. When courses are locked, it is not possible to add or remove course setting objects. | Click the '''Lock''' icon [[File:LockObjects.png]] to lock or unlock all courses. When courses are locked, it is not possible to add or remove course setting objects. | ||
===Preview=== | ===Preview=== | ||
Click the '''Preview''' button to get a preview of the selected course. You are now in the '''Preview''' mode. In the '''Preview''' mode it is possible to make several graphical adjusments on the course.<br /> | Click the '''Preview''' button [[File:PreviewCourse.png]] to get a preview of the selected course. You are now in the '''Preview''' mode. In the '''Preview''' mode it is possible to make several graphical adjusments on the course.<br /> | ||
[[File:CourseSetting_Preview.PNG]] | [[File:CourseSetting_Preview.PNG]] | ||
| Line 93: | Line 101: | ||
===Switch Between Courses=== | ===Switch Between Courses=== | ||
Use the arrow buttons to switch between the courses. | Use the arrow buttons [[File:ArrowButtons.png]] to switch between the courses. | ||
===Insert=== | ===Insert=== | ||
Select a course and click the '''Insert''' button. The following course objects can be inserted: | Select a course and click the '''Insert''' button [[File:InsertCourseObjectIcon.png]]. The following course objects can be inserted: | ||
* Mandatory crossing point(s) | * Mandatory crossing point(s) | ||
* Mandatory passage through out of bounds area | * Mandatory passage through out of bounds area | ||
| Line 105: | Line 113: | ||
===Delete=== | ===Delete=== | ||
Remove a course object from a course by selecting it and clicking the '''Delete''' button. Alternatively, you can press the '''Delete''' key. | Remove a course object from a course by selecting it and clicking the '''Delete''' button [[File:DeleteCourseIcon.png]]. Alternatively, you can press the '''Delete''' key on your keybord. | ||
===Reset=== | ===Reset=== | ||
This button is available when you are in the '''[[Edit Course Setting Objects#Preview|Preview]]''' mode. All graphical adjustments (e.g. moved control numbers or cut connection lines) are removed when clicking this button. | This button [[File:ResetCourses.png]] is available when you are in the '''[[Edit Course Setting Objects#Preview|Preview]]''' mode. All graphical adjustments (e.g. moved control numbers or cut connection lines) are removed when clicking this button. | ||
You can also reset only selected preview objects or graphical adjustment. Select them in the drawing window (press the SHIFT key to select multiple objects) and click the right mouse button. A pop-up window appears.<br> | |||
[[File:ResetSelectedPreviewObjects.png]] | |||
===Course Length and Climb=== | ===Course Length and Climb=== | ||
The length and climb of the course is displayed here. The length of the course is calculated automatically. However, you can add an extra length in the '''[[Create_a_New_Course|Courses]]''' dialog. If a '''[[DEM]]''' is used, the climb is calculated automatically, too. Although, you will have to adjust this value in the '''[[Create_a_New_Course|Courses]]''' dialog because OCAD calculates it using the linear distance. | The length and climb of the course [[File:CourseLengthClimb.png]] is displayed here. The length of the course is calculated automatically. However, you can add an extra length in the '''[[Create_a_New_Course|Courses]]''' dialog. This can be useful for example for Sprint Courses, when you want to show the length of the ideal running route.<br> | ||
If a '''[[DEM]]''' is used, the climb is calculated automatically, too '''(Climb Calculated)'''. Although, you will have to adjust this value in the '''[[Create_a_New_Course|Courses]] ''' dialog '''(Climb Used)''' because OCAD calculates it using the linear distance from one control to another. Both climb values are displayed in the Course Box, but only the '''Climb Used''' is displayed in the Control Description. | |||
===Copy Course Scheme=== | ===Copy Course Scheme=== | ||
| Line 118: | Line 130: | ||
[[File:CSBox2.png|border]] | [[File:CSBox2.png|border]] | ||
You can also '''[[Course_Setting_Export#Export_Course_Scheme|Export the Course Scheme]]'''. Choose the corresponding command in the '''Export''' submenu of the '''Course Setting''' menu. | |||
[[ | |||
---- | ---- | ||
Revision as of 18:51, 12 December 2018
![]()
![]()
![]()
![]()
The Course Setting Box on the right side of the window provides several editing options for added course setting objects (Start, Control, Finish, Marked Route etc.).

Course Object List
To edit an Course object, you have to select it first in the Course Object List or in the map window.
Course Object Box
Change Code
Change the code of the selected course setting object by clicking the corresponding button ![]() . The Course Object Dialog Box appears. Enter a arbitrary new code (no restrictions) or click the arrows to find the first
. The Course Object Dialog Box appears. Enter a arbitrary new code (no restrictions) or click the arrows to find the first ![]() or the next
or the next ![]() free code. Click the OK button when finished.
free code. Click the OK button when finished.
If you want to renumber all controls, use the Renumber all controls function in the Controls submenu of the Course Setting menu.
Text Block
Click this button ![]() to add a text block to the control description. The Course Object dialog appears. Enter a code for the text block and click the OK button. The text block appears in the list of all course objects to the left of the Object box. Select it and type a text in the field standing for the text control description. Now the text block has to be added to a course. For this reason, select the course, mark the correct position in the course (e.g. after control number 38) and double-click the text block in the course object list. The inserted text appears in the control description of the chosen course.
to add a text block to the control description. The Course Object dialog appears. Enter a code for the text block and click the OK button. The text block appears in the list of all course objects to the left of the Object box. Select it and type a text in the field standing for the text control description. Now the text block has to be added to a course. For this reason, select the course, mark the correct position in the course (e.g. after control number 38) and double-click the text block in the course object list. The inserted text appears in the control description of the chosen course.

Lock or Unlock Objects
Click the Lock button ![]() to lock or unlock course setting objects. If the course setting objects are locked, they cannot be moved in the drawing area. This can be useful if you add controls to the course by double-clicking on them. There it can happen that you shift the control accidently when double-clicking on it. When locking the controls before, this can not happen.
to lock or unlock course setting objects. If the course setting objects are locked, they cannot be moved in the drawing area. This can be useful if you add controls to the course by double-clicking on them. There it can happen that you shift the control accidently when double-clicking on it. When locking the controls before, this can not happen.
Text Control Description
Enter a text in this field ![]() for the text control description. Alternatively, the text control description can be edited using the Edit Text Control Description function in the Course Setting menu. Defining a text for the text control description is possible for Starts, Controls, Marked Routes and Text Blocks (displayed also in the symbol control description).
for the text control description. Alternatively, the text control description can be edited using the Edit Text Control Description function in the Course Setting menu. Defining a text for the text control description is possible for Starts, Controls, Marked Routes and Text Blocks (displayed also in the symbol control description).
IOF Symbol Control Description

You can edit the IOF symbol description by clicking one of the eight squares. OCAD proposes some symbols for the corresponding field in a menu. To delete a symbol from the control description, click an empty field of OCAD's proposals, when clicking the corresponding square (C-H).

A: Control Number: The control number is specified automatically depending on the sequence of the controls and cannot be edited.
B: Control Code: To edit the control code use the Change Code button.
C: Which of any Similar Feature: Declare the position of the feature when there are similar features at close quarters.
D: Control Feature: The control feature can be declared in this field.
E: Appearance: Add additional information characterizing the appearance of the feature.
F: Dimensions/Combinations: The dimensions or combinations of the feature can be declared in this field.
- You can either choose the crossing or junction symbol for two combination symbols or enter the dimension of the feature:
- Enter a value in the upper field of this box to define the dimension of this feature.
- Enter a value in both fields of this box to define the heights of two features.
- Enter a value in both fields and check the diagonal box to define the heigh of a feature on a slope.

G: Location of the Control Flag: Declare the precise location of the control flag in this field.
H: Other Information: Other information can be given in this field (e.g. radio control or refreshments).
![]() - Sources and additional information to the IOF control description can be found here: IOF Control Descriptions 2018.pdf
- Sources and additional information to the IOF control description can be found here: IOF Control Descriptions 2018.pdf
- - Editing the symbol control description is possible for Starts and Controls.
- - It is not possible to edit the control description for the finish. The control description is defined by the marked route between the last control and the finish.
Add an Own Symbol to the Control Description
It is possible to add an own symbol to the control description.
- Create a new point symbol with the correct appearance and dimensions for the control description. Learn how to create a new point symbol on the Create a New Symbol page.
- Unlike the Point Symbol Dialog in a normal map project, the Point Symbol Dialog of Course Setting projects have an additional part, namely the Course setting project for orienteering part.
- Check the Control description symbol option.
- Check the fields (B-H), which you want OCAD to propose your own symbol.
- Click the OK button when finished.
Classes and Runners
In this part of the dialog all Classes using the selected course setting objects are listed. In addition, the total number of runners visiting this object is given. Define the number of runners per class in the Classes dialog.
Course Box
Course
Select a course in the dropdown list ![]() . The course is now selected. You can add course objects to it by double clicking them on the map or on the list with all objects. There are three special items in this list:
. The course is now selected. You can add course objects to it by double clicking them on the map or on the list with all objects. There are three special items in this list:
- All courses: Select this item and click on Preview to display all courses.
- Runners: Select this item to display all controls. In the Preview mode the total number of runners visiting this control is given in brackets behind each control code. Define the number of runners per class in the Classes dialog.
- All controls: Select this item to display all controls on the map. In the Preview mode each control is displayed with its code.
Add
Click the Add icon ![]() to add a new course. The Courses dialog opens with the added course listed in the last row.
to add a new course. The Courses dialog opens with the added course listed in the last row.
Lock or Unlock Courses
Click the Lock icon ![]() to lock or unlock all courses. When courses are locked, it is not possible to add or remove course setting objects.
to lock or unlock all courses. When courses are locked, it is not possible to add or remove course setting objects.
Preview
Click the Preview button ![]() to get a preview of the selected course. You are now in the Preview mode. In the Preview mode it is possible to make several graphical adjusments on the course.
to get a preview of the selected course. You are now in the Preview mode. In the Preview mode it is possible to make several graphical adjusments on the course.

The following adjustments are allowed:
- Connection Lines: Connection lines can be edited with most of the editing tools (e.g. Reshape, Add, Move or Remove Vertices, Cut etc.). This can be useful if for example a connection line crosses another control or covers an important map object.
- Control Numbers: Select a control number and move it to another position. This can be useful if the control number gets in the way of other course objects or important map information.
Visit the Make Graphic Modifications page to get more information.
Note: Other adjustments (e.g. move controls or add new course objects) are not allowed to make in the Preview mode. Make sure you click the Preview button again before going on working on the courses.
![]() - If control circles cover important map information, they have to be cut in the normal mode and not in the Preview mode.
- If control circles cover important map information, they have to be cut in the normal mode and not in the Preview mode.
- - When moving a control or a course setting object on the map, all affecting graphical adjustments (e.g. moved control numbers or cut connection lines) made in the preview mode get lost. Use the Lock button to prevent from moving course objects accidentally.
Switch Between Courses
Use the arrow buttons ![]() to switch between the courses.
to switch between the courses.
Insert
Select a course and click the Insert button ![]() . The following course objects can be inserted:
. The following course objects can be inserted:
- Mandatory crossing point(s)
- Mandatory passage through out of bounds area
- Map exchange
- Team variation
- Leg variation
Visit the Insert Course Object page for more information.
Delete
Remove a course object from a course by selecting it and clicking the Delete button ![]() . Alternatively, you can press the Delete key on your keybord.
. Alternatively, you can press the Delete key on your keybord.
Reset
This button ![]() is available when you are in the Preview mode. All graphical adjustments (e.g. moved control numbers or cut connection lines) are removed when clicking this button.
is available when you are in the Preview mode. All graphical adjustments (e.g. moved control numbers or cut connection lines) are removed when clicking this button.
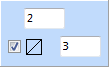
You can also reset only selected preview objects or graphical adjustment. Select them in the drawing window (press the SHIFT key to select multiple objects) and click the right mouse button. A pop-up window appears.

Course Length and Climb
The length and climb of the course ![]() is displayed here. The length of the course is calculated automatically. However, you can add an extra length in the Courses dialog. This can be useful for example for Sprint Courses, when you want to show the length of the ideal running route.
is displayed here. The length of the course is calculated automatically. However, you can add an extra length in the Courses dialog. This can be useful for example for Sprint Courses, when you want to show the length of the ideal running route.
If a DEM is used, the climb is calculated automatically, too (Climb Calculated). Although, you will have to adjust this value in the Courses dialog (Climb Used) because OCAD calculates it using the linear distance from one control to another. Both climb values are displayed in the Course Box, but only the Climb Used is displayed in the Control Description.
Copy Course Scheme
Copy the Course Scheme to clipboard as Bitmap.


You can also Export the Course Scheme. Choose the corresponding command in the Export submenu of the Course Setting menu.