Drawing Orienteering Maps in OCAD: Difference between revisions
(Created page with "The focus of this tutorial is how to draw an orienteering map with OCAD. It doesn’t matter if you start a new mapping project or update an old existing map. It is a compleme...") |
|||
| Line 18: | Line 18: | ||
: '''[http://www.ocad.com/en/support/learn-video/ OCAD Tutorial Videos]:''' Connect to Learning Videos on OCAD homepage. | : '''[http://www.ocad.com/en/support/learn-video/ OCAD Tutorial Videos]:''' Connect to Learning Videos on OCAD homepage. | ||
: '''[https://www.youtube.com/user/ocadcom/ OCAD Youtube Channel]:''' OCAD Youtube Channel | : '''[https://www.youtube.com/user/ocadcom/ OCAD Youtube Channel]:''' OCAD Youtube Channel | ||
: '''Getting Started with OCAD 2018:''' Open the PDF file 'Getting Started with OCAD 2018'. For different languages see '''[ | : '''Getting Started with OCAD 2018:''' Open the PDF file 'Getting Started with OCAD 2018'. For different languages see '''[https://www.ocad.com/en/getting-started/ here]''' | ||
: '''[http://ocad.com/blog/ OCAD Blog]:''' Show the newest posts from the OCAD Blog. | : '''[http://ocad.com/blog/ OCAD Blog]:''' Show the newest posts from the OCAD Blog. | ||
: '''[[License Transfer Utility]]:''' Opens the License Transfer Utility to deactivate your license and transfer it to another user. | : '''[[License Transfer Utility]]:''' Opens the License Transfer Utility to deactivate your license and transfer it to another user. | ||
Revision as of 17:31, 21 September 2018
The focus of this tutorial is how to draw an orienteering map with OCAD. It doesn’t matter if you start a new mapping project or update an old existing map. It is a complement to the PDF Getting Started with OCAD, which you can download from the Help Menu in the OCAD software.
About OCAD
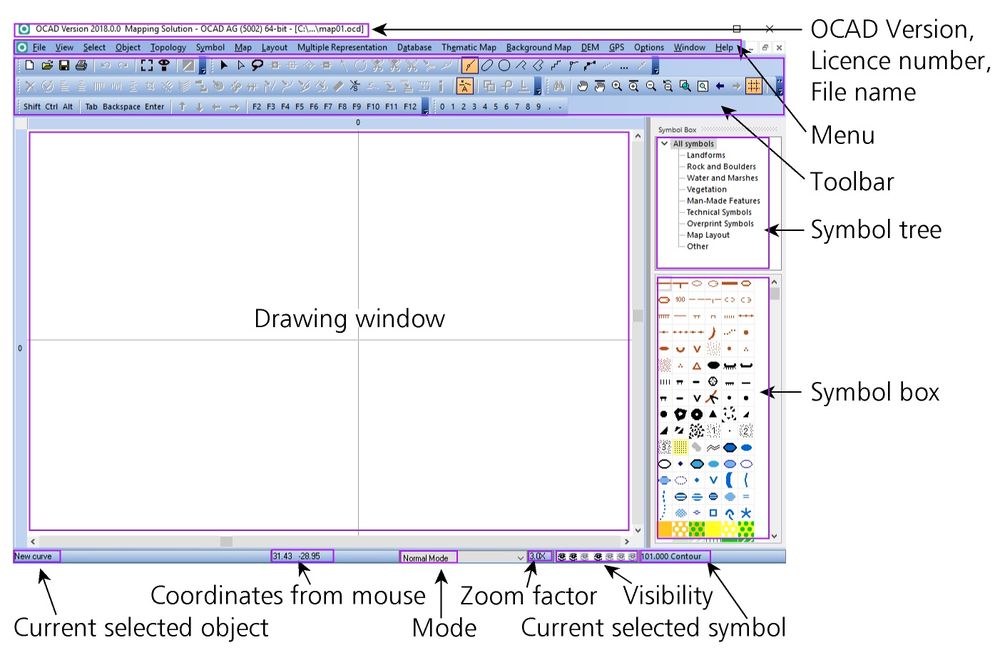
Structure of the OCAD User Interface
The image below shows you the OCAD User Interface.

OCAD Help
You will find the following submenus in the Help menu.
- Contents: Opens the OCAD Main Page.
- Menu: Help for menu commands.
- Toolbar: Help for toolbar buttons.
- Tutorial: Link to the OCAD Tutorials.
- What is New: See the newly added functions on this page.
- OCAD Home page: Opens OCAD homepage on the Internet.
- OCAD Service Update: Download the current Service Update.
- OCAD Tutorial Videos: Connect to Learning Videos on OCAD homepage.
- OCAD Youtube Channel: OCAD Youtube Channel
- Getting Started with OCAD 2018: Open the PDF file 'Getting Started with OCAD 2018'. For different languages see here
- OCAD Blog: Show the newest posts from the OCAD Blog.
- License Transfer Utility: Opens the License Transfer Utility to deactivate your license and transfer it to another user.
- License Manager: The License Manager tool shows an overview about the OCAD licenses which are assigned to your organization (company or association).
- About OCAD: General Information about OCAD like license information and current version of OCAD.
Service Update
Regular and free updates are included in the OCAD subscription model. The Service Update corrects known bugs and adds the latest cartography tools and enhancements to your OCAD.
Therefore we recommend using OCAD software always with the most recent Service Update to benefit from the quality improvements.
Please download the current Service Update from the Help -> OCAD Service Update function in the OCAD program.
The content of the Service Update is listed in the Release notes. Your current version of OCAD can be seen under About OCAD in the Help menu.
New Map
Start a New Map File
Before start mapping you should define which type of map you want to draw, which symbol set you want to use and which scale the map should have. For this tutorial we want to draw an normal forest orienteering map in scale 1:10'000.
To create a new map:
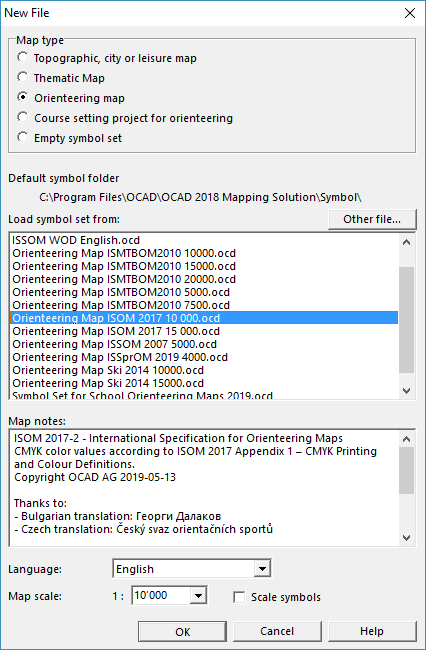
- Select New in the File menu. The New File dialog box appears.
- Choose a map type. OCAD provides predefined symbol sets to help you begin drawing your map immediately. Choose the symbol set Orienteering Map ISOM 2017 10000.ocd.
- Deside in which scale the map shall be drawn. Set the scale to 1:10'000.
- Choose the language of the symbol set. (only at ISOM 2017 available)
- By clicking the OK button, OCAD creates a new map and copies the chosen symbol set to it.
Click here to learn more about this step.
Set Scale and Coordinate System
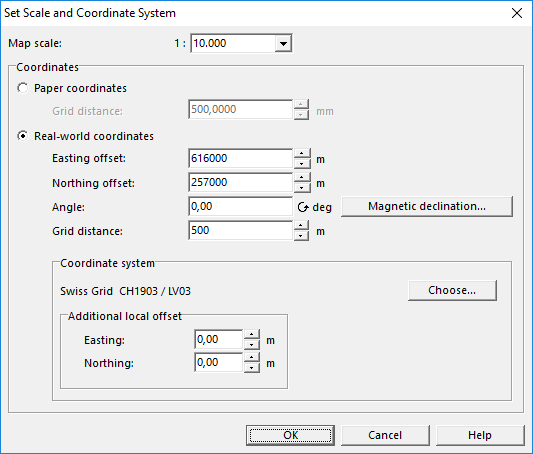
Select the Set Scale and Coordinate System item from the Map menu. The Set Scale and Coordinate System dialog box appears.
Enter the Map Scale
Enter a scale and click the OK button.
![]() Do not use this dialog to change the scale after entering the initial values. To increase or decrease the size of the map subsequently, use the Change Scale function in the Map menu. Setting the current scale does not enlarge or reduce the map. It only changes a number in the map file and georeferencing will be lost.
Do not use this dialog to change the scale after entering the initial values. To increase or decrease the size of the map subsequently, use the Change Scale function in the Map menu. Setting the current scale does not enlarge or reduce the map. It only changes a number in the map file and georeferencing will be lost.
Georeference the Map
Before loading a georeferenced Background Map, work with GPS data or import Spatial Base Data, we recommend that you first georeference the map. Georeferencing means, that you assign space-related reference information to objects in a spatial reference system. Shortly: A georeferenced map is assigned to a coordinate system. You should contact your data supplier, national surveying office or cartographic institute to find out which coordinate system will best suit your needs.
- Choose wheter you want define Paper coordinates (in mm) or Real world coordinates. We choose Real world coordinates for this tutorial.
- In the Easting offset and Northing offset fields, enter the coordinate values for the center of your map.
- The coordinate system can be rotated by entering a value in the Angle field. The "Angle" is the deviation from the magnetic North to the coordinate system. At the moment there are 0-degree deviation in Switzerland.
- In the Grid distance field, enter the desired distance for the Coordinate Grid lines.
![]() Enter the coordinate values for the center of your map in the horizontal and vertical offset fields. This is important since the drawing area of OCAD is limited to 4 x 4 m in the
Enter the coordinate values for the center of your map in the horizontal and vertical offset fields. This is important since the drawing area of OCAD is limited to 4 x 4 m in the Orienteering edition, in the
Starter edition as well as in the
Course Setting edition and 80 x 80 m in the
OCAD Mapping Solution. This option is used to ensure that imported Spatial Base Data, georeferenced Background Maps and GPS measurements do not lie outside the drawing area.
Coordinate System
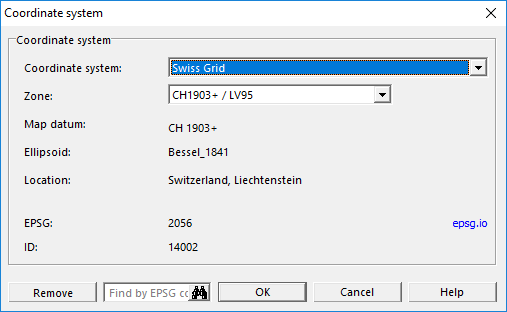
Click the Choose button to define a coordinate system. The Coordinate System dialog appears.
Choose the desired coordinate system. OCAD supports a lot of coordinate systems.
Click here to learn more about Scale, Coordinat System and Georeferencing.
Create the Base Map for the Field Work
To be updated shortly...


