Create a New Class: Difference between revisions
Jump to navigation
Jump to search
No edit summary |
No edit summary |
||
| Line 17: | Line 17: | ||
Click the '''Move Up''' or '''Move Down''' button to move a class up or down in the table. Click the '''Delete''' button to delete the selected class. Click the '''OK''' button to save and quit the dialog. | Click the '''Move Up''' or '''Move Down''' button to move a class up or down in the table. Click the '''Delete''' button to delete the selected class. Click the '''OK''' button to save and quit the dialog. | ||
=== Import Class Assignment === | === Import Class Assignment === | ||
Click the '''Import | Click the '''Import''' button to import a class assignment file. The file contains two columns with course name and class name. The columns are separated by a semikolon (';') or a tab. OCAD ignores the first header line. | ||
Example file: | Example file: | ||
Revision as of 16:46, 28 June 2013
(This function is only available in course setting projects!)
This function is used when different classes use the same course. You will have to define classes and allocate a course to them.
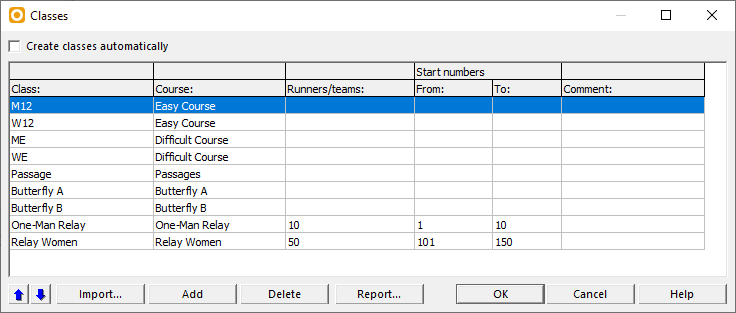
- Choose the Classes command from the Course Setting menu.
- The Classes dialog appears.
- Uncheck the Create classes automatically option. If this option is enabled, courses and classes are equal which means that every class has a different course.
- Click the Add button to create a new class. A new row is inserted in the table.
- Enter a name in the Class column (e.g. M20)
- Allocate a course. Choose the course from the dropdown list in the Course column.
- Define the estimated number of runners or teams (for Relay Courses) in the corresponding column. This number is used for the calculation of course statistic.
- Enter the Start numbers allocated to this class. This is especially important when setting a Relay Course. On the basis of the start numbers, variations get allocated to the teams.
Click the Move Up or Move Down button to move a class up or down in the table. Click the Delete button to delete the selected class. Click the OK button to save and quit the dialog.
Import Class Assignment
Click the Import button to import a class assignment file. The file contains two columns with course name and class name. The columns are separated by a semikolon (';') or a tab. OCAD ignores the first header line.
Example file:
 Course;Class
 1;M17
 1;M40
 2;W21
 3;W13-14
OCAD adds the class only if the course exists.
Back to the Course Setting for Orienteering page.
