Add Course Setting Objects: Difference between revisions
| (95 intermediate revisions by 10 users not shown) | |||
| Line 1: | Line 1: | ||
[[Category: Course Setting]][[File:Mas40px.PNG|This function is available in OCAD Mapping Solution.|link=https://www.ocad.com/en/products/ocad-for-cartography]][[File:Ori40px.PNG|This function is available in OCAD Orienteering.|link=https://www.ocad.com/en/products/ocad-for-orienteering]][[File:Sta40px.PNG|This function is available in OCAD Starter.|link=https://www.ocad.com/en/products/ocad-for-orienteering]][[File:CS40px.PNG|This function is available in OCAD Course Setting.|link=https://www.ocad.com/en/products/ocad-for-orienteering]] | |||
''(This function is only available in course setting projects!)'' | ''(This function is only available in course setting projects!)'' | ||
== | ==Add Start, Controls and Finish== | ||
'''Start''' | ====Start==== | ||
# Select the [[File:cdstart.gif]] '''Start''' symbol in the symbol box. | |||
# Select any drawing mode. | |||
# Click in the drawing area to place the object. Now the '''[[Add_Course_Setting_Objects#Course_Object_Dialog_Box|Course Object Dialog Box]]''' appears. It proposes the code S1 for the start. Enter a different code if desired.<br>[[File:Hint.jpg]] '''Skip''' the course object dialog box by holding down the Shift key when clicking in the drawing area.<br> | |||
# Click the '''OK''' button. | |||
# The '''Start''' object appears on the map. | |||
# You can now '''[[Add_a_Course_Object_to_Courses|Add the Course Object to Courses]]'''. | |||
# Select it to get some editing options. Visit the '''[[Edit Course Setting Objects]]''' page to get more information (e.g. how to edit the control description). | |||
====Control==== | |||
# Select the [[File:cdcontrol1.gif]] '''Control''' symbol in the symbol box. | |||
# Select any drawing mode. | |||
# Click in the drawing area to place the object. Now the '''[[Add_Course_Setting_Objects#Course_Object_Dialog_Box|Course Object Dialog Box]]''' appears. It proposes a code. Enter a different code if desired.<br>[[File:Hint.jpg]] '''Skip''' the course object dialog box by holding down the Shift key when clicking in the drawing area.<br>[[File:AddControl_Shift.gif]]<br> | |||
# Click the '''OK''' button. | |||
# The '''Control''' object appears on the map. | |||
# You can now '''[[Add_a_Course_Object_to_Courses|Add the Course Object to Courses]]'''. | |||
# Select it to get some editing options. Visit the '''[[Edit Course Setting Objects]]''' page to get more information (e.g. how to edit the control description). | |||
# Select the | ====Finish==== | ||
# Select the [[File:csfinish1.gif]] '''Finish''' symbol in the symbol box. | |||
# Select any drawing mode. | # Select any drawing mode. | ||
# Click in the drawing area to place the object. Now the Course Object dialog box appears. It proposes the | # Click in the drawing area to place the object. Now the '''[[Add_Course_Setting_Objects#Course_Object_Dialog_Box|Course Object Dialog Box]]''' appears. It proposes a code. Enter a different code if desired.<br>[[File:Hint.jpg]] '''Skip''' the course object dialog box by holding down the Shift key when clicking in the drawing area.<br> | ||
# Click '''OK'''. | # Click the '''OK''' button. | ||
# The '''Finish''' object appears on the map. | |||
# You can now '''[[Add_a_Course_Object_to_Courses|Add the Course Object to Courses]]'''. | |||
# Select it to get some editing options. Visit the '''[[Edit Course Setting Objects]]''' page to get more information. | |||
[[File:Hint.jpg]] It is not possible to edit the control description for the finish. The control description is defined by the marked route between the last control and the finish. | |||
=== Add Control to Map and Course at once by Moving the Connection Line=== | |||
# Select the course in the dropdown list of the '''[[Edit Course Setting Objects|Course Object Box]]'''. | |||
# Make sure that you are not in the Preview Mode. | |||
# Select the [[File:cdcontrol1.gif]] '''Control''' symbol in the symbol box. | |||
# Choose the '''[[Select#Select_Object_and_Edit_Vertex|Select Object and Edit Vertex]]''' tool. | |||
# Click on the connection line between those controls where the object should be added and drag the connection line to the place where the object should be added. Now the '''[[Add_Course_Setting_Objects#Course_Object_Dialog_Box|Course Object Dialog Box]]''' appears. It proposes a code. Enter a different code if desired.<br>[[File:Hint.jpg]] '''Skip''' the course object dialog box by holding down the Shift key when clicking in the drawing area.<br> | |||
# Click the '''OK''' button. | |||
# The object appears on the map and is '''added to the course'''. | |||
[[File:Hint.jpg]] '''Variant for step 5 and 6''': If the connection line is moved to an existing control then this control is added to the course without creating a new control on the map. | |||
[[File:AddControlToMapByMovingConnectionLine.gif]] | |||
==Add a Marked Route== | |||
A marked route is mostly used from the last control to the finish. Sometimes you may also have marked routes between controls (e.g. to cross a bridge or a dangerous area). | |||
The marked route treated in this article applies to a route the runner must use. If you want to add a marked route just for information, but which is not part of the course you have to add it as a different object, which is described at the end of this aticle. | |||
To create a marked route: | |||
# Select the [[File:Markedroute.gif]] '''Marked Route''' symbol in the symbol box. | |||
# Select a drawing tool (e.g. the curve tool). | |||
# Draw the marked route in the direction in which the competitors are running (e.g. from the last control to the finish). | |||
# Now the '''[[Add_Course_Setting_Objects#Course_Object_Dialog_Box|Course Object Dialog Box]]''' appears. It proposes a code. Enter a different code if desired (See below if this dialog box does not appear automatically). | |||
# Click the '''OK''' button. | |||
# The '''Marked Route''' object is shown on the map. | |||
# You can now '''[[Add_a_Course_Object_to_Courses|Add the Course Object to Courses]]'''. | |||
# Select it to get some editing options. Visit the '''[[Edit Course Setting Objects]]''' page to get more information. | |||
Check '''Funnel tapes''' [[File:FunnelTapes.png]] in the '''Course Object Box''' when a marked route is selected to get the corresponding symbol on the control description. | |||
[[File:FunnelTapesExample.png]] | |||
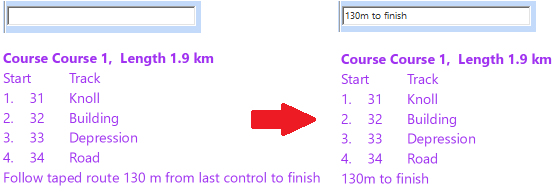
You can even enter a Text Control Description for the Marked Route. This text appears in the Text Control Description and has no effect on the Symbol Control Description, but it can be useful to make the Text Control Description smaller.<br> | |||
[[File:EditMarkedRoute.png]] | |||
The marked route defines how the finish is displayed on the control description. Marked routes can be drawn anywhere in the course, but note that they must be drawn in the direction in which the competitors are running, otherwise the course will not be drawn correctly. | |||
[[File:Hint.jpg]] Marked routes must be added to each course like controls and the finish ('''[[Add_a_Course_Object_to_Courses|Add a Course Object to Courses]]'''). | |||
[[File:MarkedRoute.png]]<br> | |||
Marked Route 1: Starts at control, ''Funnel tapes'' disabled.<br> | |||
Marked Route 2: Starts not at control, ''Funnel tapes'' disabled.<br> | |||
Marked Route 3: Starts at control and ends at finish, ''Funnel tapes'' active. | |||
If the '''[[Add_Course_Setting_Objects#Course_Object_Dialog_Box|Course Object Dialog Box]]''' does not appear automatically: | |||
# Right-click on the [[File:Markedroute.gif]] '''Marked Route''' symbol in the symbol box. | |||
# Choose the '''Edit''' command from the context menu. The '''Line Symbol''' dialog box appears. | |||
# In the '''Main Line''' tab activate the '''Course setting symbol: Marked route''' option. | |||
# Click the '''OK''' button and draw the marked route again. | |||
''' | If you want to create a marked route without influence on the course: | ||
# Right-click on the [[File:Markedroute.gif]] '''Marked Route''' symbol in the symbol box. | |||
# Choose the '''Duplicate''' command. | |||
# Right-click on the duplicated [[File:Markedroute.gif]] '''Marked Route''' symbol in the symbol box. | |||
# Choose the '''Edit''' command from the context menu. The '''Line Symbol''' dialog box appears. | |||
# In the '''Main Line''' tab disable the '''Course setting symbol: Marked route''' option. | |||
# Click the '''OK''' button. Now you can draw a marked route which cannot be added to a course and is always visible. | |||
==Add the Map Issue Point== | |||
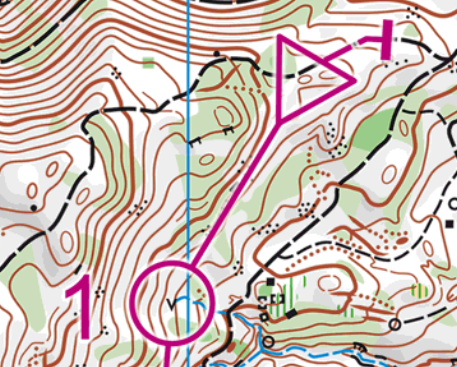
Since ISOM 2017, there's a symbol for the map issue point (symbol number 702). | |||
Draw a marked route to the start triangle and then add a [[Vertices#Add_Corner_Vertex|Corner Vertex]] into the dashed line. The crossbar for the map issue point appears. | |||
[[File:MapIssuePoint.gif]] | |||
[[File:Hint.jpg]] You can also draw the Map Issue Point like a normal point object (and not insert a Corner Vertex). However, please note that in this case the Map Issue Point will be displayed in all courses. | |||
[[File:MapIssuePoint.PNG]]<br> | |||
Example for Map Issue Point at EOC 2018 Middle Distance Final Women. | |||
==Add a Control Description== | |||
To print a control description together with the course you have to place a control description object. This object is a placeholder and indicates the upper left corner of the control description. | |||
# Select the [[File:cdsymbol.gif]] '''Control Description''' symbol in the symbol box. | |||
# Select any drawing mode. | |||
# Place the upper left corner of the control description on the map. | |||
# Now the '''[[Add_Course_Setting_Objects#Course_Object_Dialog_Box|Course Object Dialog Box]]''' appears. It proposes a code. Enter a different code if desired. | |||
# Click the '''OK''' button. | |||
# The '''Control Description''' object is indicated by a hook on the map which is the upper left corner. | |||
# Select it to get some editing options. Read the '''[[Edit_Course_Setting_Objects#IOF_Symbol_Control_Description|IOF Symbol Control Description]]''' article to get more information. | |||
'''Change Control Description Type'''<br> | |||
[[File:ChangeControlDescriptionType.png]]<br> | |||
1) Select the control description corner on the drawing area or in the course setting objects list.<br> | |||
2) Change the '''Control description type''' from symbol to text or vice versa on the right side of the window.<br> | |||
[[File:Hint.jpg]] It's the same with changing the '''Control description anchor''' from top left to bottom left in the '''Course Object Box'''. | |||
# Select the | '''Control Description with White Background'''<br> | ||
# Select a | If the background map should be masked below the text description, activate the '''White background''' option in the '''[[Course_Setting_Options|Options]]''' dialog of the '''Course Setting''' menu. | ||
# | |||
# Now the Course Object dialog box appears | Click the '''[[Edit_Course_Setting_Objects#Preview|Preview]]''' button to get a preview of the control description. | ||
# Click '''OK'''. | |||
'''Control Description with White Background (Draft Mode)''' | |||
If you prefer to print your maps in draft mode, you will face a problem, that there is no block-out of the control description in draft mode. | |||
[[File:ControlDescriptionDraftMode.png|600px]] | |||
In this case, activate the new option '''Draw white background even in draft mode''' in the [[Course_Setting_Options#White_Background|'''Course Setting Options''']] dialog. Read more in the [[Course_Setting_Options#White_Background|'''Course Setting Options''']] article. | |||
==Add a Course Title== | |||
Normally you add the title of the course to the map. To add a course title, you place a text object which is a placeholder for the course title. This text object will be filled with the course title in each course. | |||
# Select the [[File:coursetitle.gif]] '''Course Title''' symbol in the symbol box. | |||
# Select any drawing mode. | |||
# Click in the drawing area to place the object. Now the '''[[Add_Course_Setting_Objects#Course_Object_Dialog_Box|Course Object Dialog Box]]''' appears. It proposes a code. Enter a different code if desired. If this dialog does not appear automatically, you must make a modification to the course title symbol which is described below. | |||
# Click the '''OK''' button. | |||
# The '''Course Title''' object appears on the map with the placeholder text '''Course'''. | |||
# Select it to get some editing options. Visit the '''[[Edit Course Setting Objects]]''' page to get more information. | |||
Click the '''[[Edit_Course_Setting_Objects#Preview|Preview]]''' button to get a preview of the course title. | |||
OCAD allows you to use the course name (e.g. Course C), a list of all classes using that course (e.g. M16 - W20 - M40) or both (e.g. Course C M16 - W20 - M40) as a course title. To define the appearance of the course title: | |||
# Choose the '''[[Course_Setting_Options|Options]]''' command from the '''Course Setting''' menu. The '''Course Options''' dialog box appears. | |||
# Select the desired course title in the '''Course title''' box. | |||
The same course title will also appear in the control description. | |||
If the '''[[Add_Course_Setting_Objects#Course_Object_Dialog_Box|Course Object Dialog Box]]''' does not appear automatically: | |||
# Right-click on the [[File:coursetitle.gif]] '''Course Title''' symbol in the symbol box. | |||
# Choose the '''Edit''' command from the context menu. The '''Text Symbol''' dialog box appears. | |||
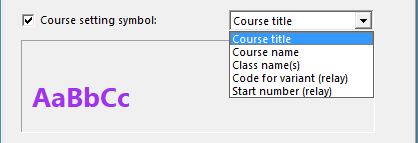
# In the '''General''' tab activate the '''Course setting symbol''' option and choose the '''Course title''' item from the dropdown list. | |||
# Click the '''OK''' button and place the course title again. | |||
[[File:Hint.jpg]] Instead of displaying the '''Course title''', you can also display the '''Course name''' and/or '''Class name(s)'''. | |||
# Right-click on the [[File:coursetitle.gif]] '''Course Title''' symbol in the symbol box. | |||
# Choose the '''Edit''' command from the context menu. The '''Text Symbol''' dialog box appears. | |||
# In the '''General''' tab activate the '''Course setting symbol''' option and choose the '''Course name''' or '''Class name(s)''' item from the dropdown list. | |||
# Click the '''OK''' button and place the course title again. | |||
# You can also display '''Course title''', '''Course name''' and '''Class name(s)''' by duplicating the symbol (right click on symbol in symbol box -> duplicate) and choose different items from the dropdown list. | |||
[[File:AddCourseTitle.png]] | |||
==Add Variant for Relay Courses== | |||
For relay courses, you can add an overview of the variations (variant) to the map. To add the variant, a text object which is a placeholder for the variant is placed. This text object will be filled with the variant of each runner when printing or exporting the map. The variations are indicated with a letter in the variant text field. The leg is indicated with the number at the beginning of the text field. The variations are indicated with letters (e.g. from A to C at a three men relay). If two runners have the same sequence of letters,they have exactly the same variations on this leg. Different letters mean different variations. | |||
# Select the [[File:Variant.PNG]] '''Variant (Relay)''' symbol in the symbol box. | |||
# Select any drawing mode. | |||
# Click in the drawing area to place the object. Now the '''[[Add_Course_Setting_Objects#Course_Object_Dialog_Box|Course Object Dialog Box]]''' appears. It proposes a code. Enter a different code if desired. If this dialog does not appear automatically, you must make a modification to the course title symbol which is described below. | |||
# Click the '''OK''' button. | |||
# The '''Variant''' object appears on the map with the placeholder text '''AB'''. This text is replaced with the variation sequence when printing or exporting the map. | |||
# Select it to get some editing options. Visit the '''[[Edit Course Setting Objects]]''' page to get more information. | |||
If the '''[[Add_Course_Setting_Objects#Course_Object_Dialog_Box|Course Object Dialog Box]]''' does not appear automatically: | |||
# Right-click on the [[File:Variant.PNG]] '''Variant (Relay)''' symbol in the symbol box. | |||
# Choose the '''Edit''' command from the context menu. The '''Text Symbol''' dialog box appears. | |||
# In the '''General''' tab activate the '''Course setting symbol''' option and choose the '''Code for variant (relay)''' item from the dropdown list. | |||
# Click the '''OK''' button and place the Variant object again. | |||
[[File:Hint.jpg]] Visit the '''[[Create Relay Courses]]''' page to get more information about relays. | |||
==Add Start Numbers for Relay Courses== | |||
For relay courses, you must add the start number to the course in order to give the right map to the right runner. To add a start number, a text object which is a placeholder for the start number is placed. This text object will be filled with the start number of each runner when printing or exporting the map. | |||
# Select the [[File:startnumber.gif]] '''Start Number (Relay)''' symbol in the symbol box. | |||
# Select any drawing mode. | |||
# Click in the drawing area to place the object. Now the '''[[Add_Course_Setting_Objects#Course_Object_Dialog_Box|Course Object Dialog Box]]''' appears. It proposes a code. Enter a different code if desired. If this dialog does not appear automatically, you must make a modification to the course title symbol which is described below. | |||
# Click the '''OK''' button. | |||
# The '''Start Number''' object appears on the map with the placeholder text '''51.1'''. This text is replaced with the start number when printing or exporting the map. | |||
# Select it to get some editing options. Visit the '''[[Edit Course Setting Objects]]''' page to get more information. | |||
If the '''[[Add_Course_Setting_Objects#Course_Object_Dialog_Box|Course Object Dialog Box]]''' does not appear automatically: | |||
# Right-click on the [[File:startnumber.gif]] '''Start Number (Relay)''' symbol in the symbol box. | |||
# Choose the '''Edit''' command from the context menu. The '''Text Symbol''' dialog box appears. | |||
# In the '''General''' tab activate the '''Course setting symbol''' option and choose the '''Start number (relay)''' item from the dropdown list. | |||
# Click the '''OK''' button and place the start number again. | |||
[[File:Hint.jpg]] Visit the '''[[Create Relay Courses]]''' page to get more information about relays. | |||
==Add Other Objects== | |||
In your Course Setting Project you may want to add other objects like: | |||
* '''Out-of-Bounds Boundary''' | |||
An out-of-bounds boundary shall not be crossed [[File:OutOfBoundsBoundary.png]].<br> | |||
[[File:OutOfBoundsBoundary Example.png]] | |||
* '''Out-of-Bounds Area''' | |||
An Out-of-Bounds Area shall not be entered. Depending on the borderline type (none, dashed, solid) you can see if the Out-of-Bound Area is marked in the terrain or not (no marking, intermittent marking, continuously marking) [[File:OutOfBoundsArea.png]].<br> | |||
[[File:OutOfBoundsArea Example.png]] | |||
* '''Crossing Point''' | |||
A crossing point can be used for instance through or over a wall or fence, across a road or railway, | |||
through a tunnel or out-of-bounds area, or over an uncrossable boundary. The lines shall reflect the length of the | |||
crossing [[File:MandatoryCrossingPoint.png]].<br> | |||
[[File:MandatoryCrossingPoint Example.png]] | |||
* '''Out-of-Bounds Route''' | |||
A route which is out-of-bounds. Competitors are allowed to cross directly over a | |||
forbidden route, but it is forbidden to go along it [[File:OutOfBoundsRoute.png]].<br> | |||
[[File:OutOfBoundsRoute Example.png]] | |||
* '''First Aid Point''' | |||
Shows the location of a first aid post [[File:FirstAidPoint.png]].<br> | |||
[[File:FirstAidPoint Example.png]] | |||
* '''Refreshment Point''' | |||
Shows the location of a refreshment point which is not at a control [[File:RefreshmentPoint.png]]. | |||
If the refreshment point is at a control, it will be marked in the Control Description only.<br> | |||
[[File:RefreshmentPoint Example.png]] | |||
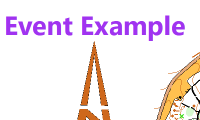
* '''Event Title''' | |||
Shows the event title [[File:Event.gif]].<br> | |||
[[File:EventTitel Example.png]] | |||
* '''Reserve Fiels''' | |||
In case of Sport Timing Software failure (SI, EMIT), punch into these fields [[File:ReserveFields.png]].<br> | |||
[[File:ReserveFields Example.png]] | |||
* '''Registration Mark''' | |||
At least three registration marks should be placed within the frame of a map in a nonsymmetrical | |||
position. These can be used for course overprinting when overprinting | |||
on already printed maps or when exporting and merging different Course Maps [[File:RegistrationMark.png]].<br> | |||
See a possile use [[O-training_with_OCAD#Print_Course_on_one_Map|here]].<br> | |||
[[File:RegistrationMark Example.png]] | |||
* '''Temporary construction or closed area''' | |||
Obvious temporary constructions like platforms for spectators and speaker, closed | |||
area for spectators, outside restaurant areas, etc. shall be represented with this symbol [[File:TemporaryClosedArea.png]].<br> | |||
[[File:TemporaryClosedArea Example.png]] | |||
* '''White Background''' | |||
White Background can be used to cover part of your Backgorund Map, e.g. for '''[[O-training_with_OCAD#Corridor|Corridor trainings]]''' [[File:WhiteBackground.png]].<br> | |||
[[File:WhiteBackground Example.png]] | |||
* '''Logo of the Event''' | |||
Use the '''[[Layout]]''' Menu to insert Logos from the Event, Sponsors, ect. Note that you can save your Layout in order to import it again the next time.<br> | |||
[[File:Logo Example.png]] | |||
* '''Date of the Event, Name of Course Setter, Corrections to the Map, Parking, Other information relevant to the runner''' | |||
For other text objects you may have to '''[[Create a New Symbol|Create Your Own Symbols]]'''. It is important for these symbols that the option '''Course Setting Symbol''' (in the symbol dialog, when you click the symbol with the right mouse button and choose '''Edit''' from the context menu) is switched off. The option '''Course Setting Symbol''' must be used only for objects which belong to a course like controls, the marked route from the last control to the finish or the course title.<br> | |||
[[File:Parking Example.png]] | |||
'''Example''' | |||
If there is a marked route for children which you would like to appear on all other courses (just for information) you proceed as follows: | |||
# Right-click on the [[File:Markedroute.gif]] '''Marked Route''' symbol in the symbol box. | |||
# Choose the '''Duplicate''' command. | |||
# Right-click on the duplicated [[File:Markedroute.gif]] '''Marked Route''' symbol in the symbol box. | |||
# Choose the '''Edit''' command from the context menu. The '''Line Symbol''' dialog box appears. | |||
# In the '''Main Line''' tab disable the '''Course setting symbol: Marked route''' option. | |||
# Click the '''OK''' button. Now you can draw a marked route which cannot be added to a course and is always visible. | |||
Use this new symbol to draw the children course. | |||
== Course Object Dialog Box == | |||
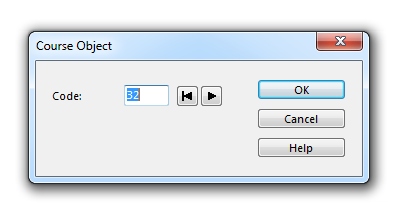
This dialog box appears after placing a course object or clicking the '''[[Edit_Course_Setting_Objects#Change_Code|Change Code]]''' button in the course setting box on the right side of the window. | |||
[[File:CourseObjectDialogBox.PNG]] | |||
In this dialog box you can create or edit the code of a course object. | |||
'''Code'''<br /> | |||
OCAD proposes the next free number for the controls and a letter plus a number for other course objects. It is recommended to use this convention. | |||
'''First Free Code''' button<br /> | |||
Click this button to get the first free code available. For control objects OCAD first searches for the lowest number you have defined and assumes that you want to use only numbers above this number. If you want to use a lower number, you must enter it on the keyboard. | |||
'''Next Free Code''' button<br /> | |||
Click this button to get the next free code available. | |||
Click the '''OK''' button when finished. | |||
You | [[File:Hint.jpg]] - There are no restrictions for the code. You can enter an arbitrary code, even letters and some glyphs are allowed. | ||
: - If '''[[Auto Control Description]]''' is activated, this dialog is extended with the control description part. Read the '''[[Auto Control Description#Course Setting with Auto Control Description|Course Setting with Auto Control Description]]''' article for more information. | |||
: - '''Skip''' the course object dialog box by [[Add_Course_Setting_Objects#Control|holding down the Shift key when clicking in the drawing area]]. | |||
---- | |||
Back to the '''[[Course Setting for Orienteering]]''' page. | |||
Revision as of 15:24, 28 May 2019
(This function is only available in course setting projects!)
Add Start, Controls and Finish
Start
- Select the
 Start symbol in the symbol box.
 - Select any drawing mode.
- Click in the drawing area to place the object. Now the Course Object Dialog Box appears. It proposes the code S1 for the start. Enter a different code if desired.
 Skip the course object dialog box by holding down the Shift key when clicking in the drawing area.
 - Click the OK button.
- The Start object appears on the map.
- You can now Add the Course Object to Courses.
- Select it to get some editing options. Visit the Edit Course Setting Objects page to get more information (e.g. how to edit the control description).
Control
- Select the
 Control symbol in the symbol box.
 - Select any drawing mode.
- Click in the drawing area to place the object. Now the Course Object Dialog Box appears. It proposes a code. Enter a different code if desired.
 Skip the course object dialog box by holding down the Shift key when clicking in the drawing area.
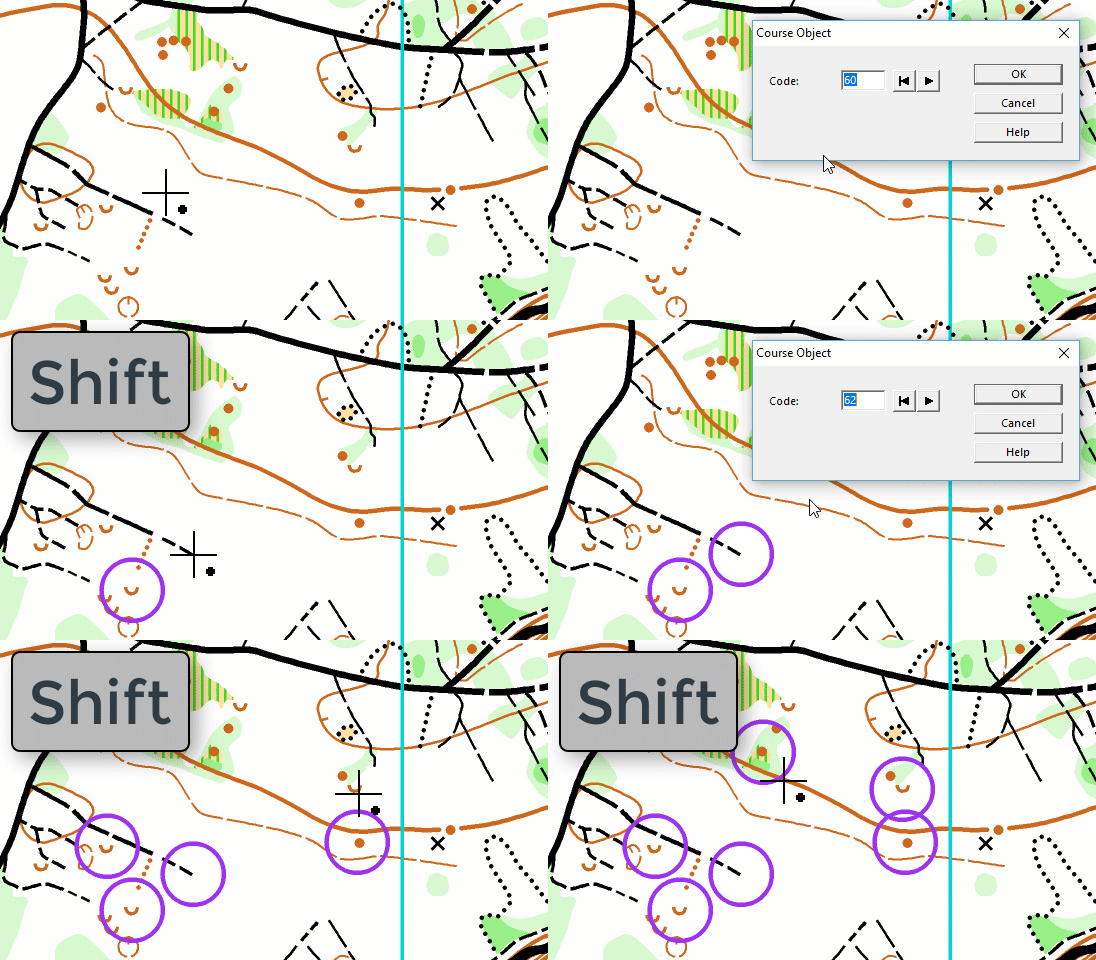
- Click the OK button.
- The Control object appears on the map.
- You can now Add the Course Object to Courses.
- Select it to get some editing options. Visit the Edit Course Setting Objects page to get more information (e.g. how to edit the control description).
Finish
- Select the
 Finish symbol in the symbol box.
 - Select any drawing mode.
- Click in the drawing area to place the object. Now the Course Object Dialog Box appears. It proposes a code. Enter a different code if desired.
 Skip the course object dialog box by holding down the Shift key when clicking in the drawing area.
 - Click the OK button.
- The Finish object appears on the map.
- You can now Add the Course Object to Courses.
- Select it to get some editing options. Visit the Edit Course Setting Objects page to get more information.
![]() It is not possible to edit the control description for the finish. The control description is defined by the marked route between the last control and the finish.
It is not possible to edit the control description for the finish. The control description is defined by the marked route between the last control and the finish.
Add Control to Map and Course at once by Moving the Connection Line
- Select the course in the dropdown list of the Course Object Box.
- Make sure that you are not in the Preview Mode.
- Select the
 Control symbol in the symbol box.
 - Choose the Select Object and Edit Vertex tool.
- Click on the connection line between those controls where the object should be added and drag the connection line to the place where the object should be added. Now the Course Object Dialog Box appears. It proposes a code. Enter a different code if desired.
 Skip the course object dialog box by holding down the Shift key when clicking in the drawing area.
 - Click the OK button.
- The object appears on the map and is added to the course.
![]() Variant for step 5 and 6: If the connection line is moved to an existing control then this control is added to the course without creating a new control on the map.
Variant for step 5 and 6: If the connection line is moved to an existing control then this control is added to the course without creating a new control on the map.
Add a Marked Route
A marked route is mostly used from the last control to the finish. Sometimes you may also have marked routes between controls (e.g. to cross a bridge or a dangerous area).
The marked route treated in this article applies to a route the runner must use. If you want to add a marked route just for information, but which is not part of the course you have to add it as a different object, which is described at the end of this aticle.
To create a marked route:
- Select the
 Marked Route symbol in the symbol box.
 - Select a drawing tool (e.g. the curve tool).
- Draw the marked route in the direction in which the competitors are running (e.g. from the last control to the finish).
- Now the Course Object Dialog Box appears. It proposes a code. Enter a different code if desired (See below if this dialog box does not appear automatically).
- Click the OK button.
- The Marked Route object is shown on the map.
- You can now Add the Course Object to Courses.
- Select it to get some editing options. Visit the Edit Course Setting Objects page to get more information.
Check Funnel tapes ![]() in the Course Object Box when a marked route is selected to get the corresponding symbol on the control description.
in the Course Object Box when a marked route is selected to get the corresponding symbol on the control description.
You can even enter a Text Control Description for the Marked Route. This text appears in the Text Control Description and has no effect on the Symbol Control Description, but it can be useful to make the Text Control Description smaller.
The marked route defines how the finish is displayed on the control description. Marked routes can be drawn anywhere in the course, but note that they must be drawn in the direction in which the competitors are running, otherwise the course will not be drawn correctly.
![]() Marked routes must be added to each course like controls and the finish (Add a Course Object to Courses).
Marked routes must be added to each course like controls and the finish (Add a Course Object to Courses).
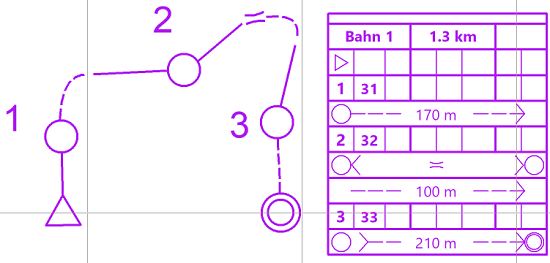
Marked Route 1: Starts at control, Funnel tapes disabled.
Marked Route 2: Starts not at control, Funnel tapes disabled.
Marked Route 3: Starts at control and ends at finish, Funnel tapes active.
If the Course Object Dialog Box does not appear automatically:
- Right-click on the
 Marked Route symbol in the symbol box.
 - Choose the Edit command from the context menu. The Line Symbol dialog box appears.
- In the Main Line tab activate the Course setting symbol: Marked route option.
- Click the OK button and draw the marked route again.
If you want to create a marked route without influence on the course:
- Right-click on the
 Marked Route symbol in the symbol box.
 - Choose the Duplicate command.
- Right-click on the duplicated
 Marked Route symbol in the symbol box.
 - Choose the Edit command from the context menu. The Line Symbol dialog box appears.
- In the Main Line tab disable the Course setting symbol: Marked route option.
- Click the OK button. Now you can draw a marked route which cannot be added to a course and is always visible.
Add the Map Issue Point
Since ISOM 2017, there's a symbol for the map issue point (symbol number 702).
Draw a marked route to the start triangle and then add a Corner Vertex into the dashed line. The crossbar for the map issue point appears.
![]() You can also draw the Map Issue Point like a normal point object (and not insert a Corner Vertex). However, please note that in this case the Map Issue Point will be displayed in all courses.
You can also draw the Map Issue Point like a normal point object (and not insert a Corner Vertex). However, please note that in this case the Map Issue Point will be displayed in all courses.
Example for Map Issue Point at EOC 2018 Middle Distance Final Women.
Add a Control Description
To print a control description together with the course you have to place a control description object. This object is a placeholder and indicates the upper left corner of the control description.
- Select the
 Control Description symbol in the symbol box.
 - Select any drawing mode.
- Place the upper left corner of the control description on the map.
- Now the Course Object Dialog Box appears. It proposes a code. Enter a different code if desired.
- Click the OK button.
- The Control Description object is indicated by a hook on the map which is the upper left corner.
- Select it to get some editing options. Read the IOF Symbol Control Description article to get more information.
Change Control Description Type
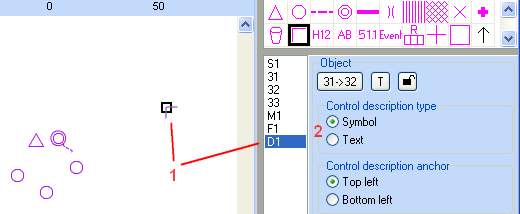
1) Select the control description corner on the drawing area or in the course setting objects list.
2) Change the Control description type from symbol to text or vice versa on the right side of the window.
![]() It's the same with changing the Control description anchor from top left to bottom left in the Course Object Box.
It's the same with changing the Control description anchor from top left to bottom left in the Course Object Box.
Control Description with White Background
If the background map should be masked below the text description, activate the White background option in the Options dialog of the Course Setting menu.
Click the Preview button to get a preview of the control description.
Control Description with White Background (Draft Mode)
If you prefer to print your maps in draft mode, you will face a problem, that there is no block-out of the control description in draft mode.
In this case, activate the new option Draw white background even in draft mode in the Course Setting Options dialog. Read more in the Course Setting Options article.
Add a Course Title
Normally you add the title of the course to the map. To add a course title, you place a text object which is a placeholder for the course title. This text object will be filled with the course title in each course.
- Select the
 Course Title symbol in the symbol box.
 - Select any drawing mode.
- Click in the drawing area to place the object. Now the Course Object Dialog Box appears. It proposes a code. Enter a different code if desired. If this dialog does not appear automatically, you must make a modification to the course title symbol which is described below.
- Click the OK button.
- The Course Title object appears on the map with the placeholder text Course.
- Select it to get some editing options. Visit the Edit Course Setting Objects page to get more information.
Click the Preview button to get a preview of the course title.
OCAD allows you to use the course name (e.g. Course C), a list of all classes using that course (e.g. M16 - W20 - M40) or both (e.g. Course C M16 - W20 - M40) as a course title. To define the appearance of the course title:
- Choose the Options command from the Course Setting menu. The Course Options dialog box appears.
- Select the desired course title in the Course title box.
The same course title will also appear in the control description.
If the Course Object Dialog Box does not appear automatically:
- Right-click on the
 Course Title symbol in the symbol box.
 - Choose the Edit command from the context menu. The Text Symbol dialog box appears.
- In the General tab activate the Course setting symbol option and choose the Course title item from the dropdown list.
- Click the OK button and place the course title again.
![]() Instead of displaying the Course title, you can also display the Course name and/or Class name(s).
Instead of displaying the Course title, you can also display the Course name and/or Class name(s).
- Right-click on the
 Course Title symbol in the symbol box.
 - Choose the Edit command from the context menu. The Text Symbol dialog box appears.
- In the General tab activate the Course setting symbol option and choose the Course name or Class name(s) item from the dropdown list.
- Click the OK button and place the course title again.
- You can also display Course title, Course name and Class name(s) by duplicating the symbol (right click on symbol in symbol box -> duplicate) and choose different items from the dropdown list.
Add Variant for Relay Courses
For relay courses, you can add an overview of the variations (variant) to the map. To add the variant, a text object which is a placeholder for the variant is placed. This text object will be filled with the variant of each runner when printing or exporting the map. The variations are indicated with a letter in the variant text field. The leg is indicated with the number at the beginning of the text field. The variations are indicated with letters (e.g. from A to C at a three men relay). If two runners have the same sequence of letters,they have exactly the same variations on this leg. Different letters mean different variations.
- Select the
Variant (Relay) symbol in the symbol box.
- Select any drawing mode.
- Click in the drawing area to place the object. Now the Course Object Dialog Box appears. It proposes a code. Enter a different code if desired. If this dialog does not appear automatically, you must make a modification to the course title symbol which is described below.
- Click the OK button.
- The Variant object appears on the map with the placeholder text AB. This text is replaced with the variation sequence when printing or exporting the map.
- Select it to get some editing options. Visit the Edit Course Setting Objects page to get more information.
If the Course Object Dialog Box does not appear automatically:
- Right-click on the
Variant (Relay) symbol in the symbol box.
- Choose the Edit command from the context menu. The Text Symbol dialog box appears.
- In the General tab activate the Course setting symbol option and choose the Code for variant (relay) item from the dropdown list.
- Click the OK button and place the Variant object again.
![]() Visit the Create Relay Courses page to get more information about relays.
Visit the Create Relay Courses page to get more information about relays.
Add Start Numbers for Relay Courses
For relay courses, you must add the start number to the course in order to give the right map to the right runner. To add a start number, a text object which is a placeholder for the start number is placed. This text object will be filled with the start number of each runner when printing or exporting the map.
- Select the
 Start Number (Relay) symbol in the symbol box.
 - Select any drawing mode.
- Click in the drawing area to place the object. Now the Course Object Dialog Box appears. It proposes a code. Enter a different code if desired. If this dialog does not appear automatically, you must make a modification to the course title symbol which is described below.
- Click the OK button.
- The Start Number object appears on the map with the placeholder text 51.1. This text is replaced with the start number when printing or exporting the map.
- Select it to get some editing options. Visit the Edit Course Setting Objects page to get more information.
If the Course Object Dialog Box does not appear automatically:
- Right-click on the
 Start Number (Relay) symbol in the symbol box.
 - Choose the Edit command from the context menu. The Text Symbol dialog box appears.
- In the General tab activate the Course setting symbol option and choose the Start number (relay) item from the dropdown list.
- Click the OK button and place the start number again.
![]() Visit the Create Relay Courses page to get more information about relays.
Visit the Create Relay Courses page to get more information about relays.
Add Other Objects
In your Course Setting Project you may want to add other objects like:
- Out-of-Bounds Boundary
An out-of-bounds boundary shall not be crossed ![]() .
.

- Out-of-Bounds Area
An Out-of-Bounds Area shall not be entered. Depending on the borderline type (none, dashed, solid) you can see if the Out-of-Bound Area is marked in the terrain or not (no marking, intermittent marking, continuously marking) ![]() .
.

- Crossing Point
A crossing point can be used for instance through or over a wall or fence, across a road or railway,
through a tunnel or out-of-bounds area, or over an uncrossable boundary. The lines shall reflect the length of the
crossing ![]() .
.
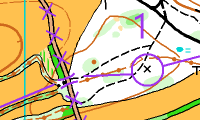
- Out-of-Bounds Route
A route which is out-of-bounds. Competitors are allowed to cross directly over a
forbidden route, but it is forbidden to go along it ![]() .
.

- First Aid Point
Shows the location of a first aid post ![]() .
.
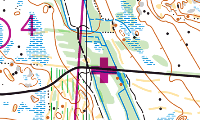
- Refreshment Point
Shows the location of a refreshment point which is not at a control ![]() .
If the refreshment point is at a control, it will be marked in the Control Description only.
.
If the refreshment point is at a control, it will be marked in the Control Description only.
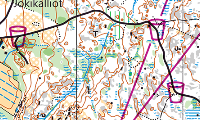
- Event Title
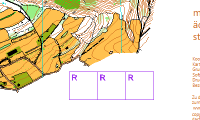
- Reserve Fiels
In case of Sport Timing Software failure (SI, EMIT), punch into these fields ![]() .
.
- Registration Mark
At least three registration marks should be placed within the frame of a map in a nonsymmetrical
position. These can be used for course overprinting when overprinting
on already printed maps or when exporting and merging different Course Maps ![]() .
.
See a possile use here.
- Temporary construction or closed area
Obvious temporary constructions like platforms for spectators and speaker, closed
area for spectators, outside restaurant areas, etc. shall be represented with this symbol ![]() .
.

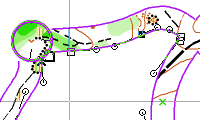
- White Background
White Background can be used to cover part of your Backgorund Map, e.g. for Corridor trainings ![]() .
.
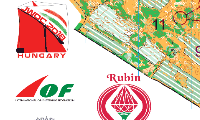
- Logo of the Event
Use the Layout Menu to insert Logos from the Event, Sponsors, ect. Note that you can save your Layout in order to import it again the next time.
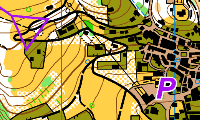
- Date of the Event, Name of Course Setter, Corrections to the Map, Parking, Other information relevant to the runner
For other text objects you may have to Create Your Own Symbols. It is important for these symbols that the option Course Setting Symbol (in the symbol dialog, when you click the symbol with the right mouse button and choose Edit from the context menu) is switched off. The option Course Setting Symbol must be used only for objects which belong to a course like controls, the marked route from the last control to the finish or the course title.
Example
If there is a marked route for children which you would like to appear on all other courses (just for information) you proceed as follows:
- Right-click on the
 Marked Route symbol in the symbol box.
 - Choose the Duplicate command.
- Right-click on the duplicated
 Marked Route symbol in the symbol box.
 - Choose the Edit command from the context menu. The Line Symbol dialog box appears.
- In the Main Line tab disable the Course setting symbol: Marked route option.
- Click the OK button. Now you can draw a marked route which cannot be added to a course and is always visible.
Use this new symbol to draw the children course.
Course Object Dialog Box
This dialog box appears after placing a course object or clicking the Change Code button in the course setting box on the right side of the window.
In this dialog box you can create or edit the code of a course object.
Code
OCAD proposes the next free number for the controls and a letter plus a number for other course objects. It is recommended to use this convention.
First Free Code button
Click this button to get the first free code available. For control objects OCAD first searches for the lowest number you have defined and assumes that you want to use only numbers above this number. If you want to use a lower number, you must enter it on the keyboard.
Next Free Code button
Click this button to get the next free code available.
Click the OK button when finished.
![]() - There are no restrictions for the code. You can enter an arbitrary code, even letters and some glyphs are allowed.
- There are no restrictions for the code. You can enter an arbitrary code, even letters and some glyphs are allowed.
- - If Auto Control Description is activated, this dialog is extended with the control description part. Read the Course Setting with Auto Control Description article for more information.
- - Skip the course object dialog box by holding down the Shift key when clicking in the drawing area.
Back to the Course Setting for Orienteering page.

