Map Transform: Difference between revisions
| (48 intermediate revisions by 4 users not shown) | |||
| Line 1: | Line 1: | ||
[[File:TransformExample.PNG|800px]] | [[File:TransformExample.PNG|800px]] | ||
==Move [[File:Space.PNG]][[File:Pro40px.PNG|This function is available in OCAD 12 Professional.|link=https://www.ocad.com/en/products/ocad-for-cartography]][[File:Std40px.PNG|This function is available in OCAD 12 Orienteering.|link=https://www.ocad.com/en/products/ocad-for-orienteering]][[File:Sta40px.PNG|This function is available in OCAD 12 Starter.|link=https://www.ocad.com/en/products/ocad-for-orienteering]]== | |||
==Move [[File:Space.PNG]][[File:Pro40px.PNG|This function is available in OCAD | |||
The '''Move Map''' dialog appears. Depending on wheter you are using paper coordinates or real world coordinates ('''[[Create a New Map#Set Scale and Coordinate System|Set Scale and Coordinate System]]''' you can enter different values. | Select the '''Transform''' item in the '''Map''' menu and choose '''Move'''. | ||
The '''Move Map''' dialog appears. Depending on wheter you are using paper coordinates or real world coordinates ('''[[Create a New Map#Set Scale and Coordinate System|Set Scale and Coordinate System]]''') you can enter different values. | |||
[[File:Move.PNG]] | [[File:Move.PNG]] | ||
| Line 13: | Line 15: | ||
[[File:Hint.jpg|hint]] Do not use this dialog to change the real world coordinate offset if the map is georeferenced. To move a georeferenced map, use the '''[[Map Transform#Center Map to Drawing Area|Center Map to Drawing Area]]''' function in the '''Transform''' submenu of the '''[[Map]]''' menu and enter the new offset. | [[File:Hint.jpg|hint]] Do not use this dialog to change the real world coordinate offset if the map is georeferenced. To move a georeferenced map, use the '''[[Map Transform#Center Map to Drawing Area|Center Map to Drawing Area]]''' function in the '''Transform''' submenu of the '''[[Map]]''' menu and enter the new offset. | ||
==Stretch or Shrink [[File:Space.PNG]][[File:Pro40px.PNG|This function is available in OCAD | ==Stretch or Shrink [[File:Space.PNG]][[File:Pro40px.PNG|This function is available in OCAD 12 Professional.|link=https://www.ocad.com/en/products/ocad-for-cartography]][[File:Std40px.PNG|This function is available in OCAD 12 Orienteering.|link=https://www.ocad.com/en/products/ocad-for-orienteering]][[File:Sta40px.PNG|This function is available in OCAD 12 Starter.|link=https://www.ocad.com/en/products/ocad-for-orienteering]][[File:CS40px.PNG|This function is available in OCAD 12 Course Setting.|link=https://www.ocad.com/en/products/ocad-for-orienteering]]== | ||
[[File:StretchShrinkExample.PNG|800px]] | [[File:StretchShrinkExample.PNG|800px]] | ||
Select the '''Transform''' item in the '''Map''' menu and choose '''Stretch/Shrink'''. | |||
The '''Stretch/Shrink Map''' dialog opens. | The '''Stretch/Shrink Map''' dialog opens. | ||
| Line 24: | Line 28: | ||
Click the '''OK''' button when you are finished. | Click the '''OK''' button when you are finished. | ||
==Mirror [[File:Space.PNG]][[File:Pro40px.PNG|This function is available in OCAD | ==Mirror [[File:Space.PNG]][[File:Pro40px.PNG|This function is available in OCAD 12 Professional.|link=https://www.ocad.com/en/products/ocad-for-cartography]][[File:Std40px.PNG|This function is available in OCAD 12 Orienteering.|link=https://www.ocad.com/en/products/ocad-for-orienteering]][[File:Sta40px.PNG|This function is available in OCAD 12 Starter.|link=https://www.ocad.com/en/products/ocad-for-orienteering]][[File:CS40px.PNG|This function is available in OCAD 12 Course Setting.|link=https://www.ocad.com/en/products/ocad-for-orienteering]]== | ||
[[File:MirrorExample.PNG|800px]] | [[File:MirrorExample.PNG|800px]] | ||
Select the '''Transform''' item in the '''Map''' menu and choose '''Mirror'''. | |||
The '''Mirror Map''' dialog opens, which is the same as the '''Stretch/Shrink Map''' dialog. | The '''Mirror Map''' dialog opens, which is the same as the '''Stretch/Shrink Map''' dialog. | ||
| Line 35: | Line 41: | ||
Click the '''OK''' button when you are finished. | Click the '''OK''' button when you are finished. | ||
==Rotate Map== | ==Rotate Map [[File:Space.PNG]][[File:Pro40px.PNG|This function is available in OCAD 12 Professional.|link=https://www.ocad.com/en/products/ocad-for-cartography]][[File:Std40px.PNG|This function is available in OCAD 12 Orienteering.|link=https://www.ocad.com/en/products/ocad-for-orienteering]][[File:Sta40px.PNG|This function is available in OCAD 12 Starter.|link=https://www.ocad.com/en/products/ocad-for-orienteering]]== | ||
[[File:RotateMapExample.PNG|800px]] | [[File:RotateMapExample.PNG|800px]] | ||
Select the '''Transform''' item in the '''Map''' menu and choose '''Rotate Map'''. | |||
The '''Rotate Map''' dialog opens. | The '''Rotate Map''' dialog opens. | ||
| Line 45: | Line 53: | ||
Click the '''OK''' button to finish. | Click the '''OK''' button to finish. | ||
==Change Coordinate System== | ==Change Coordinate System [[File:Space.PNG]][[File:Pro40px.PNG|This function is available in OCAD 12 Professional.|link=https://www.ocad.com/en/products/ocad-for-cartography]][[File:Std40px.PNG|This function is available in OCAD 12 Orienteering.|link=https://www.ocad.com/en/products/ocad-for-orienteering]]== | ||
Select the '''Transform''' item in the '''Map''' menu and choose '''Change Coordinate System'''. | |||
The '''Change Coordinate System''' dialog opens. | The '''Change Coordinate System''' dialog opens. | ||
| Line 53: | Line 64: | ||
Click the '''Choose''' button in the '''Into''' part to choose a new coordinate system. Select the system in the '''[[Create_a_New_Map#Coordinate_System|Coordinate System]]''' dialog and click the '''OK''' button.<br /> | Click the '''Choose''' button in the '''Into''' part to choose a new coordinate system. Select the system in the '''[[Create_a_New_Map#Coordinate_System|Coordinate System]]''' dialog and click the '''OK''' button.<br /> | ||
The new offset is displayed in the '''Horizontal offset''' and '''Vertical offset''' fields and can be edited there, too.<br /> | The new offset is displayed in the '''Horizontal offset''' and '''Vertical offset''' fields and can be edited there, too.<br /> | ||
The option '''Scale symbols''' is only enabled when [http://en.wikipedia.org/wiki/Mercator_projection Google Mercator] coordinate system is choosen. If this option is checked then OCAD scales all symbols according to the new scale in the center of the map. The map looks similar as before the transformation. | |||
Click the '''OK''' button when finished. OCAD converts every vertex' coordinate to UTM and then (if necessary) to the desired coordinate system. Due to different origins of the coordinate systems the map gets transformed (stretched/shrinked and rotated). | Click the '''OK''' button when finished. OCAD converts every vertex' coordinate to UTM and then (if necessary) to the desired coordinate system. Due to different origins of the coordinate systems the map gets transformed (stretched/shrinked and rotated). | ||
==Affine== | ==Affine [[File:Space.PNG]][[File:Pro40px.PNG|This function is available in OCAD 12 Professional.|link=https://www.ocad.com/en/products/ocad-for-cartography]][[File:Std40px.PNG|This function is available in OCAD 12 Orienteering.|link=https://www.ocad.com/en/products/ocad-for-orienteering]]== | ||
Select the '''Transform''' item in the '''Map''' menu and choose '''Affine''' to adjust the whole map on background map or on grid. With this function you can geo-reference the map. | |||
The '''grid button''' must be pressed to see the grid. | The '''grid button''' must be pressed to see the grid. | ||
You can use 1 to 12 points for the adjustment. For each point you do the following: | You can use 1 to 12 points for the adjustment. For each point you do the following: | ||
| Line 67: | Line 82: | ||
[[File:Hint.jpg]] This function works in the same way as the '''[[Background_Map#Adjust_a_Background_Map|Adjust a Background Map]]''' function, but it is for the map. | [[File:Hint.jpg]] This function works in the same way as the '''[[Background_Map#Adjust_a_Background_Map|Adjust a Background Map]]''' function, but it is for the map. | ||
==Rubbersheeting== | ==Rubbersheeting [[File:Space.PNG]][[File:Pro40px.PNG|This function is available in OCAD 12 Professional.|link=https://www.ocad.com/en/products/ocad-for-cartography]][[File:Std40px.PNG|This function is available in OCAD 12 Orienteering.|link=https://www.ocad.com/en/products/ocad-for-orienteering]]== | ||
Select the '''Transform''' item in the '''Map''' menu and choose '''Rubbersheeting''' to adjust the map or a part of the map to a geo-referenced background map. The '''Rubbersheeting Transformation''' dialog appears. | |||
[[File:Rubbersheeting.PNG]] | [[File:Rubbersheeting.PNG]] | ||
| Line 97: | Line 113: | ||
: -The '''[[Map Transform#Affine|Affine]]''' function is much easier to handle and gives more or less the same result. | : -The '''[[Map Transform#Affine|Affine]]''' function is much easier to handle and gives more or less the same result. | ||
== | ==Local Transformation== | ||
Local Transformation is an ''interactive'' tool to '''eliminate local distortions'''. This tool makes the adjustment of existing maps to geo-referenced base maps (hillshading, orthophotos etc.) easier and more accurate too.<br> | |||
Select the Transform item in the '''Map''' menu and choose '''Local Transformation''' to open the '''Local Transformation''' dialog. | |||
:[[File:LocalTransformation.png]] | |||
# Define the ''Radius'' of transformation. | |||
# Choose if objects with ''protected symbol'' and ''layout objects'' shall be transformed as well. | |||
# Click on the '''Start the interactive transformation''' button. | |||
# Press the left mouse button at the transformation center and move the mouse meanwhile to transform. The mouse up needs to be within the circle. | |||
::[[File:hint.jpg|hint]] While pressing the left mouse button, the beforehand defined transformation radius will be shown with a blue circle. | |||
::[[File:hint.jpg|hint]] Each vertex inside the circle will be transformed. Thus the transformation doesn't stop exactly at the border of the circle for line and area objects that are partially within the circle. They get transformed until their first vertex out of the circle. | |||
::[[File:hint.jpg|hint]] It is possible to edit the map while having opened the non-modal '''Local Transformation''' dialog. | |||
:[[File:LocalTransformationExample.png]] | |||
[[File: | ==Center Map to Drawing Area [[File:Space.PNG]][[File:Pro40px.PNG|This function is available in OCAD 12 Professional.|link=https://www.ocad.com/en/products/ocad-for-cartography]][[File:Std40px.PNG|This function is available in OCAD 12 Orienteering.|link=https://www.ocad.com/en/products/ocad-for-orienteering]]== | ||
Select the '''Transform''' item in the '''Map''' menu and choose '''Center Map to Drawing Area'''. The '''Center Map to Drawing Area''' dialog appears. | |||
This function is often used to center a map drawn in OCAD Professional edition into the smaller drawing area from OCAD | [[File:CenterMapToDrawingArea.png|800px]] | ||
In the dialog the extent with the existing map offset is shown in grey, the extent with the new offset in blue. The green rectangle shows the drawing area of OCAD Professional edition (80x80m), the orange the drawing area from | |||
This function is often used to center a map drawn in OCAD Professional edition into the smaller drawing area from OCAD Orienteering, Starter or CS edition. OCAD moves the map offset, all objects, all background maps and all bookmarks. After this function the map is still geo-referenced. | |||
In the dialog the extent with the existing map offset is shown in grey, the extent with the new offset in blue. The green rectangle shows the drawing area of OCAD Professional edition (80x80m), the orange the drawing area from Orienteering, Starter and CS edition (4x4m). | |||
If a map should be visible in all OCAD editions then the entire map must fit in the 4x4m drawing area. | If a map should be visible in all OCAD editions then the entire map must fit in the 4x4m drawing area. | ||
The new map offset is displayed in the '''New map offset''' fields and can be edited there. Click the '''Center map''' button to move the map to the center of the drawing area. The geo-reference of the map is not changed. | The proposed new map offset is displayed in the '''New map offset''' fields and can be edited there. This new map offset is calculated from the map and his visible background maps. If the background maps are hidden then OCAD calculates the new map offset only from the map. | ||
Click the '''Center map''' button to move the map to the center of the drawing area. | |||
The geo-reference of the map is not changed. | |||
---- | ---- | ||
Back to the '''[[Map]]''' page. | Back to the '''[[Map]]''' page. | ||
Latest revision as of 14:25, 12 November 2015

Move 


Select the Transform item in the Map menu and choose Move.
The Move Map dialog appears. Depending on wheter you are using paper coordinates or real world coordinates (Set Scale and Coordinate System) you can enter different values.

With set paper coordinates enter a X and a Y value in mm. By clicking the OK button the map is moved in the desired direction.
With set real world coordinates enter a value in m for easting and northing. By clicking the OK button the map is moved in the desired direction.
Check the corresponding option to move also Background Maps, Layout Objects and Bookmarks.
![]() Do not use this dialog to change the real world coordinate offset if the map is georeferenced. To move a georeferenced map, use the Center Map to Drawing Area function in the Transform submenu of the Map menu and enter the new offset.
Do not use this dialog to change the real world coordinate offset if the map is georeferenced. To move a georeferenced map, use the Center Map to Drawing Area function in the Transform submenu of the Map menu and enter the new offset.
Stretch or Shrink 

Select the Transform item in the Map menu and choose Stretch/Shrink.
The Stretch/Shrink Map dialog opens.

Enter a percentage value for the horizontal strech/shrink and the vertical stretch/shrink. If both values are the same, the proportions of the map are kept.
Check the corresponding boxes if you want to reflect the map horizontally or vertically.
Click the OK button when you are finished.
Mirror

Select the Transform item in the Map menu and choose Mirror.
The Mirror Map dialog opens, which is the same as the Stretch/Shrink Map dialog.

Enter a percentage value for the horizontal strech/shrink and the vertical stretch/shrink. If both values are the same, the proportions of the map are kept.
Check the corresponding boxes if you want to reflect the map horizontally or vertically.
Click the OK button when you are finished.
Rotate Map

Select the Transform item in the Map menu and choose Rotate Map.
The Rotate Map dialog opens.

Enter an angle in degrees and check the corresponing option if you want to rotate objects with symbols orientated to north.
Click the OK button to finish.
Change Coordinate System
Select the Transform item in the Map menu and choose Change Coordinate System.
The Change Coordinate System dialog opens.

The current coordinate system is displayed in the Change map from part of the dialog.
Click the Choose button in the Into part to choose a new coordinate system. Select the system in the Coordinate System dialog and click the OK button.
The new offset is displayed in the Horizontal offset and Vertical offset fields and can be edited there, too.
The option Scale symbols is only enabled when Google Mercator coordinate system is choosen. If this option is checked then OCAD scales all symbols according to the new scale in the center of the map. The map looks similar as before the transformation.
Click the OK button when finished. OCAD converts every vertex' coordinate to UTM and then (if necessary) to the desired coordinate system. Due to different origins of the coordinate systems the map gets transformed (stretched/shrinked and rotated).
Affine
Select the Transform item in the Map menu and choose Affine to adjust the whole map on background map or on grid. With this function you can geo-reference the map. The grid button must be pressed to see the grid. You can use 1 to 12 points for the adjustment. For each point you do the following:
- Mark a point on map.
- Mark the same grid point on reference (background map or grid).
When you have adjusted enough points, press the Enter key on the keyboard. The map is rotated and stretched (Affine transformation) to get the best fit for the adjustment points. You can achieve a precise adjustment with 4 adjustment points arranged in a rectangle. In this way you can compensate rotation and distortion. The horizontal and vertical scales will be adjusted individually.
![]() This function works in the same way as the Adjust a Background Map function, but it is for the map.
This function works in the same way as the Adjust a Background Map function, but it is for the map.
Rubbersheeting
Select the Transform item in the Map menu and choose Rubbersheeting to adjust the map or a part of the map to a geo-referenced background map. The Rubbersheeting Transformation dialog appears.

Rubbersheeting perimeter
The Rubbersheeting perimeter is an area in which the Rubbersheeting Transformation is carried out. Objects outside of the rubbersheeting perimeter are not transformed.
Click the Define button and define the perimeter by drawing a polyline on the map (one corner per click). To define a new rubbersheeting perimeter click the Remove button to remove the actual one. Click the Load button to load an exported rubbersheeting perimeter (txt-File). Click the Save button to save the current perimeter.
Rubbersheeting settings
Check the corresponding boxes if you want to transform objects with protected symbols, transform layout objects or decrease rubbersheeting towards the border of the perimeter.
Rubbersheeting points
Click the Add button and do the following steps:
- Click a point on the map.
- Click the same point on the reference map (grid or background map). The rubbersheeting points are shown on the map by a red and a green cross and a connection line.
- Do the same procedure for other points.
- Click the Transform button to transform the map. Click the Save button to save the rubbersheeting points. Click the Remove button to remove the selected rubbersheeting point. Click the Remove all button to remove all rubbersheeting points. Click the Load button to load a saved selection of rubbersheeting points.

Click the Close button when finished.

![]() -Click the Undo button in the Standard Toolbar if you are not satisfied with the rubbersheeting transformation.
-Click the Undo button in the Standard Toolbar if you are not satisfied with the rubbersheeting transformation.
- -Uncheck rubbersheeting points in the Used column if they should not be included in the transformation. Unchecked rubbersheeting points appear in gray color on the map.
- -The rubbersheeting perimeter defines that only objects or vertices of objects within this perimeter are transformed. But it is possible that objects or vertices of objects are moved out of the perimeter by the transformation! Place rubbersheeting point pairs with the same position on the perimeter border to avoid this.
- -The Affine function is much easier to handle and gives more or less the same result.
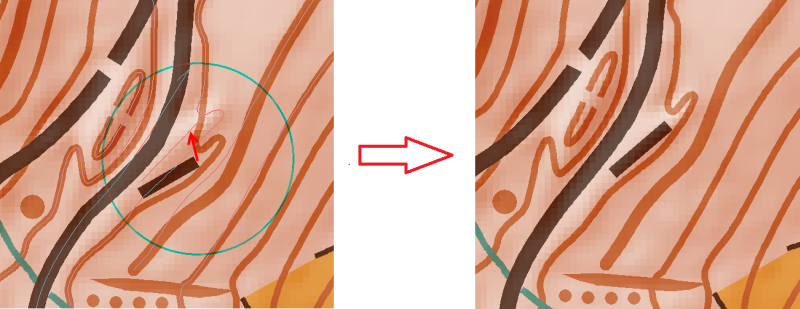
Local Transformation
Local Transformation is an interactive tool to eliminate local distortions. This tool makes the adjustment of existing maps to geo-referenced base maps (hillshading, orthophotos etc.) easier and more accurate too.
Select the Transform item in the Map menu and choose Local Transformation to open the Local Transformation dialog.

- Define the Radius of transformation.
- Choose if objects with protected symbol and layout objects shall be transformed as well.
- Click on the Start the interactive transformation button.
- Press the left mouse button at the transformation center and move the mouse meanwhile to transform. The mouse up needs to be within the circle.
 While pressing the left mouse button, the beforehand defined transformation radius will be shown with a blue circle.
- Each vertex inside the circle will be transformed. Thus the transformation doesn't stop exactly at the border of the circle for line and area objects that are partially within the circle. They get transformed until their first vertex out of the circle.
- It is possible to edit the map while having opened the non-modal Local Transformation dialog.

Center Map to Drawing Area
Select the Transform item in the Map menu and choose Center Map to Drawing Area. The Center Map to Drawing Area dialog appears.

This function is often used to center a map drawn in OCAD Professional edition into the smaller drawing area from OCAD Orienteering, Starter or CS edition. OCAD moves the map offset, all objects, all background maps and all bookmarks. After this function the map is still geo-referenced. In the dialog the extent with the existing map offset is shown in grey, the extent with the new offset in blue. The green rectangle shows the drawing area of OCAD Professional edition (80x80m), the orange the drawing area from Orienteering, Starter and CS edition (4x4m). If a map should be visible in all OCAD editions then the entire map must fit in the 4x4m drawing area.
The proposed new map offset is displayed in the New map offset fields and can be edited there. This new map offset is calculated from the map and his visible background maps. If the background maps are hidden then OCAD calculates the new map offset only from the map.
Click the Center map button to move the map to the center of the drawing area.
The geo-reference of the map is not changed.
Back to the Map page.