Database: Difference between revisions
No edit summary |
|||
| Line 4: | Line 4: | ||
In OCAD information which is stored in a database can be added to an object (e.g. position of the object, name of the place, URL-Link, length of the object etc.). A database is structured as follows: | In OCAD information which is stored in a database can be added to an object (e.g. position of the object, name of the place, URL-Link, length of the object etc.). A database is structured as follows: | ||
===General Structure of a Database=== | |||
====Table==== | ====Table==== | ||
A database usually consists of several tables. There are different forms of databases: In a flat file database like '''[http://en.wikipedia.org/wiki/DBase dBase]''', each table is a file and all tables in a folder form the database. In other databases like '''[http://en.wikipedia.org/wiki/Microsoft_Access Microsoft Access]''' or in spreadsheet programs like '''[http://en.wikipedia.org/wiki/Microsoft_Excel Microsoft Excel]''' all tables of the database are in the same file. | A database usually consists of several tables. There are different forms of databases: In a flat file database like '''[http://en.wikipedia.org/wiki/DBase dBase]''', each table is a file and all tables in a folder form the database. In other databases like '''[http://en.wikipedia.org/wiki/Microsoft_Access Microsoft Access]''' or in spreadsheet programs like '''[http://en.wikipedia.org/wiki/Microsoft_Excel Microsoft Excel]''' all tables of the database are in the same file. | ||
| Line 11: | Line 12: | ||
====Field==== | ====Field==== | ||
A record consists of fields. Each field contains a single information of an OCAD object, which is described by the corresponding record. Normally this information is a number, but can also be text. For example the x-coordinate of the objects' position. | A record consists of fields. Each field contains a single information of an OCAD object, which is described by the corresponding record. Normally this information is a number, but can also be text. For example the x-coordinate of the objects' position. Each record has a key field, which is used to identify the record. This is mostly a number. | ||
====Example==== | ====Example==== | ||
The following table contains three records. Each record describes a street object in OCAD and consists of four fields: '''ID''', '''Symbolnumber''', '''Lenght in m''' and '''Name of the street'''. The '''ID''' is the key field, which is used by OCAD to identify the record. | |||
{| class="wikitable" | {| class="wikitable" | ||
|- | |- | ||
! ID | ! ID !! Symbolnumber !! Length in m !! Name of the street | ||
|- | |- | ||
| 1 || 104.000 || 647.1 || Baker Street | | 1 || 104.000 || 647.1 || Baker Street | ||
| Line 25: | Line 28: | ||
|} | |} | ||
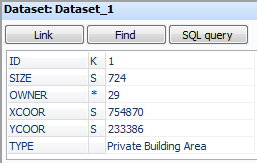
In OCAD a record is displayed as follows when the corresponding object is selected: | |||
[[File:Database1.PNG]] | |||
===Some Terms=== | |||
====Dataset==== | |||
To connect to a table OCAD uses a dataset. The dataset contains the link to the database, the name of the table, the name of the key field and information about other special fields. | To connect to a table OCAD uses a dataset. The dataset contains the link to the database, the name of the table, the name of the key field and information about other special fields. | ||
You can have several datasets for the same OCAD map. | You can have several datasets for the same OCAD map. | ||
==Manage Database Connections== | |||
===Create a New Database Connection=== | |||
You have to create a dataset, which can be done by following these steps: | |||
# Choose the '''Manage Database Connections''' command in the '''Database''' menu. | |||
# The '''Manage Database Connections''' dialog opens. | |||
# Click the '''New''' button. | |||
#: [[File:Database2.PNG]] | |||
# The '''New Dataset''' dialog appears. Choose the '''Create new database file''' option and select a '''Database type''' or choose the '''Use existing datasource''' option. | |||
# If a new database file is to be created, the '''Save Database File''' dialog appears. If an existing datasource is used, the location of the datasource has to be specified by clicking the '''Browse''' button or connecting via ODBC in the '''Manage Database Connections''' dialog. | |||
# The dataset is created. You are now connected to the database. | |||
===dBase=== | |||
When OCAD is connected with a dBase table there are additional functions available. In dBase each table is a file. It is possible to edit field settings within OCAD. If a dBase table is loaded, the '''Edit fields''' button is enabled in the '''General''' tab of the '''Manage Database Connections''' dialog. Click it to open the '''dBase Table''' dialog. | |||
[[File:dBaseTableDialog.PNG]] | |||
This dialog box lists the fields of the dBase table. Each field is displayed in a line. There are several functions available: | |||
* '''Name::''' Enter here the name for the field. The name must start with a letter and may contain up to 10 letters and numbers. Letters are converted to capital letters. | * '''Name::''' Enter here the name for the field. The name must start with a letter and may contain up to 10 letters and numbers. Letters are converted to capital letters. | ||
* '''Type::''' Choose | * '''Type::''' Choose either '''Character (C)''', '''Number (N)''' or '''Float (F)''' as a field type. | ||
* '''Length::''' Enter here the number of characters for the field. | * '''Length::''' Enter here the number of characters for the field. | ||
* '''Decimals::''' This filed is only active if the data type is Float. Enter the number of | * '''Decimals::''' This filed is only active if the data type is '''Float'''. Enter the number of decimals. | ||
* '''Move Up:''' Click this icon to move the selected field one line upwards. | * '''Move Up:''' Click this icon to move the selected field one line upwards. | ||
* '''Move Down:''' Click this icon to move the selected field one line downwards. | * '''Move Down:''' Click this icon to move the selected field one line downwards. | ||
* '''Insert:''' Click this button to add a field. After adding the new field, the dBase table is restructured. Existing information is preserved. | * '''Insert:''' Click this button to add a field. After adding the new field, the dBase table is restructured. Existing information is preserved. | ||
* '''Delete:''' Click this button to delete the selected field. | * '''Delete:''' Click this button to delete the selected field. | ||
* ''' | * '''Character encoding:''' A character encoding type can be chosen in the corresponding dropdown list. | ||
===ODBC=== | |||
You can access to databases via '''[http://en.wikipedia.org/wiki/ODBC ODBC]''' ('''O'''pen '''M'''anage '''D'''atabase '''C'''onnection). This is an interface to connect to all kind of databases. | |||
Click the '''ODBC''' button in the '''Manage Database Connections''' dialog to create a new ODBC data source or to modify an existing data source. The '''ODBC Data Source Administrator''' is started. This is a Microsoft program and contains its own online help. Here are just some hints: | |||
Normally you create a new User DNS. | Normally you create a new User DNS. | ||
: For a connection to an ''' | : For a connection to an '''Excel''' file, you select the Excel driver and the Excel (*.xls) file. | ||
: For a connection to an '''Access''' database, you select the Access driver and the Access (*.mdb) file. | : For a connection to an '''Access''' database, you select the Access driver and the Access (*.mdb) file. | ||
: For a connection to a '''flat file''' database like dBase you do not select the dBase file. Instead you select the folder where the dBase file is. | : For a connection to a '''flat file''' database like dBase you do not select the dBase file. Instead you select the folder where the dBase file is. | ||
===General Settings for the Selected Dataset=== | |||
The first of the three tabs in the '''Manage Database Connections''' dialog is about general settings of the currently selected dataset. In the first part the source of the database is given. It can be either a '''Database file''' or an '''ODBC data source'''. In the lower part of this tab, the '''Table''' which contains the desired information can be chosen. Define a '''Key field''' so that OCAD can identify the record. This field is mostly named '''ID'''. | |||
[[File:Database3.PNG]] | |||
===Create and Edit Secondary Tables=== | |||
ToDo | |||
==Define Special Fields== | |||
Open this tab to define special fields. Special fields are automatically updated in the database when a modification to the object in the map is made. | |||
However, it does not work in the other direction. If you change such a field in the table, the object is not updated. | |||
''' | OCAD provides the following special fields: | ||
: | * '''Symbol field''': The symbol number of the object is automatically copied to the database field which you have chosen in the dropdown list. | ||
: | * '''Text field''': For text and line text objects, the text of the objects is automatically copied to the database field which you have chosen in the dropdown list. For multiline text, only the first line is copied. | ||
: | * '''Size field''': The size of the object is automatically copied to the database field which you have chosen in the dropdown list. For line objects the length and for area objects the area is taken. Adjust the units in the corresponding fields as well as the number of decimals. | ||
* '''Easting''': For point objects the horizontal coordinate is copied to the chosen database field. For line, area and text objects it is the horizontal coordinate of the start point. | |||
* '''Northing''': For point objects the vertical coordinate is copied to the chosen database field. For line, area and text objects it is the vertical coordinate of the start point. | |||
* '''Angle''': For point and text objects the angle is copied to the chosen database field. | |||
---- | |||
Note: the part below this line is edited at the moment. | |||
---- | |||
'''Linking objects to the table''' | '''Linking objects to the table''' | ||
Revision as of 12:00, 27 August 2012
Introduction to Database Connection
In OCAD information which is stored in a database can be added to an object (e.g. position of the object, name of the place, URL-Link, length of the object etc.). A database is structured as follows:
General Structure of a Database
Table
A database usually consists of several tables. There are different forms of databases: In a flat file database like dBase, each table is a file and all tables in a folder form the database. In other databases like Microsoft Access or in spreadsheet programs like Microsoft Excel all tables of the database are in the same file.
Record
A table consists of records. A record is a row in the table and contains the information about an OCAD object.
Field
A record consists of fields. Each field contains a single information of an OCAD object, which is described by the corresponding record. Normally this information is a number, but can also be text. For example the x-coordinate of the objects' position. Each record has a key field, which is used to identify the record. This is mostly a number.
Example
The following table contains three records. Each record describes a street object in OCAD and consists of four fields: ID, Symbolnumber, Lenght in m and Name of the street. The ID is the key field, which is used by OCAD to identify the record.
| ID | Symbolnumber | Length in m | Name of the street |
|---|---|---|---|
| 1 | 104.000 | 647.1 | Baker Street |
| 2 | 103.000 | 1276.1 | Oak Field Road |
| 3 | 105.000 | 345.6 | Fairlawn Avenue |
In OCAD a record is displayed as follows when the corresponding object is selected:
Some Terms
Dataset
To connect to a table OCAD uses a dataset. The dataset contains the link to the database, the name of the table, the name of the key field and information about other special fields. You can have several datasets for the same OCAD map.
Manage Database Connections
Create a New Database Connection
You have to create a dataset, which can be done by following these steps:
- Choose the Manage Database Connections command in the Database menu.
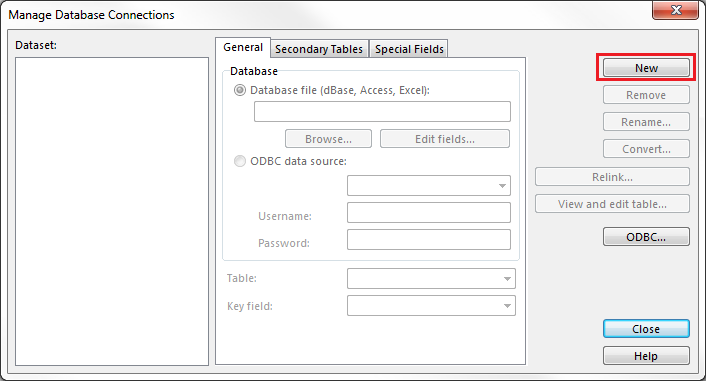
- The Manage Database Connections dialog opens.
- Click the New button.
- The New Dataset dialog appears. Choose the Create new database file option and select a Database type or choose the Use existing datasource option.
- If a new database file is to be created, the Save Database File dialog appears. If an existing datasource is used, the location of the datasource has to be specified by clicking the Browse button or connecting via ODBC in the Manage Database Connections dialog.
- The dataset is created. You are now connected to the database.
dBase
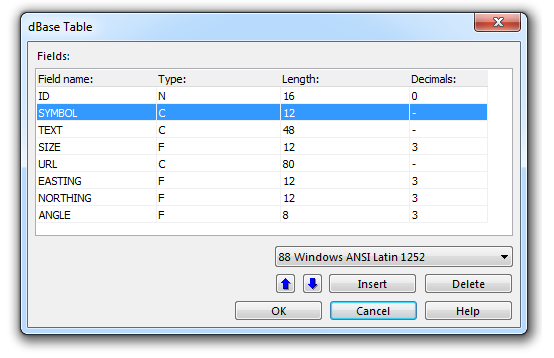
When OCAD is connected with a dBase table there are additional functions available. In dBase each table is a file. It is possible to edit field settings within OCAD. If a dBase table is loaded, the Edit fields button is enabled in the General tab of the Manage Database Connections dialog. Click it to open the dBase Table dialog.
This dialog box lists the fields of the dBase table. Each field is displayed in a line. There are several functions available:
- Name:: Enter here the name for the field. The name must start with a letter and may contain up to 10 letters and numbers. Letters are converted to capital letters.
- Type:: Choose either Character (C), Number (N) or Float (F) as a field type.
- Length:: Enter here the number of characters for the field.
- Decimals:: This filed is only active if the data type is Float. Enter the number of decimals.
- Move Up: Click this icon to move the selected field one line upwards.
- Move Down: Click this icon to move the selected field one line downwards.
- Insert: Click this button to add a field. After adding the new field, the dBase table is restructured. Existing information is preserved.
- Delete: Click this button to delete the selected field.
- Character encoding: A character encoding type can be chosen in the corresponding dropdown list.
ODBC
You can access to databases via ODBC (Open Manage Database Connection). This is an interface to connect to all kind of databases.
Click the ODBC button in the Manage Database Connections dialog to create a new ODBC data source or to modify an existing data source. The ODBC Data Source Administrator is started. This is a Microsoft program and contains its own online help. Here are just some hints: Normally you create a new User DNS.
- For a connection to an Excel file, you select the Excel driver and the Excel (*.xls) file.
- For a connection to an Access database, you select the Access driver and the Access (*.mdb) file.
- For a connection to a flat file database like dBase you do not select the dBase file. Instead you select the folder where the dBase file is.
General Settings for the Selected Dataset
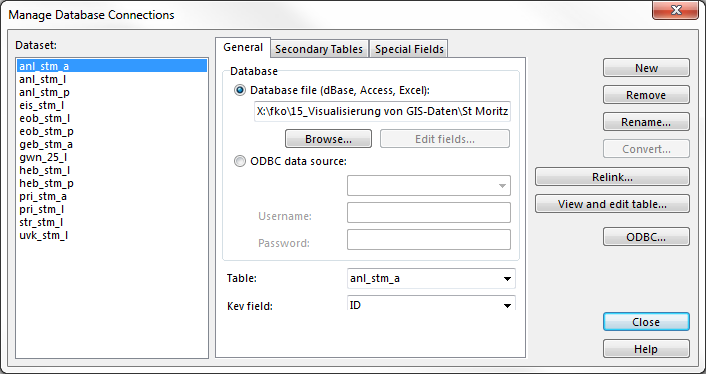
The first of the three tabs in the Manage Database Connections dialog is about general settings of the currently selected dataset. In the first part the source of the database is given. It can be either a Database file or an ODBC data source. In the lower part of this tab, the Table which contains the desired information can be chosen. Define a Key field so that OCAD can identify the record. This field is mostly named ID.
Create and Edit Secondary Tables
ToDo
Define Special Fields
Open this tab to define special fields. Special fields are automatically updated in the database when a modification to the object in the map is made. However, it does not work in the other direction. If you change such a field in the table, the object is not updated.
OCAD provides the following special fields:
- Symbol field: The symbol number of the object is automatically copied to the database field which you have chosen in the dropdown list.
- Text field: For text and line text objects, the text of the objects is automatically copied to the database field which you have chosen in the dropdown list. For multiline text, only the first line is copied.
- Size field: The size of the object is automatically copied to the database field which you have chosen in the dropdown list. For line objects the length and for area objects the area is taken. Adjust the units in the corresponding fields as well as the number of decimals.
- Easting: For point objects the horizontal coordinate is copied to the chosen database field. For line, area and text objects it is the horizontal coordinate of the start point.
- Northing: For point objects the vertical coordinate is copied to the chosen database field. For line, area and text objects it is the vertical coordinate of the start point.
- Angle: For point and text objects the angle is copied to the chosen database field.
Note: the part below this line is edited at the moment.
Linking objects to the table
- Let's assume that you want to create an Internet map with street find function. All street names must have a record in the table and must be linked to this table. OCAD provides a quick way to create these links.
- Select All Symbols used for street names.
- Choose Create Links from the Database menu.
- Select the dataset, if the map has several datasets and click OK.
- Now all street names are linked and the map is ready to create an Internet map with street find function.
Link Object
This dialog box appears when clicking the Link button in the database box on the right side of the screen.
- Dataset: Select here the dataset to be used for the link.
- Key: Enter here a value for the key field in the database table. The key points to a record in the table.
- Create new record: Activate this box if a new record should be created in the database table for this object.
- Remove: Click this button to remove an existing link.
Linking an Object to a Database
To link an object to a database you must have created a dataset.
Proceed as follows:
- Select the object
- Click the Link button in the database box on the right side of the screen. The Link Object dialog box appears.
Find Object
This dialog box appears when clicking the Find button in the database box on the right side of the screen. This function lets you search for an object with a specified key value. If the function is successful, the object is marked in the map.
- Dataset: Select here the dataset to be used.
- Key: Enter here the value of the key to be found.
Select Database Object
This dialog box appears when clicking the SQL Query button in the database box on the right side of the screen.
This function lets you search for object(s) with linked database records. Selected objects are marked in the map and linked database records are shown in a table.
SELECT FROM
- Dataset: Select the dataset to be used.
WHERE
- Field: Choose a field of the selected dataset. When you double-click on a field name it is added to the SQL statement box.
- Operator: Select an operator. When you double-click on an operator it is added to the SQL statement box.
- Value: Select a Value. When you double-click on a value it is added to the SQL statement box.
SQL Statement: The SQL statement should always contain the components FIELD - OPERATOR - VALUE (ex. Length > 430).
Click Select button to start the database query.
Assign Symbols, Texts and Angles
Choose this command after importing a Shape file. After importing the objects have no symbol assigned and appear gray (as unsymbolized objects). With this command you can use the information in the dBase table to assign OCAD symbols to the objects.
Click Symbols, Texts or Angles in Database menu. The appropriate dialog box appears
In this dialog box you can create a list of conditions. You can save the list to a condition file (*.cnt) for later use. You can load an existing condition file to modify or execute it.
- Dataset: Select here the dataset which should be used to assign symbols. Check All to execute the condition for all datasets.
- DLoad: Click this button to load an existing condition file (*.cnt).
- DSave: Click this button to save the changes to a condition file (*.cnt).
- DSave as: Click this button to save the changes to a different condition file (*.cnt).
- DSymbol: Select here a symbol. For those objects the condition is fulfilled, the symbol number will be assigned.
- DCondition: Enter the condition here.
- DMove up: Click this button to move up the selected condition.
- DMove down: Click this button to move down the selected condition.
- DAdd: Click this button to add a condition to the list.
- DDelete: Click this button to delete the selected condition.
- DExecute: Click this button to execute the assignment.
- DAngle field: Choose the field in the dataset which contains the angle values.
- DAngle values: Hint that angle values have to be entered in DD (not DMS).
Manage Database Connections
ToDo
Create and Update Records
ToDo
Update Special Fields
ToDo
Create Objects from Table
Choose this command to create OCAD objects from database records. The coordinates of objects must be stored in the database.
- Dataset: Select here the dataset.
- Condition: Enter the condition for the objects here.
Database fields
- Horizontal coordinate: Select the database field for the horizontal coordinate.
- Vertical coordinate: Select the database field for the vertical coordinate.
- Unit of measure: Select the unit of measure for the database fields with the horizontal and vertical coordinate.
- Text field: This field is only activated if an text symbol is selected. Choose the database field for the label.
Offset
- Horizontal offset: Enter here the value for the horizontal offset between the coordinate and the reference point of the object. A positive value shift the object to right, a negative value to left.
- Vertical offset: Enter here the value for the vertical offset between the coordinate and the reference point of the object. A positive value shift the object upward, a negative value downward.
Assign Symbols by Records
Choose this submenu to assign symbols to the objects according to the database.
Add Texts by Records
Choose this submenu to assign text to text objects from the database.
Define Object Directions by Records
ToDo
OCAD does not rotate line text objects!
Merge Objects by Records
Choose this command to merge objects that have the same value on a specified database field.
For example all river segments with the same river name. By executing *Merge Objects by Records* the river objects are selected name by name and merged if all objects with this name have the same symbol.
Select Linked Objects with Corresponding Record
ToDo
Select Linked Objects without Corresponding Record
ToDo
Select Objects Linked to the same Record
ToDo
Delete Database Record when Deleting Object
ToDo
Create Database Record when Cutting Object
ToDo
Previous Chapter: GPS
Next Chapter: XML Script
Back to Main Page


