Create a new CSA Project
Diese Funktion ist in OCAD 11 nur in Englisch verfügbar.
Connect to the Server
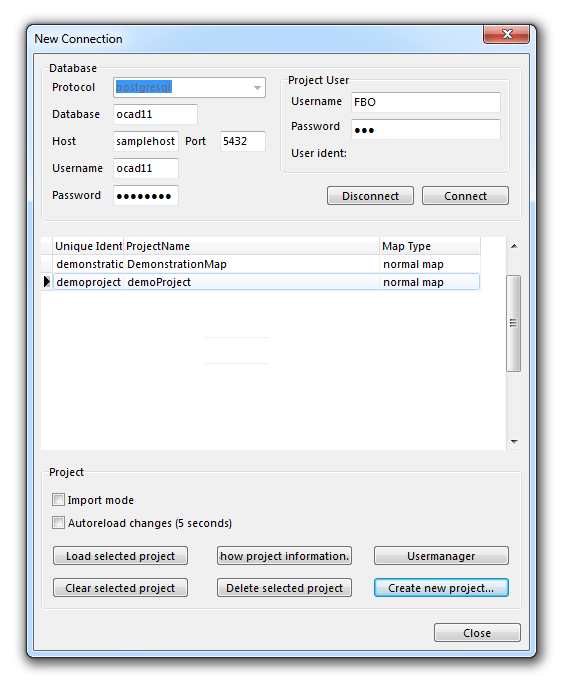
After the Installation und dem Setup der Client Server Architektur (CSA), a connection to the server can be made. Click the Connect/Disconnect icon in the Client Server toolbar to build up a new connection. The New Connection dialog is shown.
The upper left side shows the connection data to the PostgreSQL server. It should be preconfigured by your administrator. The upper right side provides a login form in order to gain access to your projects. This login is personal for each user. Click the Connect button when you have entered all relevant data. If the login succeeds, a table is shown in the middle of the dialog with an overview of all available projects on the server.
In the lower part of the New Connection dialog there are several buttons and options:
- Import mode: The Import mode option allows to import local OCAD data into a CSA-Project. Read the Import Map article for more information.
- Autoreload changes (5 seconds): With a checked Autoreload changes option, changes made by other users on the loaded CSA-Project are updated automatically every fifth second. The update happens in the background and does not become visible until the screen is refreshed.
- Load selected project: Click this button to load the selected project.
- Clear selected project: Click this button to clear all entries made in the database on the server.
- Delete selected project: Click this button to delete the selected projects completely (The whole database is deleted).
- Create new project: Click this button to create a new CSA-Project.
- User manager: Click this button to manage the Rights Management.
- Show project information: Click this button to show all available information for the selected CSA-Project.
Create a New Project
To create a new CSA-Project, you must have the necessary Rights to do so. A server administrator can manage all the rights. More information can be found on the Rights Management page.
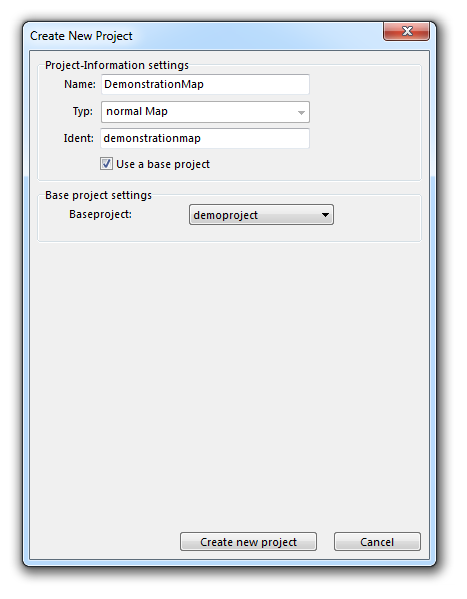
- Click the Create new project button. The Create New Project dialog appears.
- Enter a project name in the Name field. In the Ident field an identifier is automatically derived from the project name but can be manually adjusted, too.
- Choose a project type in the Type dropdown list.
- Adjust the Map settings (Set Scale and Coordinate System) as you are used to from local OCAD projects.
If an existing geo-referenced OCAD-File is imported (Import Map) later, you can leave the Map settings blank and import them with the OCAD-File.
The Use a base project option can be enabled if you want to use another CSA-Project as a template. The Map settings part of the dialog disappears and instead of that, you can choose a Base project from the dropdown list.
The new CSA-Project takes all map settings (Set Scale and Coordinate System), symbols and colors from the chosen project. They are copied once and are not updated if you change anything in the base project. In this case an update must be done manually.
Click the Create new project button when finished.
A new CSA-Project is created and appears in the table of the New Connection dialog. The project can be loaded by selecting it and clicking the Load selected project button. Unless you have used a base project, symbols and colors have to be defined, which can happen either manually or by importing (Import Map) them from another project.
Import Map
A new created CSA-Project is still empty. To import a local OCAD map, follow these steps:
- Make sure that the CSA-Project is closed.
- Open the local OCAD-Project with the Open function in the File menu.
- When the local map is loaded click the
Connect/Disconnect icon in the Client Server toolbar.
- The New Connection dialog appears.
- Select the SC-Project in the table in the middle of the dialog.
- Check the Import mode option.
- Click the Load selected project button.
- The map opens but it is not added to the server yet. You have the option to
Generate a Map Preview by clicking the corresponding icon in the Client Server toolbar. This will later help to handle big projects faster and to navigate easier through the map.
- To import the map click the
Import Map icon in the Client Server toolbar.
- The Import Map dialog opens with the following import options:
- Import all objects: If this option is checked, all objects are imported. Otherwise only Symbols, Colors, Spot Colors and Map Settings are imported.
- Replace all symbols: If this option is checked, all Symbols in the existing CSA-Project are replaced with those in the local OCAD-Project.
- Replace all colors: If this option is checked, all Colors in the existing CSA-Project are replaced with those in the local OCAD-Project.
- Replace all spot colors: If this option is checked, all Spot Colors in the existing CSA-Project are replaced with those in the local OCAD-Project.
- Replace scale and view parameter: If this option is checked, the Set Scale and Coordinate System in the existing CSA-Project is replaced with the one in the local OCAD-Project.
- Click the Import button. The objects are copied to the server. This can take some time depending on the number of objects imported. The progress can be seen in the Status Bar.
![]() All with an object connected Database Links are imported, too.
All with an object connected Database Links are imported, too.
Get Objects
After a CSA-Project was successfully created and some data (at least Symbols and Colors) exist, you are able to start working. Close all opened projects and then click the Connect/Disconnect icon. The New Connection dialog opens. Select the CSA-Project, uncheck the Import mode option and click the Load Selected Project button. If you have created a Map Preview during the import of a map, you will see it in the project (see picture). Otherwise the project is blank.
If a Map Preview was generated, the loaded project shows a raster preview of the map which is handled as a normal raster background map and also can be hidden with the F10 key or managed with the Manage command in the Background Map menu. To load objects of a certain area from the server move the map to the desired position and click the Get Objects from Current View icon in the Client Server toolbar. All objects which are in the current view are loaded from the server. If the Alt key is pressed when the
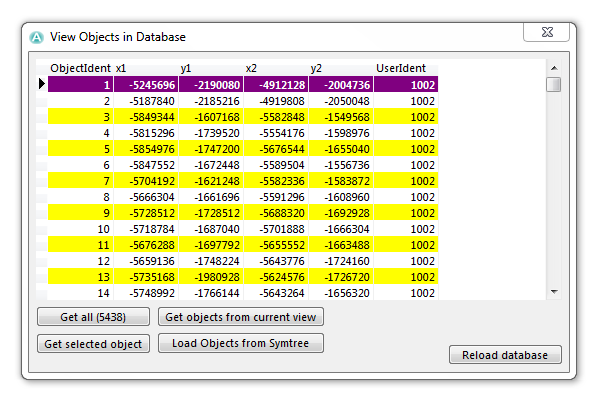
Get Objects from Current View icon is clicked, the Show Objects in Database dialog appears with advanced options. This dialog provides a table with all objects listed which are stored on the server.
- Click the Get all button to load the objects of the entire map. The number in brackets indicates the number of objects to be loaded.
- Click the Get objects from current view button to load all objects of the current view which has the same effect as a simple click on the
Get Objects from Current View icon in the Client Server toolbar.
- Click the Get selected object button to load the object which is selected in the table of the dialog.
- Click the Load Objects from Symbol Tree button to load all objects with symbols which are together in a group in the symbol tree. This is especially useful if you want to load and edit for example only the roads:
- 1. The Load Objects from Symbol Tree dialog opens.
- 2. Select a group of the symbol tree (for example the group with symbols for roads) or select multiple groups with the Ctrl key pressed.
- 3. The selection of the groups can be saved. Enter a name in the Selection field on top of the dialog and click the Save button. If there are already selections saved, select it in the drop down list and click the Load button. With the Delete button the selection can be deleted.
- 4. Click the OK button when finished. The desired objects are loaded.
- Click the Reload database button to update the table of objects.
Next page: Working on a CSA Project
Back to the Client Server Architecture page.
An overview about all pages dealing with the Client Server Architecture can be found in the corresponding category (see below for the link).


