Layout

|
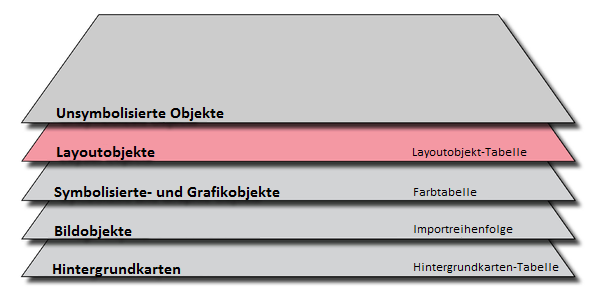
In OCAD 11 a layout layer has been added. This layer may contains raster images and vector objects like lines, areas or text. The vector layout objects color model is CMYK. The layout images' one is RGB. Spot colors are not supported by the OCAD layout layer.
Layout objects can not be selected, moved, removed or changed unless by clicking Edit Layout Objects in Layout menu.
Edit Layout Objects
Add new layout objects like lines, areas or text and define their properties.
Lines: Color and line width.
Areas: Color.
Text: Color, Font and text size.
![]() The error message: "Layout font attributes list is full" appears if the list contains the maximum of 256 entries.
The error message: "Layout font attributes list is full" appears if the list contains the maximum of 256 entries.
Layout Images
Add layout images by clicking the Add button in the images box.
Move or resize a layout image by clicking the Move or resize button in the images box.
Remove a layout image by clicking the Remove button in the images box.
Layout Objects List
All Layout objects are listed in the layout objects list. It is possible to set them visible or hidden and to move them up and down.
Import Layout
Choose this command to import the layout objects from another OCAD map. The layout objects are placed in the center of actual drawing area.
Save Layout
Choose this command to save the layout objects to a separate file.
Hide Layout
Check the Hide Layout menu item to hide the layout objects.
Add North Arrow or Scale Bar
Not implemented.
Add Map Legend
![]() This function creates symbolized map objects, not layout objects. Use the function Convert to Layout Object to convert them to layout objects.
This function creates symbolized map objects, not layout objects. Use the function Convert to Layout Object to convert them to layout objects.
Create Graticule Name Index
This command is only available if the map is georeferenced and a coordinate system is set. The command calculates a name index based on the WGS84 graticule.
Select one or more symbols in the symbol box before choosing the command. All text objects and line text objects with these symbol(s) are included to the index.
Create Graticule Name Index Dialog
- Index origin of longitude/latitude: Enter index origin coordinates.
- Horizontal/vertical distance: Enter the distance between the grid lines.
- Angle: Enter the angle of the grid. This angle is normally zero.
- Style: Choose a numbering style. One axis is always numbered "A, B, C..." and the other "1, 2, 3..."
- Name index symbol: Choose a text symbol. It is used to draw the graticule name index on the map.
After clicking the OK button a text object with the index will be added in the center of the drawing area.
![]() This function creates symbolized map objects, not layout objects. Use the function Convert to Layout Object to convert the index to layout objects.
This function creates symbolized map objects, not layout objects. Use the function Convert to Layout Object to convert the index to layout objects.
Create Name Index
Select one or more symbols in the symbol box before choosing the command. All text objects and line text objects with these symbol(s) are included to the index.
Create Name Index Dialog
- Horizontal/vertical offset: Enter the coordinates of the upper left or lower left corner where the numbering of the grid starts.
- Horizontal/vertical distance: Enter the distance between the grid lines.
- Angle: Enter the angle of the grid. This angle is normally zero.
- Style: Choose a numbering style. One axis is always numbered "A, B, C..." and the other "1, 2, 3..."
- Symbol: Choose a text symbol. It is used to draw the name index on the map.
After clicking the OK button a text object with the index will be added in the center of the drawing area.
![]() This function creates symbolized map objects, not layout objects. Use the function Convert to Layout Object to convert the index to layout objects.
This function creates symbolized map objects, not layout objects. Use the function Convert to Layout Object to convert the index to layout objects.
Previous Chapter: Edit Object
Next Chapter: Export Files
Back to Main Page
