Create a new CSA Project
Connect Database
After the basic database setup you can connect to the database. You have to enter the information in the below shown mask.
For the first connection you have to provide the database protocol – currently only Postgres is supported. For a connection although the host, the database name, the port and the port must be provided. The user name for the database currently must be ocad11 as mentioned in the setup selection and a Password.
For the project user you must provide the data as inserted during the installation for the user name and the password. When you are connected the currently database projects get loaded and your userident. In the current development stage none of the provided settings are saved! The hard coded default settings shown above. The database password is ocaddb.
The auto reload changes re-fetches all loaded objects when they changed in the db.
Create new Project
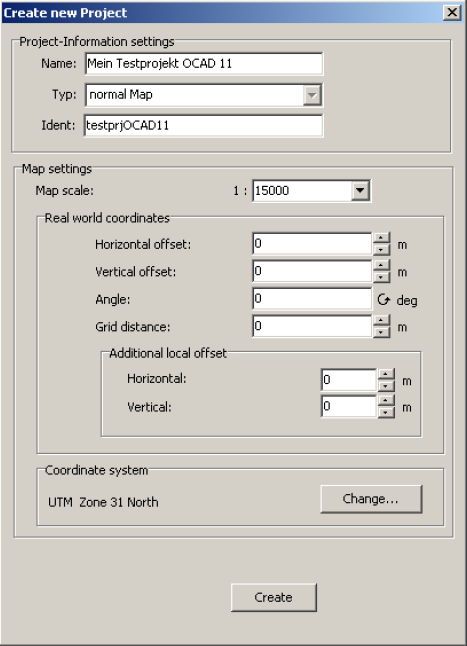
After the basic setup you can create a new map project in the database. To do so click in the connection window on new project. The following information have to be provided for the project creation.
A project name and a unique project ident must be supplied. When you enter a project name a project ident will be created of the name by default but you can change it the way you like. A map scale and a grid distance should be provided all other parameters are optional. When clicking on the Create button the new project will be created and should shown up in the database window.
Draw with database connection
To draw objects directly into the database you have to create a database project first. As next step load a file with a symbol set. Now the database project can be associated with the file. Therefore open the database window, select a project from the projects grid and click OK.
Every new drawn object is now immediately saved into the database project. The objects get automatically checked out too for future editing.
All objects checked out can be edited all others only can be viewed.
Every object inserted or changed is saved as undo in the database. You can click Undo button in the database toolbar to revise the last change or insert and click on Redo to redo the last change.
Add objects to the database
Add objects to the database is only needed to import objects. For importing one or more selected objects the following steps needs to be done.
- load the file with the objects
- associate the file with a project from the projects grid
- select one or more objects
- click the Add objects to the database button
- the objects will be added to the database
All objects associated with the database will only be saved in the database. The same applies for object changes too.
Add all objects to the database
To import all objects from a file into the database the following steps needs to be done:
- load the file with the objects
- associated the file with a project from the projects grid
- hold down the shift+alt key and click on the Add objects button
- all objects from the file with the status normal or hidden will be imported in the
database now. All objects from the file are imported in the database now. For now all changes will only be saved in the database.
Add symbol descriptions to the database
To import the symbol descriptions into the database the following steps needs be done:
- load the file with the objects
- associated the file with a project from the projects grid
- hold down the alt key and click on the Add objects button
- all symbol descriptions from the file will be imported into the database
![]() Important note: In the current implementation the symbol description depends on the
symbol number. Only ONE Symbol table is used no duplicate symbol numbers are
prevented and failure will occur if you try to import duplicate symbol numbers!
Important note: In the current implementation the symbol description depends on the
symbol number. Only ONE Symbol table is used no duplicate symbol numbers are
prevented and failure will occur if you try to import duplicate symbol numbers!
Remove objects from the Database
To remove objects from the database not simple delete them with the delete key. By hitting
the delete key the object is only removed from the current view. Loading the project again
the object will show up as before. To remove an object from the database the object must
be checked out. After a successful checkout objects can be remove from the database
with a click.+
Get all from current view
To get all objects from the current loaded view click on the button. To get the objects
window hold down the alt – key and click on the button.
Check out element(s)
To check out elements for editing from the database select the objects to be check out and
click on the button. If no problem occurs during the check out nothing seems to be done.
On any error a message will appear describing the error.
Check in element(s)
To check in elements you finished editing with select them and click on the Check in
button. Now other users are able to check the elements out and edit them. To check in all
your objects checked out click on the show objects checked out button and there click
the Check in all button all.
Objects dialog
Hold down the alt key and Click on the get objects from current view button to get the objects window.
All objects saved in the database. Here can be chosen to Load all objects, Get all from the current view of the work sheet or to get a selected object. It is possible that not all objects are shown therefore click the Reload button. All objects from the database are re-fetch. To get all objects from the database click on the Get all button. Depending on how many objects are save in the database this may takes a long time. The objects count is show in braces in the Get all button.
Show checked out dialog
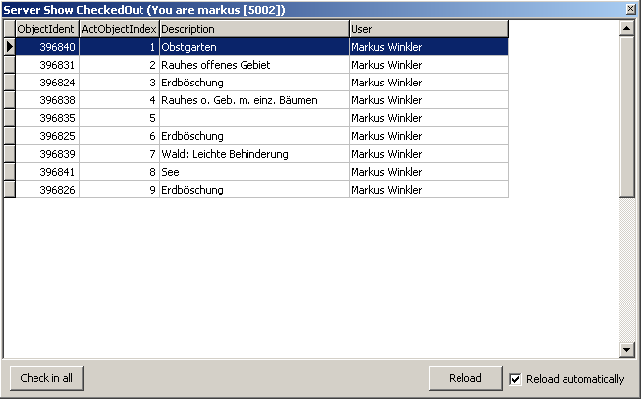
With this dialog you can show all objects checked out by any user of the project. Only the objects you have currently loaded are shown in the list.
You can leave the window open an you will see all check in and check out by any user working with the project. By clicking on of the rows in the list OCAD will jump to the selected object in the current project. If you deselect the reload functionality you can click the Reload button to reload the window manually otherwise the reload takes place every 3 seconds. The description column show you the symbol description of the object is drawn with. The button Check in all checks in all your objects you have checked out for editing.
Generate Project Preview
With this functionality a raster map preview can be created.
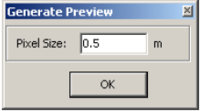
To generate a raster map preview the project must be drawn with real world coordinates. As next step you have to set the pixel size per meter for the preview. By clicking OK the generation process will start. First all objects from the database will be loaded into the current worksheet. This step may take a longer time depends how many objects are in the project. Afterwards the preview is generated and saved into the database. Now every time you load the project from the database the preview will be loaded first. This may help you to find the correct view in the file and you have to load only the objects you need to work with.
Back to Server Client


