Bahnlegungsobjekte bearbeiten: Unterschied zwischen den Versionen
FBO (Diskussion | Beiträge) K (FBO verschob Seite Edit Course Setting Objects nach Bahnlegungsobjekte bearbeiten) |
FBO (Diskussion | Beiträge) Keine Bearbeitungszusammenfassung |
||
| Zeile 1: | Zeile 1: | ||
[[Category: | [[Category: Bahnlegung]] | ||
[[File:Pro40px.PNG|Diese Funktion ist verfügbar in OCAD 11 Professional.|link=https://www.ocad.com/de/produkte/ocad-fuer-kartografie]][[File:Std40px.PNG|Diese Funktion ist verfügbar in OCAD 11 Orienteering Standard.|link=https://www.ocad.com/de/produkte/ocad-fuer-orientierungslauf]][[File:Sta40px.PNG|Diese Funktion ist verfügbar in OCAD 11 Starter.|link=https://www.ocad.com/de/produkte/ocad-fuer-orientierungslauf]][[File:CS40px.PNG|Diese Funktion ist verfügbar in OCAD 11 Course Setting.|link=https://www.ocad.com/de/produkte/ocad-fuer-orientierungslauf]] | |||
Die '''Bahnlegungsbox''' auf der rechten Seite des Fensters gibt Ihnen verschiedene Bearbeitungsmöglichkeiten für Bahnobjekte (Start, Posten, Ziel, Pflichststrecke, etc.), welche Sie bereits hinzugefügt haben. | |||
[[File:CourseSettingDialog.PNG]] | [[File:CourseSettingDialog.PNG]] | ||
== | ==Code ändern== | ||
Sie können den Code eines Bahnobjektes ändern, indem Sie auf die entsprechende Schaltfläche klicken (siehe Abbildung oben). Das '''[[Bahnlegungsobjekte hinzufügen#Bahnlegungsobjekt Dialogfenster|Bahnlegungsobjekt]]'''-Dialogfenster erscheint. Geben Sie einen beliebigen neuen Code ein (keine Einschränkungen) oder benutzen Sie die Pfeile, um den nächsten freien Code zu finden. Lesen Sie auch den '''[[Bahnlegungsobjekte hinzufügen#Bahnlegungsobjekt Dialogfenster|Bahnlegungsobjekt-Dialogfenster]]'''-Artikel für weitere Informationen. Klicken Sie auf die '''OK'''-Schaltfläche, um zu beenden. | |||
Wenn Sie alle Posten neu nummerieren wollen, benutzen Sie die '''[[Bahnlegung_für_den_Orientierungslauf#Posten_neu_nummerieren|Posten neu nummerieren]]'''-Funktion im '''Posten'''-Untermenü des '''Bahnlegungsmenüs'''. | |||
== | ==Textblock== | ||
Klicken Sie auf die '''Textblock'''-Schaltfläche (siehe Abbildung oben), um einen Textblock zur Postenbeschreibung hinzuzufügen. Das '''[[Bahnlegungsobjekte hinzufügen#Bahnlegungsobjekt Dialogfenster|Bahnlegungsobjekt]]'''-Dialogfenster erscheint. Geben Sie einen Code für den Textblock ein und klicken Sie auf die '''OK'''-Schaltfläche. Der Textblock erscheint in der Liste der Bahnobjekte auf der rechten Seite des Fensters mit dem Standardcode T1. Selektieren Sie ihn und geben Sie in das leere Feld in der '''Bahnlegungsbox''' einen Text ein. Jetzt müssen Sie ihn noch zu einer Bahn hinzufügen. Dazu selektieren Sie die entsprechende Bahn, bestimmen einen Ort (z.B. nach Posten mit Kontrollnummer 38), selektieren diesen Ort mit einem Klick und machen schliesslich einen Doppelklick auf den Textblock. Dieser wird dann an der entsprechenden Stelle eingefügt und erscheint in der Postenbeschreibung. | |||
[[File:TextBlockExample.PNG|200px]] | [[File:TextBlockExample.PNG|200px]] | ||
== | ==Sperren und Entsperren der Postition von Bahnobjekten== | ||
Klicken Sie auf die '''Sperren'''-Schaltfläche (siehe Abbildung oben), um Bahnobjekte zu sperren oder entsperren. Wenn Bahnobjekte gesperrt sind, können Sie in der Zeichnungsfläche nicht bewegt werden. | |||
== | ==Textpostenbeschreibung== | ||
Geben Sie einen Text für die Textpostenbeschreibung in das '''Textpostenbeschreibungsfeld''' (siehe Abbildung oben) ein. Alternativ können Sie die '''[[Text-Postenbeschreibung bearbeiten]]'''-Funktion verwenden, welche Sie im '''Bahnlegungsmenü''' finden. Sie können einen Text für den Start, Posten, Pflichtstrecken und Textblöcke (erscheinen auch in der Symbolpostenbeschreibung) definieren. | |||
==IOF | ==IOF Postenbeschreibung== | ||
Die IOF Symbol-Postenbeschreibung kann durch Klicken auf eines der acht Quadrate (siehe Abbildung oben) geändert werden. OCAD schlägt einige Symbole für das entsprechende Feld in einem Dropdown-Gitter vor. | |||
[[File:ControlDescriptionDeclaration.PNG]] | [[File:ControlDescriptionDeclaration.PNG]] | ||
A: ''' | A: '''Postennummer''': Die Postennummer wird automatisch hinzugefügt, abhängig von der Reihenfolge der Posten, und kann nicht geändert werden. | ||
B: ''' | B: '''Kontrollzahl''': Um die Kontrollzahl zu ändern, benutzen Sie die '''[[Bahnlegungsobjekte_bearbeiten#Code_ändern|Code eines Bahnobjekts ändern]]'''-Schaltfläche (siehe Abbildung oben). | ||
C: ''' | C: '''Welches Objekt (im Kreis)''': Präzisieren Sie das genaue Objekt, wenn sich mehrere Objekte gleicher Art innerhalb des Postenkreises befinden. | ||
D: ''' | D: '''Postenobjekt''': In diesem Feld kann das Postenobjekt deklariert werden. | ||
E: ''' | E: '''Präzisierung der Art des Postenobjektes''': Hier können Sie zusätzliche Informationen, welche die Art des Objektes beschreiben, hinzufügen. | ||
F: ''' | F: '''Grösse des Postenobjektes''': In diesem Feld kann die Grösse oder die Art der Kombination zweier Objekte eingegeben werden. | ||
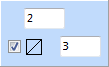
: | : Sie können entweder das Kreuzungs- oder Gabelungssymbol für eine Kombination von Symbolen eingeben oder die Grösse des Objektes: | ||
: [[File:HeighOnASlope.PNG]] | : [[File:HeighOnASlope.PNG]] | ||
: | : Geben Sie im oberen Feld dieser Box die Grösse des Objektes ein. | ||
: | : Geben Sie in beiden Feldern einen Wert ein, um die Grösse zweier Objekte zu definieren. | ||
: | : Geben Sie in beiden Feldern einen Wert ein und aktivieren Sie die Diagonaloption, um die Höhen eines Objektes an einem Hang zu definieren. | ||
G: ''' | G: '''Standort der Postenmarkierung''': Deklarieren Sie hier den präzisen Ort der Postenflagge. | ||
H: ''' | H: '''Weitere wichtige Informationen''': Wichtige Informationen (z.B. Kontrollposten, Verpflegungsposten etc.) können Sie hier eingeben. | ||
[[File:Hint.jpg]] - | [[File:Hint.jpg]] - Quellen und weitere Informationen zur IOF Symbol-Postenbeschreibung finden Sie unter folgendem Link (nur in Englisch): '''[http://orienteering.org/wp-content/uploads/2010/12/IOF-Control-Descriptions-2004.pdf IOF Control Descriptions 2004.pdf]''' | ||
: - | : - Eine deutsche Übersetzung der IOF-Symbole finden Sie hier: '''[http://www.oefol.at/news/2004/iof_postenbeschreibung_kurz.pdf IOF-Symbole deutsch]''' | ||
: - | : - Die Symbol-Postenbeschreibung kann nur für den '''Start''' und '''Posten''' geändert werden. | ||
: - Es ist nicht möglich, die Postenbeschreibung für das Ziel zu ändern. Hier ist die Postenbeschreibung, abhängig von der Distanz vom letzten Posten zum Ziel oder der Pflichtstrecke ins Ziel. | |||
===Add an Own Symbol to the Control Description=== | ===Add an Own Symbol to the Control Description=== | ||
Version vom 11. Januar 2013, 10:35 Uhr
![]()
![]()
![]()
![]()
Die Bahnlegungsbox auf der rechten Seite des Fensters gibt Ihnen verschiedene Bearbeitungsmöglichkeiten für Bahnobjekte (Start, Posten, Ziel, Pflichststrecke, etc.), welche Sie bereits hinzugefügt haben.

Code ändern
Sie können den Code eines Bahnobjektes ändern, indem Sie auf die entsprechende Schaltfläche klicken (siehe Abbildung oben). Das Bahnlegungsobjekt-Dialogfenster erscheint. Geben Sie einen beliebigen neuen Code ein (keine Einschränkungen) oder benutzen Sie die Pfeile, um den nächsten freien Code zu finden. Lesen Sie auch den Bahnlegungsobjekt-Dialogfenster-Artikel für weitere Informationen. Klicken Sie auf die OK-Schaltfläche, um zu beenden.
Wenn Sie alle Posten neu nummerieren wollen, benutzen Sie die Posten neu nummerieren-Funktion im Posten-Untermenü des Bahnlegungsmenüs.
Textblock
Klicken Sie auf die Textblock-Schaltfläche (siehe Abbildung oben), um einen Textblock zur Postenbeschreibung hinzuzufügen. Das Bahnlegungsobjekt-Dialogfenster erscheint. Geben Sie einen Code für den Textblock ein und klicken Sie auf die OK-Schaltfläche. Der Textblock erscheint in der Liste der Bahnobjekte auf der rechten Seite des Fensters mit dem Standardcode T1. Selektieren Sie ihn und geben Sie in das leere Feld in der Bahnlegungsbox einen Text ein. Jetzt müssen Sie ihn noch zu einer Bahn hinzufügen. Dazu selektieren Sie die entsprechende Bahn, bestimmen einen Ort (z.B. nach Posten mit Kontrollnummer 38), selektieren diesen Ort mit einem Klick und machen schliesslich einen Doppelklick auf den Textblock. Dieser wird dann an der entsprechenden Stelle eingefügt und erscheint in der Postenbeschreibung.

Sperren und Entsperren der Postition von Bahnobjekten
Klicken Sie auf die Sperren-Schaltfläche (siehe Abbildung oben), um Bahnobjekte zu sperren oder entsperren. Wenn Bahnobjekte gesperrt sind, können Sie in der Zeichnungsfläche nicht bewegt werden.
Textpostenbeschreibung
Geben Sie einen Text für die Textpostenbeschreibung in das Textpostenbeschreibungsfeld (siehe Abbildung oben) ein. Alternativ können Sie die Text-Postenbeschreibung bearbeiten-Funktion verwenden, welche Sie im Bahnlegungsmenü finden. Sie können einen Text für den Start, Posten, Pflichtstrecken und Textblöcke (erscheinen auch in der Symbolpostenbeschreibung) definieren.
IOF Postenbeschreibung
Die IOF Symbol-Postenbeschreibung kann durch Klicken auf eines der acht Quadrate (siehe Abbildung oben) geändert werden. OCAD schlägt einige Symbole für das entsprechende Feld in einem Dropdown-Gitter vor.

A: Postennummer: Die Postennummer wird automatisch hinzugefügt, abhängig von der Reihenfolge der Posten, und kann nicht geändert werden.
B: Kontrollzahl: Um die Kontrollzahl zu ändern, benutzen Sie die Code eines Bahnobjekts ändern-Schaltfläche (siehe Abbildung oben).
C: Welches Objekt (im Kreis): Präzisieren Sie das genaue Objekt, wenn sich mehrere Objekte gleicher Art innerhalb des Postenkreises befinden.
D: Postenobjekt: In diesem Feld kann das Postenobjekt deklariert werden.
E: Präzisierung der Art des Postenobjektes: Hier können Sie zusätzliche Informationen, welche die Art des Objektes beschreiben, hinzufügen.
F: Grösse des Postenobjektes: In diesem Feld kann die Grösse oder die Art der Kombination zweier Objekte eingegeben werden.
- Sie können entweder das Kreuzungs- oder Gabelungssymbol für eine Kombination von Symbolen eingeben oder die Grösse des Objektes:
- Geben Sie im oberen Feld dieser Box die Grösse des Objektes ein.
- Geben Sie in beiden Feldern einen Wert ein, um die Grösse zweier Objekte zu definieren.
- Geben Sie in beiden Feldern einen Wert ein und aktivieren Sie die Diagonaloption, um die Höhen eines Objektes an einem Hang zu definieren.

G: Standort der Postenmarkierung: Deklarieren Sie hier den präzisen Ort der Postenflagge.
H: Weitere wichtige Informationen: Wichtige Informationen (z.B. Kontrollposten, Verpflegungsposten etc.) können Sie hier eingeben.
![]() - Quellen und weitere Informationen zur IOF Symbol-Postenbeschreibung finden Sie unter folgendem Link (nur in Englisch): IOF Control Descriptions 2004.pdf
- Quellen und weitere Informationen zur IOF Symbol-Postenbeschreibung finden Sie unter folgendem Link (nur in Englisch): IOF Control Descriptions 2004.pdf
- - Eine deutsche Übersetzung der IOF-Symbole finden Sie hier: IOF-Symbole deutsch
- - Die Symbol-Postenbeschreibung kann nur für den Start und Posten geändert werden.
- - Es ist nicht möglich, die Postenbeschreibung für das Ziel zu ändern. Hier ist die Postenbeschreibung, abhängig von der Distanz vom letzten Posten zum Ziel oder der Pflichtstrecke ins Ziel.
Add an Own Symbol to the Control Description
It is possible to add an own symbol to the control description.
- Create a new point symbol with the correct appearance and dimensions for the control description. Learn how to create a new point symbol on the Create a New Symbol page.
- Unlike the Point Symbol Dialog in a normal map project, the Point Symbol Dialog of Course Setting projects have an additional part, namely the Course setting project for orienteering part.
- Check the Control description symbol option.
- Check the fields (B-H), which you want OCAD to propose your own symbol.
- Click the OK button when finished.
Classes and Runners
In this part of the dialog all Classes using the selected course setting objects are listed. In addition, the total number of runners visiting this object is given. Define the number of runners per class in the Classes dialog.
Course
Select a course in the dropdown list (see figure at the top). The course is now selected. You can add course objects to it by double clicking them on the map or on the list with all objects. There are two special items in this list:
- Runners: Select this item to display all controls. In the Preview mode the total number of runners visiting this control is given in brackets behind each control code. Define the number of runners per class in the Classes dialog.
- All controls: Select this item to display all controls on the map. In the Preview mode each control is displayed with its code.
Lock Courses
Click the Lock icon to lock or unlock all courses. When courses are locked, it is not possible to add or remove course setting objects.
Preview
Click the Preview button to get a preview of the selected course. You are now in the Preview mode. In the Preview mode it is possible to make several graphical adjusments on the course.
The following adjustments are allowed:
- Connection Lines: Connection lines can be edited with most of the editing tools (e.g. Reshape, Add, Move or Remove Vertices, Cut etc.). This can be useful if for example a connection line crosses another control or covers an important map object.
- Control Numbers: Select a control number and move it to another position. This can be useful if the control number gets in the way of other course objects or important map information.
Visit the Make Graphic Modifications page to get more information.
Note: Other adjustments (e.g. move controls or add new course objects) are not allowed to make in the Preview mode. Make sure you click the Preview button again before going on working on the courses.
![]() - If control circles cover important map information, they have to be cut in the normal mode and not in the Preview mode.
- If control circles cover important map information, they have to be cut in the normal mode and not in the Preview mode.
- - When moving a control or a course setting object on the map, all affecting graphical adjustments (e.g. moved control numbers or cut connection lines) made in the preview mode get lost. Use the Lock button to prevent from moving course objects accidentally.
Switch Between Courses
Use the arrow buttons to switch between the courses.
Insert
Select a course and click the Insert button. The following course objects can be inserted:
- Mandatory crossing point(s)
- Mandatory passage through out of bounds area
- Map exchange
- Team variation
- Leg variation
Visit the Insert Course Object page for more information.
Delete
Remove a course object from a course by selecting it and clicking the Delete button. Alternatively, you can press the Delete key.
Reset
This button is available when you are in the Preview mode. All graphical adjustments (e.g. moved control numbers or cut connection lines) are removed when clicking this button.
Course Length and Climb
The length and climb of the course is displayed here. The length of the course is calculated automatically. However, you can add an extra length in the Courses dialog. If a DEM is used, the climb is calculated automatically, too. Although, you will have to adjust this value in the Courses dialog because OCAD calculates it using the linear distance.
Functions for Special Course Objects
Control Description
Choose the ![]() Control Description symbol and place it on the map. Enter a code in the Course Object dialog and click the OK button. The upper right corner of the control description is indicated with a hook. In the Course Object Box on the right side of the window you have the option to change the Control description type from symbol to text or change the Control description anchor from top left to bottom left.
Control Description symbol and place it on the map. Enter a code in the Course Object dialog and click the OK button. The upper right corner of the control description is indicated with a hook. In the Course Object Box on the right side of the window you have the option to change the Control description type from symbol to text or change the Control description anchor from top left to bottom left.
Marked Route
If you select a marked route on the map, enable the Funnel tapes option in the Course Object Box to get the corresponding symbol in the control description. In addition, a text can be entered in the field above. This text appears in the text control description and has no effect on the symbol control description.
Learn how to add a Marked route with help of the Add a Marked Route article.