WMS: Difference between revisions
| (20 intermediate revisions by 3 users not shown) | |||
| Line 1: | Line 1: | ||
'''WMS (Web Map Service)''' and '''WMTS (Web Map Tile Service)''' are interfaces for retrieving geodata as raster data over the internet. The images are generated by a map server using data from a GIS database. | |||
These images can be used as background maps in OCAD. | |||
*A '''WMS''' is calculated on the server side and delivers one image per request. | |||
*A '''WMTS''' delivers tiles that have been pre-renderd on the server side, and cached on the client side. The background maps are thus loaded significantly faster by a WMTS service than by a WMS service. | |||
[[File:Hint.jpg]] WMS / WMTS requires a georeferenced map. Choose the '''[[Create_a_New_Map#Set_Scale_and_Coordinate_System|Scale and Coordinate System]]''' command from the '''Map''' menu to set the map scale and a coordinate system.<br> | |||
Real world coordinates do not have to be necessarily defined. They can be left at (0/0) for example. | |||
[[File:WMS.gif]] | |||
== WMS Server [[File:Space.PNG]][[File:Mas40px.PNG|This function is available in OCAD Mapping Solution.|link=https://www.ocad.com/en/products/ocad-for-cartography]][[File:Ori40px.PNG|This function is available in OCAD Orienteering.|link=https://www.ocad.com/en/products/ocad-for-orienteering]]== | |||
To set up a map from a WMS / WMTS server choose the '''WMS / WMTS''' command from the '''[[Background Map]]''' menu. The '''WMS / WMTS''' dialog appears. | |||
The WMS servers are listed in the upper left box of the '''WMS - Web Map Service''' dialog. | |||
There are already some preset connections the first time you start the dialogue. | |||
: [[File:WmsDialog1.png|700px]] | |||
=== Add a WMS / WMTS Server === | |||
: [[File: | # Click the '''Add''' button. | ||
# The '''Edit WMS / WMTS Properties''' dialog appears. | |||
# Enter the '''Service''', '''Name''' of the server, the '''URL''' and choose the '''Version'''<br> If required, also provide a '''Login''' with '''Password''', the '''Token Server URL''' and a '''Key'''.<br>You will get these data from the WMS /WMTS provider. | |||
#: [[File:EditWMSServerProperties.PNG|500px]] | |||
# For WMTS additional information will be shown in the '''WMTS memory cache'''. | |||
# Click the '''OK''' button when finished. | |||
# The WMS / WMTS server appears in the upper left WMS / WMTS server box. | |||
=== | === Connect to a WMS / WMTS Server === | ||
Select a WMS server and click | Select a WMS / WMTS server from the list and click '''Connect'''. If the connection was successful, OCAD gets a list from the server with the available layers. These layers are listed in the WMS / WMTS layer table of the '''WMS / WMTS''' dialog. Read the '''[[WMS#WMS / WMTS_Layer|WMS / WMTS Layer]]''' article to learn how to use layers as '''[[Background Map|Background Maps]]'''. | ||
[[File:WMSDialog2.PNG|700px]] | |||
=== Edit WMS / WMTS Server Properties === | |||
Select a WMS / WMTS server and click the '''Edit''' button to edit its properties. The '''Edit WMS / WMTS Properties''' dialog appears which is equal to the '''[[WMS#Add a WMS Server|Add WMS / WMTS Server]]''' dialog. | |||
: [[File:EditWMSServerProperties.PNG|500px]] | |||
=== Remove a WMS / WMTS Server === | |||
Click the '''Remove''' button to remove the selected WMS / WMTS server from the list. | |||
== WMS / WMTS Layer == | |||
===Add Selected Layers to Background Maps=== | |||
After connecting to a WMS / WMTS server the available WMS / WMTS layers are listed in the WMS / WMTS layer box. | |||
: [[File:WMSDialog3.PNG|700px]] | |||
=== Add | |||
[[File: | |||
# Select a WMS / WMTS layer in the list and choose an '''Image format''' from dropdown list (those formats are provided by the WMS / WMTS server). There is also a Search Field. | |||
# Choose an option how to add the selected layers: | |||
#* '''Add Selected Layers as WMS / WMTS Layers to Background Maps (Online)''' | |||
#:: [[File:WmsAddLayerOnline.png|500px]] | |||
#:: This is an online '''[[Background Map]]''' . It is updated by the WMS / WMTS Server by each change of the map view. This can take a moment. Choose the ''online'' option only if you are using a fast WMS / WMTS server and work woth high speed internet connection. As an alternative, you can add the layer as an offline background map. | |||
#* '''Add current view of selected layers to background maps (Offline)''' | |||
#:: [[File:WmsAddCurrentViewOffline.png|500px]] <br> | |||
#::* Define the '''Offline folder'''. The current map folder is set as default. | |||
#:: With this offline option an image of the chosen WMS / WMTS layer of the current view is downloaded from the WMS / WMTS server and added as a custom background map to the map. It does not get updated when changing the view. | |||
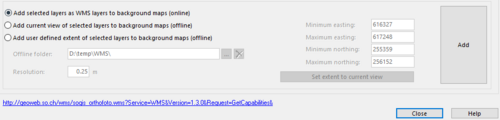
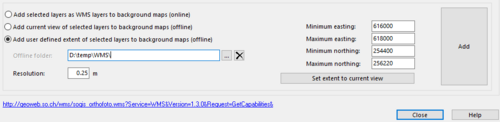
#* '''Add User Defined Extent of Selected Layers to Background Maps (Offline)''' | |||
#:: [[File:WmsAddUserDefinedExtentOffline.png|500px]] <br> | |||
#::* Define the '''Offline folder'''. The current map folder is set as default. | |||
#::* Define the '''Resolution'''. | |||
#::* Define the '''Extent''' (minimum easting, maximum easting, minimum northing, maximum northing). The current view extent is set as a default when opening the WMS / WMTS dialog but the entries are not updated automatically by changing the view. The extent can be updated by clicking the '''Set extent to current view''' button. | |||
#:: With this offline option an image of the chosen WMS / WMTS layer of the defined extent is downloaded from the WMS / WMTS server and added as a custom background map to the map. It does not get updated when changing the view. | |||
# Click the '''Add''' button. | |||
#:: The WMS / WMTS layer appears in the table of the '''[[Background_Map#Manage_Background_Maps|Manage Background Map]]''' dialog which can be displayed in the '''[[Background Map]]''' menu. | |||
#:: [[File: hint.jpg]] The '''Background map (Geo-Referenced)''' dialog appears if no real world coordinates offset is set. Choose an offset and click the '''OK''' button. | |||
<br><br> | |||
[[File:Hint.jpg]] Web Map Services generally provide their images in multiple spatial reference systems. OCAD can only access to WMS / WMTS if the OCAD maps' coordinate system (ex. Swiss Grid CH1903+/LV95) is supported by the WMS / WMTS. Then the '''Spatial reference system''' is automatically set to the corresponding EPSG code. If the chosen coordinate system is not compatible with the WMS / WMTS, the '''Spatial reference system''' caption in the WMS / WMTS dialog remains empty. | |||
<br><br> | |||
Click the '''Close''' button when finished.<br><br> | |||
[[ | ===Remove Selected Layers from Background Maps=== | ||
[[File: | To remove a WMS / WMTS layer or to manage its view, choose the '''[[Background_Map#Manage_Background_Maps|Manage]]''' command from the '''[[Background Map]]''' menu:<br> | ||
[[File:WMSBackGroundMap.PNG|700px]] | |||
===WMS Examples=== | |||
[[File:WMS ForestReserve.png]]<br> | |||
''WMS layer indicating forest reserves that may not be entered.'' | |||
<br><br> | |||
[[File:WMS CadastralSurvey.png]]<br> | |||
''WMS layer that contains cadastral survey data.'' | |||
Latest revision as of 15:53, 23 August 2023
WMS (Web Map Service) and WMTS (Web Map Tile Service) are interfaces for retrieving geodata as raster data over the internet. The images are generated by a map server using data from a GIS database.
These images can be used as background maps in OCAD.
- A WMS is calculated on the server side and delivers one image per request.
- A WMTS delivers tiles that have been pre-renderd on the server side, and cached on the client side. The background maps are thus loaded significantly faster by a WMTS service than by a WMS service.
![]() WMS / WMTS requires a georeferenced map. Choose the Scale and Coordinate System command from the Map menu to set the map scale and a coordinate system.
WMS / WMTS requires a georeferenced map. Choose the Scale and Coordinate System command from the Map menu to set the map scale and a coordinate system.
Real world coordinates do not have to be necessarily defined. They can be left at (0/0) for example.

WMS Server 


To set up a map from a WMS / WMTS server choose the WMS / WMTS command from the Background Map menu. The WMS / WMTS dialog appears.
The WMS servers are listed in the upper left box of the WMS - Web Map Service dialog.
There are already some preset connections the first time you start the dialogue.

Add a WMS / WMTS Server
- Click the Add button.
- The Edit WMS / WMTS Properties dialog appears.
- Enter the Service, Name of the server, the URL and choose the Version
If required, also provide a Login with Password, the Token Server URL and a Key.
You will get these data from the WMS /WMTS provider. - For WMTS additional information will be shown in the WMTS memory cache.
- Click the OK button when finished.
- The WMS / WMTS server appears in the upper left WMS / WMTS server box.

Connect to a WMS / WMTS Server
Select a WMS / WMTS server from the list and click Connect. If the connection was successful, OCAD gets a list from the server with the available layers. These layers are listed in the WMS / WMTS layer table of the WMS / WMTS dialog. Read the WMS / WMTS Layer article to learn how to use layers as Background Maps.

Edit WMS / WMTS Server Properties
Select a WMS / WMTS server and click the Edit button to edit its properties. The Edit WMS / WMTS Properties dialog appears which is equal to the Add WMS / WMTS Server dialog.
Remove a WMS / WMTS Server
Click the Remove button to remove the selected WMS / WMTS server from the list.
WMS / WMTS Layer
Add Selected Layers to Background Maps
After connecting to a WMS / WMTS server the available WMS / WMTS layers are listed in the WMS / WMTS layer box.

- Select a WMS / WMTS layer in the list and choose an Image format from dropdown list (those formats are provided by the WMS / WMTS server). There is also a Search Field.
- Choose an option how to add the selected layers:
- Add Selected Layers as WMS / WMTS Layers to Background Maps (Online)
- This is an online Background Map . It is updated by the WMS / WMTS Server by each change of the map view. This can take a moment. Choose the online option only if you are using a fast WMS / WMTS server and work woth high speed internet connection. As an alternative, you can add the layer as an offline background map.
- Add current view of selected layers to background maps (Offline)

- Define the Offline folder. The current map folder is set as default.
- With this offline option an image of the chosen WMS / WMTS layer of the current view is downloaded from the WMS / WMTS server and added as a custom background map to the map. It does not get updated when changing the view.
- Add User Defined Extent of Selected Layers to Background Maps (Offline)
- Define the Offline folder. The current map folder is set as default.
- Define the Resolution.
- Define the Extent (minimum easting, maximum easting, minimum northing, maximum northing). The current view extent is set as a default when opening the WMS / WMTS dialog but the entries are not updated automatically by changing the view. The extent can be updated by clicking the Set extent to current view button.
- With this offline option an image of the chosen WMS / WMTS layer of the defined extent is downloaded from the WMS / WMTS server and added as a custom background map to the map. It does not get updated when changing the view.
- Click the Add button.
- The WMS / WMTS layer appears in the table of the Manage Background Map dialog which can be displayed in the Background Map menu.
 The Background map (Geo-Referenced) dialog appears if no real world coordinates offset is set. Choose an offset and click the OK button.


![]() Web Map Services generally provide their images in multiple spatial reference systems. OCAD can only access to WMS / WMTS if the OCAD maps' coordinate system (ex. Swiss Grid CH1903+/LV95) is supported by the WMS / WMTS. Then the Spatial reference system is automatically set to the corresponding EPSG code. If the chosen coordinate system is not compatible with the WMS / WMTS, the Spatial reference system caption in the WMS / WMTS dialog remains empty.
Web Map Services generally provide their images in multiple spatial reference systems. OCAD can only access to WMS / WMTS if the OCAD maps' coordinate system (ex. Swiss Grid CH1903+/LV95) is supported by the WMS / WMTS. Then the Spatial reference system is automatically set to the corresponding EPSG code. If the chosen coordinate system is not compatible with the WMS / WMTS, the Spatial reference system caption in the WMS / WMTS dialog remains empty.
Click the Close button when finished.
Remove Selected Layers from Background Maps
To remove a WMS / WMTS layer or to manage its view, choose the Manage command from the Background Map menu:

WMS Examples

WMS layer indicating forest reserves that may not be entered.

WMS layer that contains cadastral survey data.