Thematic Map
OCAD ThematicMapper has been developped in a joint project of the OCAD Inc. and the Institute of Cartography and Geoinformation at ETH Zurich. As a core of the new application a step-by-step wizard guides - considering established cartographic rules - through the process of creating thematic maps. The wizard supports the user from the data analysis to the thematic symbolization and visualization. The OCAD ThematicMapper opens the OCAD software for the broad scope of thematic statistical maps.
OCAD ThematicMapper supports numerous visualization methods for point-like, linear and area-based representations like proportional symbols, lines and arrows as well as choropleths or various types of charts such as bar charts, pie charts and wing charts. These can be divided into groups for example, to make comparable the consumption of different energy sources of two years.
Create a Thematic Map 

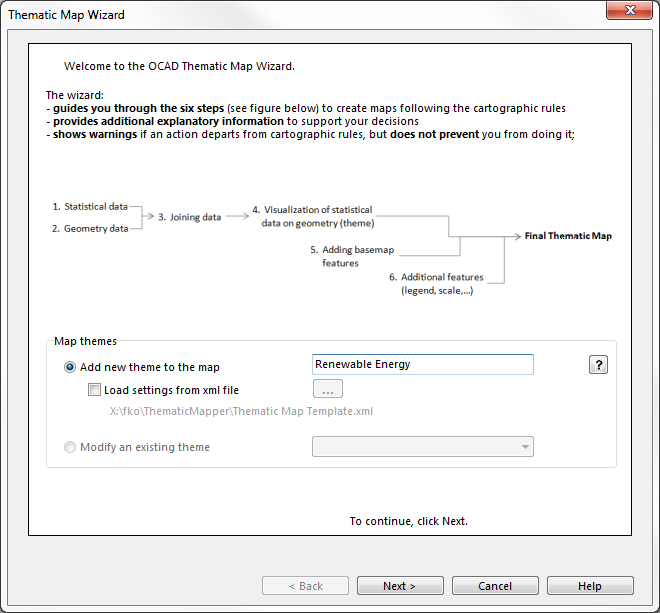
You can get access to the Thematic Map Wizard by opening a New File with choosing Thematic Map as a map type (this is done silently in the OCAD ThematicMapper edition) or by clicking Create with Wizard... in the Thematic Map menu. It opens the Welcome page of the wizard with an overview of the six steps to create a thematic map.
Requirements
OCAD ThematicMapper module requires the Borland Database Engine and the Microsoft Access Database Engine. See also system requirements.
Welcome Page
Add a new theme
Choose the Add new theme to the map option and enter a name for the theme (ex. population change). It is possible to load the wizard settings with the load settings from xml file option if you have already created thematic maps with the Thematic Map Wizard. The xml file can be choosen with the ... button.
![]() A map can have more than one theme (ex. choropleths + proportional symbols).
A map can have more than one theme (ex. choropleths + proportional symbols).
![]() The next button is only active if a theme name is set.
The next button is only active if a theme name is set.
Modify an existing theme
Use the option Modify an existing theme to change the settings of an already existing theme in your map file.
Step 1 - Statistical Data
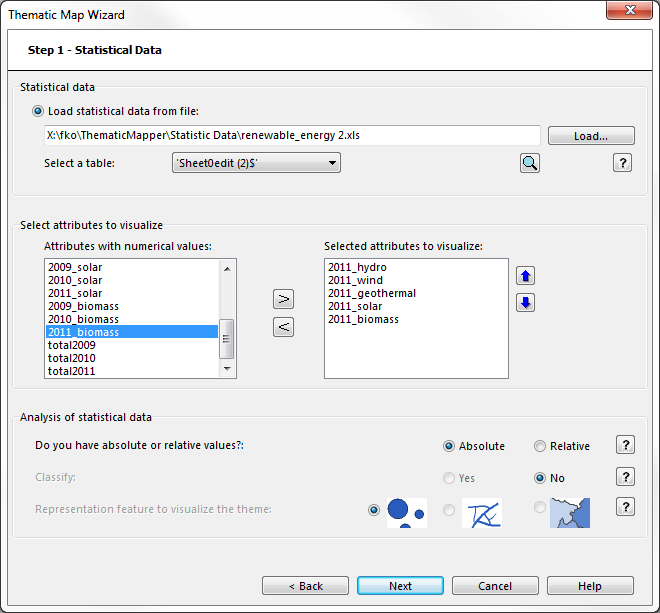
- Load statistical data from a file (*.xls, *.csv, *.dbf or *.txt).
- Select attributes to visualize either by double click, drag and drop or selecting them and pressing the [>]-button.
- Define if the attribute values are absolute or relative and if they shall be classified and choose the representation feature to visualize the theme.
- Click the Next button to go on with Step 2.
Step 2 - Geometry
- Load the geometry data from shape (*.shp) file.
- Set map scale and map size.
- Select a coordinate system.
The template file is loaded from: OCAD program path -> symbols\Thematic Map.ocd. Select another one by clicking on the Choose button.
- Click the Next button to go on with Step 3.
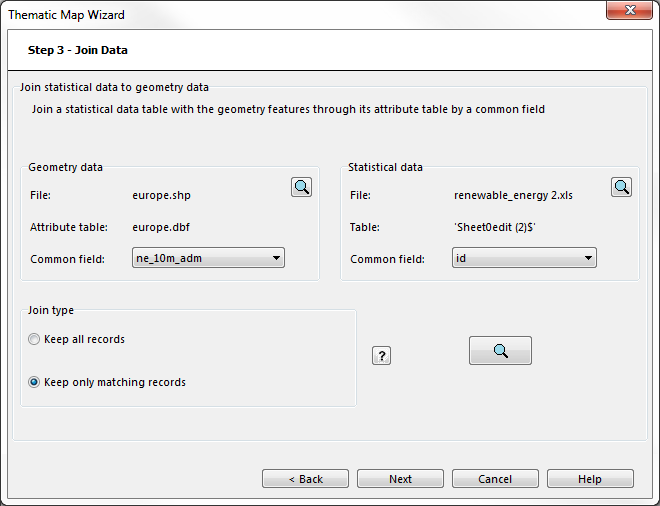
Step 3 - Join Data
- Choose a common field in both tables.
- Decide betweeon the options Keep all records (Left outer join) or Keep matching records (inner join).
- Click the Next button to go on with step 4.
Step 4 - Visualization of map's theme
Step 4.1: Choose a Visualization Method
- Choose a visualization method that is suitable for the chosen data. The wizard suggests the most appropriate method(s) according to the choices done in Step 1.
- Click the Next button to go on with step 4.
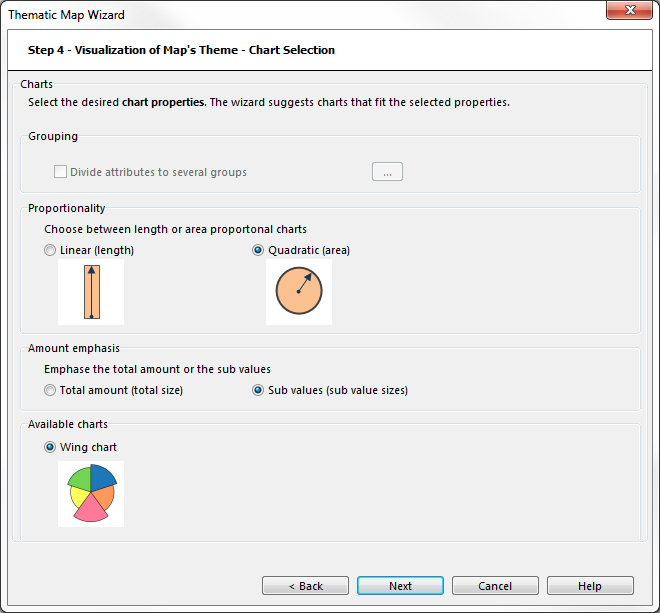
Step 4.1.1: Select the Chart Properties (Only for charts)
- Grouping: Choose if the attributes shall be divided into groups.
 The grouping option is only enabled if the number of selected attributes allows to create groups with a constant number of attributes.
- Select the Divide attributes to several groups option if they attributes should be divided to several groups.
- Click on the ... button to open the Define groups with drag and drop window.
- Select a number of groups and divide the attributes to the corresponding number of columns. Each column represents one group. Keep attention that have the same order of attributes.
- Enter the group names in the first row.
- Click Close to hide the Define groups with drag and drop window.
- Proportionality
- Choose if the chart size should be Linear (length) or Quadratic (area) proportional to the data values.
- Amount emphasis
- Choose between emphasizing the Total amount (total size) or the Sub values (sub value sizes).
- Choose one of the available charts.
- Click the Next button to go on.
Step 4.2: Visualization Properties
![]() The available visualization properties depend from the visualization method chosen in step 4.1.
The available visualization properties depend from the visualization method chosen in step 4.1.
![]() Click the
Click the lense icon to show/hide the preview on the right side of the wizard.
Proportional Symbols
- Choose a Visualization type like Proportional bar, Proportional circle or Proportional square.
- Define the symbol color by double-clicking on the attribute(s). The color picker opens and allows to define the color either with CMYK or RGB.
- Scale the symbol size by a Representation ratio or a Maximum size (height, radius, side length etc.). Define also a minimum size (height, radius etc.)
- Define a Bar width for the visualization type Proportional bar.
- Define the Stroke color and Stroke width and if the stroke width shall decrease for smaller symbols.
- Define the Opacity in a value range between 0 and 100%.
- Decide if 0 values and no data shall be shown.
- Click the Next button to go on.
Step 5 - Visualization of Basemap
The different layers are listed in the table.
- Additional basemap layers can be added
and layers can also be removed
. Make sure that the basemap features are suitable for this scale.
- The layer order can be changed by clicking the
 and
and  button.
 - Define the visualization properties (fill color, stroke color and width) for the geometry layer and the basemap layer(s).
- Click the Next button to go on.
Step 6 - Additional Map Elements
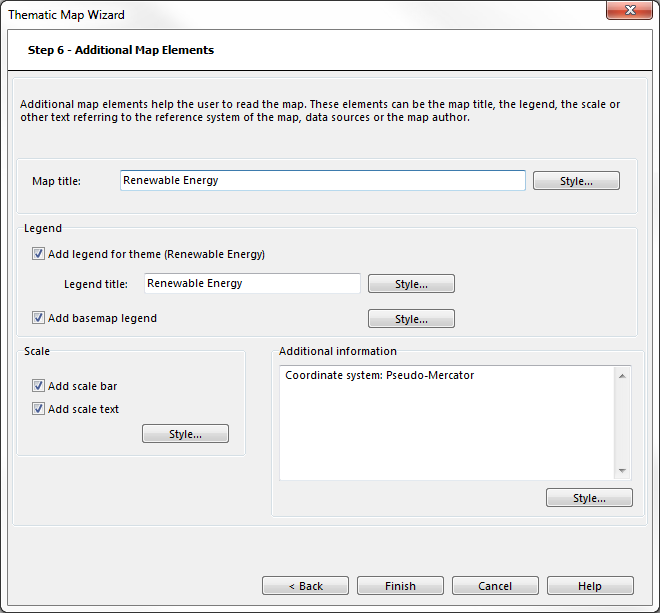
Additional map elements help the user to read the map. The elements can be moved and edited directly on the map.
- Enter a Map title and define it's style.
- Choose if a Legend for the theme shall be added, define it's title and the style.
- Choose if a Basemap legend shall be added.
- Choose if a Scale bar and/ or a Scale text shall be added.
- Decide if you want to add any Additional text information by typing the text into the box.
- Click on the Finish button to create the final map.
Create Thematic Maps with XML Script
OCAD XML scripts functionality does also support to create thematic maps with xml script
Thematic Map Samples
There are several sample maps available in the OCAD program subfolder Samples\ThematicMapper (usually C:\Program Files\OCAD\OCAD 20xx\Samples\ThematicMapper) as well as statistic data samples, geometry data samples and XML script samples.
![]() Open the sample maps by using Open Sample Map... in the File menu.
Open the sample maps by using Open Sample Map... in the File menu.
![]() Execute the XML scripts by using Execute XML Script in the File menu.
Execute the XML scripts by using Execute XML Script in the File menu.
Thematic Map Tutorials
- Visualisierung von Einwohnerdaten mit proportionalen Symbolen: Download as a PDF file. (Visualization of population data with proportional symbols)
- Visualisierung von Migrationsdaten mit proportionalen Pfeilen: Download as a PDF file. (Visualization of migration data with proportional arrows)
- Visualisierung von Daten zur Produktion erneuerbarer Energie mit unterteilten Flügeldiagrammen: Download as a PDF file. (Visualization of renewable energy production data with divided wing charts)
Thematic Map Videos
Link to Youtube Video Playlist
Back to Main Page
