Select: Difference between revisions
| (4 intermediate revisions by the same user not shown) | |||
| Line 72: | Line 72: | ||
[[File:Hint.jpg|hint]] If a corner is rectangular, the angle will be kept and the segment can be move only along this/these straight/s. | [[File:Hint.jpg|hint]] If a corner is rectangular, the angle will be kept and the segment can be move only along this/these straight/s. | ||
====Toggle between vertices==== | |||
Toggle between normal-dash-corner vertex with CTRL+SPACE key + click on vertex. | |||
====Toggle between segments==== | |||
Toggle between straight and bezier curve segment with CTRL+SPACE key + click on segment. | |||
Toggle multiple identical segments between straight/bezier with TAB+SPACE key + click on segment. | |||
[[File:ToggleVertextSegment.gif]] | |||
== Select and Edit Objects and Vertices - Varia== | == Select and Edit Objects and Vertices - Varia== | ||
| Line 191: | Line 201: | ||
<br /> | <br /> | ||
==Select Objects by Date= | ==Select Objects by Date [[File:Space.PNG]][[File:Mas40px.PNG|This function is available in OCAD Mapping Solution.|link=https://www.ocad.com/en/products/ocad-for-cartography]][[File:Ori40px.PNG|This function is available in OCAD Orienteering.|link=https://www.ocad.com/en/products/ocad-for-cartography]]== | ||
[[File: | |||
#Choose the Select Object by Date command from the Select menu. | With this function objects can be selected either by their '''Creation date''' or '''Modification date'''.<br> | ||
It allso allows to differ between '''All objects''' and '''All objects from selected symbols'''.<br> | |||
#Choose the '''Select Object by Date''' command from the '''Select''' menu. | |||
#A dialog appears where you can pick the date mode, enter the time frame and deside which symbols shall be selected. | #A dialog appears where you can pick the date mode, enter the time frame and deside which symbols shall be selected. | ||
#: | #:By default, the actual date is picked. | ||
#:Alternatively, click the '''Last modified''' button to select the last 100 changed objects. | |||
#:'''All objects from selected symbols''' means to select only the previously selected symbol within the time frame. | |||
#Click the OK button to select the object(s).<br> | #Click the OK button to select the object(s).<br> | ||
[[File:SelectObjectbyDate.png]] | [[File:SelectObjectbyDate.png]] | ||
The '''Object Information''' dialog appears. | The '''[[Edit_Object#Object_Information|Object Information]]''' dialog appears. | ||
It's possible to sort the values by double clicking on the top row. | |||
Click on a object in the list to move to the corresponding object. | |||
[[File:SelectObjectbyDateSort.png]] | |||
==Select Object by Object Index [[File:Space.PNG]][[File:Mas40px.PNG|This function is available in OCAD Mapping Solution.|link=https://www.ocad.com/en/products/ocad-for-cartography]]== | ==Select Object by Object Index [[File:Space.PNG]][[File:Mas40px.PNG|This function is available in OCAD Mapping Solution.|link=https://www.ocad.com/en/products/ocad-for-cartography]]== | ||
Latest revision as of 17:35, 11 February 2024
Select and Edit Object 


Choose Select and Edit Object in the Select menu or click the Select and Edit Object icon ![]() in the Editing and Drawing Toolbar to select and edit an object. The cursor changes to a black arrow like on the icon
in the Editing and Drawing Toolbar to select and edit an object. The cursor changes to a black arrow like on the icon ![]() . You are now in the Select and Edit Object mode.
. You are now in the Select and Edit Object mode.

- Objects can be selected by either clicking on them or clicking outside and drawing a window over the object. You can select multiple objects on the same time with this method.
- While moving/stretching/rotating an object, it's new position is shown with a draft line.
Stretch an Area or Line Object
If you have Object Stretching in the Object category in OCAD Preferences activated, you can click and drag the black squares ![]() (stretching points) to stretch the object. If you want to keep the shape of the object drag one of the corner points. If you drag one of the middle points, the object is distorted in the corresponding direction. If you hold down the
(stretching points) to stretch the object. If you want to keep the shape of the object drag one of the corner points. If you drag one of the middle points, the object is distorted in the corresponding direction. If you hold down the ![]() key while dragging a stretching point
key while dragging a stretching point ![]() , the object is stretched relative to the center.
, the object is stretched relative to the center.
Stretching does not work for point and text objects. If you stretch line text objects, the line is stretched and not the text.
If Object Stretching is not enabled, the stretching points ![]() are not visible.
are not visible.
Move an Object
Objects can be moved by clicking inside the object and moving the mouse after the object got selected. If the mouse is in a correct spot, it changeds to a cross shaped cursor ![]() .
.
Alternatively, click and drag one of the unfilled squares ![]() (moving points) to move the object. Each square represents a vertex. If a hole is selected, you can move it in the same way. Line, area and text objects don't need to be picked by their moving points to be moved, a simple click and drag in the object is sufficent.
(moving points) to move the object. Each square represents a vertex. If a hole is selected, you can move it in the same way. Line, area and text objects don't need to be picked by their moving points to be moved, a simple click and drag in the object is sufficent.
Objects can also be moved using the Arrow Keys. Additionally, press the Shift key to move the object faster.
Select Object and Edit Vertex
Choose Select Object and Edit Vertex in the Select menu or click the Select Object and Edit Vertex icon ![]() in the Editing and Drawing Toolbar to select and edit vertices. The cursor changes to a transparent arrow like on the icon
in the Editing and Drawing Toolbar to select and edit vertices. The cursor changes to a transparent arrow like on the icon ![]() . You are now in the Select Object and Edit Vertex mode.
Click on an object to select it.
. You are now in the Select Object and Edit Vertex mode.
Click on an object to select it.
For point objects, the middle of the symbol is represented by a large square ![]() . For line and area objects, the first point of the object is represented by a large square
. For line and area objects, the first point of the object is represented by a large square ![]() , vertices by small squares
, vertices by small squares ![]() , and the last point of the object by a cross X. With Bézier curves, circle symbols
, and the last point of the object by a cross X. With Bézier curves, circle symbols ![]() are used to represent the ends of the tangents.
are used to represent the ends of the tangents.

- Objects can be selected by either clicking on them or clicking outside and drawing a window over the object. You can select multiple objects on the same time with this method.
- While moving vertices, a draft line shows the connection to the previous and next unmoved vertex.
Move an Object
Objects can be moved by shifting vertices.
Objects can also be moved using the Arrow Keys. Additionally, press the Shift key to move the object faster.
Move Single Vertices
Once an object is selected you can move a single vertex of the selected object. Simply drag the desired point to the new position.
![]() Right angles are kept by holding down SHIFT key while moving a single vertex.
Right angles are kept by holding down SHIFT key while moving a single vertex.

Edit Vertices
Vertices are used to define the position of points, lines and areas. There are 3 types of vertices:
- Normal Vertex
 Add normal vertex
 - Corner Vertex
 Add corner vertex
 - Dash Vertex
 Add dash vertex
Which type you choose Vertices is of importance, especially for dashed or dotted lines.
Read more on the Vertices page.
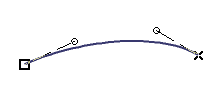
Edit a Bezier Vertex
Once an object containing Bezier vertices is selected you can edit those.

Drag a tangent endpoint O to edit the tangent.
Move Vertex With Arrow Keys
It is also possible to move a vertex with arrow keys. Double click on a vertex and move it then with the arrow keys. The selected vertex gets shown a little bigger after double click.

Move a Segment
A selected object can be changed by moving its segments. Just click on the segment and drag it.


![]() Move Line and Area Segements needs to be activated before in the OCAD Preferences.
Move Line and Area Segements needs to be activated before in the OCAD Preferences.
![]() If a corner is rectangular, the angle will be kept and the segment can be move only along this/these straight/s.
If a corner is rectangular, the angle will be kept and the segment can be move only along this/these straight/s.
Toggle between vertices
Toggle between normal-dash-corner vertex with CTRL+SPACE key + click on vertex.
Toggle between segments
Toggle between straight and bezier curve segment with CTRL+SPACE key + click on segment.
Toggle multiple identical segments between straight/bezier with TAB+SPACE key + click on segment.

Select and Edit Objects and Vertices - Varia
Settings for Select and Edit Objects and Vertices
If you have enabled the Auto select symbol when selecting object option in the Symbol category of OCAD Preferences, the corresponding symbol is automatically selected when selecting an object. This does not work for a selection of multiple objects.
Disable Context menu in drawing area in the GUI (Graphical User Interface) category of OCAD Preferences to switch easily between the current Drawing mode and the Select Object and Edit Vertex mode by a simple click with the right mouse button on the drawing area. If this option is enabled, the context menu appears by clicking on the drawing area with the right mouse button. Read more about the context menu on the OCAD Preferences page.

Select a Hole in an Area
It is possible to select a hole in an area object by clicking inside the desired hole. Only the hole and its vertices will be selected. You can accomplish editing operations (e.g. Enlarge/Reduce, Fill, Rotate, Move or Delete) as for a normal area object. Find more about cutting holes on the Edit Object page.
Move neighboring segments and congruent vertices
If you have objects with congruent vertices and/or neighbouring segments, you can move their vertices and segments together.
- For vertices, at least three congruent vertices in a row must have exactly the same position.
- For segments, at least two congruent vertices in a row must have exactly the same position.
First select the vertex or the segment to be shifted, then press the Tabulator key and move the vertex/segment.

![]() This function won't work if there's even a small offsett between the vertices. Use the Ctrl button for line tracing, Snapping or the Fill function to be sure the vertices of the different objects are at exact the same place.
This function won't work if there's even a small offsett between the vertices. Use the Ctrl button for line tracing, Snapping or the Fill function to be sure the vertices of the different objects are at exact the same place.
![]() Activate Move line and area segments to shift segments and Move closed start and end points of line and area objects together in the OCAD Preferences to not get trouble if one of the three vertices is a start or end point and.
Activate Move line and area segments to shift segments and Move closed start and end points of line and area objects together in the OCAD Preferences to not get trouble if one of the three vertices is a start or end point and.
Select and Edit Multiple Objects
Drag an area in the ![]() Select and Edit Object or
Select and Edit Object or ![]() Select Object and Edit Vertex mode to select all objects which are in it.
Select Object and Edit Vertex mode to select all objects which are in it.
You can choose between two modes to select multiple objects in the Select category of OCAD Preferences in the Options menu: Either all objects must be with at least one vertex in the selection or all objects must be completely in the selection.

Alternatively, you can select every object individually by holding the Shift key while clicking the objects (or remove from selected objects, if already selected before).
In the ![]() Select and Edit Object mode it is possible to enlarge or reduce a selection of objects. For that purpose, drag one of the black squares
Select and Edit Object mode it is possible to enlarge or reduce a selection of objects. For that purpose, drag one of the black squares ![]() in the desired direction.
in the desired direction.
It is also possible to move a selection of objects in both modes. If you move the mouse over the selection the cursor changes its appearance to ![]() . By clicking and dragging the selection or using the arrow keys you can move it.
. By clicking and dragging the selection or using the arrow keys you can move it.
![]() Enable the Move multiple objects option in the Warnings category of OCAD Preferences to get a warning message when you move multiple objects. Use this option in order to guard against moving multiple objects accidentally.
Enable the Move multiple objects option in the Warnings category of OCAD Preferences to get a warning message when you move multiple objects. Use this option in order to guard against moving multiple objects accidentally.
Select Object with Lasso Tool
- Choose Select Object with Lasso Tool in the Select menu or click the Select Object with Lasso Tool icon
 in the Editing and Drawing Toolbar. The transparent arrow with a loop behind shows that you are now in the Select Object with Lasso Tool mode.
 - Draw a Freehand line by holding down the left mouse button when moving the mouse cursor.
- Finish the lasso line by leaving the left mouse key. The objects within the lasso line are selected.
![]() It depends from the Select Preferences if objects that are only partially within the lasso line are selected.
It depends from the Select Preferences if objects that are only partially within the lasso line are selected.

Select Objects by Symbol
Choose Select Objects by Symbol in the Select menu to select all objects with certain symbols or in a certain layer. As an example you can select all roads. The Select By Symbol dialog box appears.

All objects with a selected symbol
Choose this option and click on the OK button to select all objects with the selected symbol(s). Select the symbol(s) before you choose the Select Objects by Symbol command. For the example given above, select all road symbols. All roads are selected and you can for example measure their total length or make a modification to them.
All objects in layer
If you import files like PDF, DXF, Adobe Illustrator or OpenStreetMap with layer information, the layer information does not get lost, though OCAD does not support layers as they are known in Adobe Illustrator or similar applications. Choose the All objects in a layer option to select all objects which are in the same layer. Choose a layer in the dropdown list. If you have selected an object of this layer before choosing this command, the layer name will already be filled in. For example, choose the layer which contains all the roads and click the OK button to select all roads.
Objects without symbol
Choose this option and click on the OK button to select all Unsymbolized Objects.
Objects with unknown symbol
Choose this option and click on the OK button to select all Objects with Unknown Symbol.
Objects with invalid symbol type
Choose this option and click on the OK button to select all Objects with Invalid Symbol Type.
Graphic objects
Choose this option and click on the OK button to select all Graphic Objects.
Image objects
Choose this option and click on the OK button to select all Image Objects.
Select Objects by Property
Choose Select Objects by Property in the Select menu to select objects by particular properties. The Select by Property dialog box appears.

In the Select field you can choose between different options:
- The All Objects option means that the selection is made out of all objects on the map.
- The Objects with a selected symbol option means that the selection is reduced to the objects with a symbol that is selected in the symbol box.
- The All objects in Layer option means that the selection is made out of all objects which are in the same layer. .
- The Object without Symbol option means that the selection is made out of all Objects without Symbol.
- The Grafic Object option means that the selection is made out of all Grafic Objects.
- The Image Object option means that the selection is made out of all Image Objects.
In the Condition field you can impose conditions.
- Choose a property like Number of vertices, Elevation [m], Length [m], Area [m] or Object Type in the first box.
- Choose an operator like < > = in the second box.
- Enter a condition value in the third box.
Click the Select button to continue.
The Object Information table dialog box appears and the desired objects are selected. The number of selected objects is shown in the header of the dialog. You have now different options:
- Click the Save Selection button to save the selection.
- Click the Report button to save a report in a Microsoft Excel (.xls), Text (.txt), Website (.htm) or Microsoft Word (.doc) file.
- Click the Close button to close the dialog and return to the Select Objects by Property dialog.
![]() The Object Information and the Select Objects by Property dialog are non-modal dialogs. This means, that you can edit the map without closing the dialogs. If the Object Information dialog box is opened, you can for example select other objects on the map. The object information is refreshed automatically.
The Object Information and the Select Objects by Property dialog are non-modal dialogs. This means, that you can edit the map without closing the dialogs. If the Object Information dialog box is opened, you can for example select other objects on the map. The object information is refreshed automatically.
Example 1: Select all objects which are longer than 200m.
- Choose the All objects option in the Select Objects by Property dialog.
- In the Condition field choose Length [m] as the Property, > as an operator and enter the value 200.
- Click on the Select button to continue. The Object Information table dialog box appears. All objects longer than 200m are selected and listed in the table dialog box.
Example 2: Select all lakes and ponds with an area smaller or equal than 3000m2.
- Select the symbol for a lake and a pond in the symbol box. It is possible to do this even if the Select Objects by Property dialog is opened because it is a non-modal dialog.
- Choose the Objects with a selected symbol option in the Select Objects by Property dialog.
- In the Condition field choose Area [m2] as the Property, <= as an operator and enter the value 3000.
- Click on the Select button to continue. The Object Information table dialog box appears. All lakes and ponds with an area smaller or equal than 3000m2 are selected and listed in the table dialog box.

Select Objects by Date
With this function objects can be selected either by their Creation date or Modification date.
It allso allows to differ between All objects and All objects from selected symbols.
- Choose the Select Object by Date command from the Select menu.
- A dialog appears where you can pick the date mode, enter the time frame and deside which symbols shall be selected.
- By default, the actual date is picked.
- Alternatively, click the Last modified button to select the last 100 changed objects.
- All objects from selected symbols means to select only the previously selected symbol within the time frame.
- Click the OK button to select the object(s).

The Object Information dialog appears.
It's possible to sort the values by double clicking on the top row.
Click on a object in the list to move to the corresponding object.

Select Object by Object Index
With this function objects can be selected by their object index. The object index is an internal index for each object and cannot be changed. The object information is shown in the Object Information dialog which can be found in the Object menu.
Choose the Select Object by Object Index command from the Select menu. A dialog appears where you can enter the object index. Click the OK button to select the object.
The first drawn or imported object has the object index 1. The object index is a number and unique in a ocd file.
Select Duplicate Objects
Choose this function from the Select menu.
With this function you can find all duplicate objects. The objects must be identical and on the same position that they can be found. The selection can be saved with OCAD Mapping Solution right after carrying out the command (Save a Selection).
![]() Objects with different symbols whose geometry is identical are not selected.
Objects with different symbols whose geometry is identical are not selected.
Select Self Intersected Objects
Choose this function from the Select menu.
This function selects all line, area and line text objects with a self-intersecting geometry. The selection can be saved right after carrying out the command (Save a Selection).
Select Objects with Invalid Geometry
Choose this function from the Select menu to select all objects with invalid geometry.
The following objects are selected:
- Objects which start with a hole: OCAD selects all objects, whose first vertex has a hole flag. This can be a hole with no exterior ring.
- Damaged Bezier curves: A Bezier curve is composed of minimum a start point, a first Bezier vertex, a second Bezier vertex and an end point (see illustration).
- If a Bezier curve has less than these vertices, it is selected.

- Line objects with invalid hole flag: A line object which contains a vertex with a hole flag is selected.
- Area object with invalid geometry: OCAD selects all area objects, whose vertices have the same coordinate. This problem can occur when the scale is reduced.
- Line objects with the same start and end point: This problem can occur when the scale is reduced. In this case, the start and end point of a really short line object can fall together.
- Area object with an invalid hole: A hole must have minimum three vertices. A hole with one or two vertices is selected (see illustration).

- Area object with an invalid exterior ring: An invalid exterior ring can be a ring with only one vertex (see illustration).

- Graphic object with invalid object type: Graphic Objects are either areas or lines. OCAD selects all other types.
- Object with invalid number of vertices: A line object must have minimum two vertices and an area object three. If they have less vertices, they are selected. In addition, text and line text objects containing no text are selected. To select line text objects with a too short line, use the Select Line Text Objects with too Short Line function.
It is difficult to get an object with invalid geometry. It can happen when you import files or change the scale.
After choosing the function, OCAD searches objects with invalid geometry, selects them and displays them in the Object Information dialog. In addition, a text file opens with a report. This file is stored in a temporary folder.

The selected objects should be deleted, otherwise they can cause problems when exporting files like PDF or Shape.
The object index is indicated in the Object Information dialog as well as in the text file. Use the Select Object by Object Index function to find the object later with help of the object index.
Select Line Text Objects with Line too Short
Choose this function from the Select menu.
This function selects all line text objects whose text is longer than the line length. This can happen when the font of a text symbol has been increased. The selection can be saved right after carrying out the command (Save a Selection).
Select Group
If you have Grouped objects on your map, you can select them easily by choosing the Select Group command in the Select menu.
Select All
Choose Select All in the Select menu to select all symbolized (also from protected and hidden symbols), unsymbolized, graphic and image objects. Layout objects are not selected.
Clear Selection
Choose Clear Selection in the Select menu or press the Esc key to deselect all objects.
Invert Selection
Choose Invert Selection in the Select menu to deselect all selected objects and select all unselected object. Layout objects are not selected.
Select Next Object
Select an object behind an object already selected
This menu item is only available if an object is already selected.
Choose Select Next Object in the Select menu to select an object which is behind an object that is already selected.
![]() To select an object behind an already selected object you can also keep the Alt or Alt Gr key pressed and click on the already selected object.
To select an object behind an already selected object you can also keep the Alt or Alt Gr key pressed and click on the already selected object.

Select next object for editing
Select a line object and choose the ![]() Cut function. If you press the Alt key, the cursor changes to the
Cut function. If you press the Alt key, the cursor changes to the ![]() Select Object and Edit Vertex mode. Keep the Alt key pressed and click the next object you want to cut. Release the Alt key and continue with the cutting.
Select Object and Edit Vertex mode. Keep the Alt key pressed and click the next object you want to cut. Release the Alt key and continue with the cutting.
This works also with the Reshape function and with adding/removing Vertices.

Save Selection
Choose Save Selection in the Select menu to save the current selection. The Save Selection dialog box appears.

Enter the name of the selection and click on the Save button.
![]() Choose Select Objects by Symbol in the Select menu to select all objects of the selected symbols.
Choose Select Objects by Symbol in the Select menu to select all objects of the selected symbols.
![]() Due to performance issues the number of objects in a selection is limited by 50'000 objects.
Due to performance issues the number of objects in a selection is limited by 50'000 objects.
Reload Selection
Choose Reload Selection in the Select menu to select all objects from a saved selection. Choose a saved selection and the Reload Selection dialog appears.

The list of the selected objects with aditional information is shown in the dialog. The number of selected objects is shown in the caption in brackets.
Select one object in the list and OCAD selects this object in the drawing area in the edit mode.
![]() The Reload Selection function selects also symbolized objects from symbols with the status Protect or Hide.
The Reload Selection function selects also symbolized objects from symbols with the status Protect or Hide.
Edit Selection
Choose Edit Selection in the Select menu to rename or delete saved selections.

Delete a Selection
Select a selection in the Edit Selection dialog and click the Delete button to delete it. Click the Delete all button to delete all selections.
Rename a Selection
Select a selection in the Edit Selection dialog. Then enter a new name for the selection in the Selection name field. Click the Rename button to apply the new name.
Click the OK button to save and quit the Edit Selection dialog. Click the Cancel button to close the Edit Selection dialog without saving any changes.
Back to Main Page