Move Parallel and Move and Duplicate Parallel by Specified Distance: Difference between revisions
| Line 1: | Line 1: | ||
==Move Parallel== | ==Move Parallel== | ||
Choose this function in the '''Object''' menu or click the [[File:Icon_MoveParallel.PNG]] '''Move Parallel''' button in the '''Editing and Drawing Toolbar'''. | Choose this function in the '''Object''' menu or click the [[File:Icon_MoveParallel.PNG]] '''Move Parallel''' button in the '''Editing and Drawing Toolbar'''. | ||
This mode is activated when a line or area object is selected. | This mode is activated when a line, line text or area object is selected. | ||
Choose this function to move a line (or the outline of an area) parallel to the original line. | Choose this function to move a line (or the outline of an area) parallel to the original line. | ||
# Select a line, line text, or area object. | |||
# Choose the [[File:Icon_MoveParallel.PNG]] '''Move Parallel''' function. | |||
# Drag a vertex of the selected object in the desired direction. A help line with vertices gives a preview of the parallel moved object. | |||
# Drop the object to finish parallel moving. | |||
This mode is especially useful when writing street names on curved streets. To draw the line for the line text, follow the center line of the street and enter the text. Then select this mode to move the text to the desired position. The line of the text will stay parallel to the original line and follows curves so that a constant distance from the original line is kept. | This mode is especially useful when writing street names on curved streets. To draw the line for the line text, follow the center line of the street and enter the text. Then select this mode to move the text to the desired position. The line of the text will stay parallel to the original line and follows curves so that a constant distance from the original line is kept. | ||
Revision as of 08:51, 29 May 2012
Move Parallel
Choose this function in the Object menu or click the Move Parallel button in the Editing and Drawing Toolbar.
This mode is activated when a line, line text or area object is selected.
Choose this function to move a line (or the outline of an area) parallel to the original line.
- Select a line, line text, or area object.
- Choose the
Move Parallel function.
- Drag a vertex of the selected object in the desired direction. A help line with vertices gives a preview of the parallel moved object.
- Drop the object to finish parallel moving.
This mode is especially useful when writing street names on curved streets. To draw the line for the line text, follow the center line of the street and enter the text. Then select this mode to move the text to the desired position. The line of the text will stay parallel to the original line and follows curves so that a constant distance from the original line is kept.
Move Parallel with Distance

|
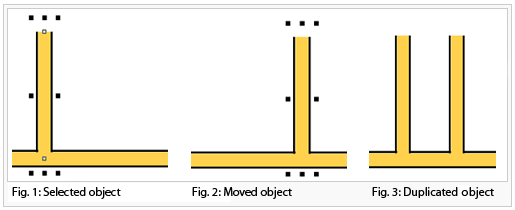
To move an object parallel with a certain distance, select the object and choose Move Parallel with Distance from Object menu.
Move or Duplicate the orginal object on Paper distance (mm) or by Real world coordinates (m).
