Database
Introduction to Database Connection
In OCAD information which is stored in a database can be added to an object (e.g. position of the object, name of the place, URL-Link, length of the object etc.). A database is structured as follows:
General Structure of a Database
Table
A database usually consists of several tables. There are different forms of databases: In a flat file database like dBase, each table is a file and all tables in a folder form the database. In other databases like Microsoft Access or in spreadsheet programs like Microsoft Excel all tables of the database are in the same file.
Record
A table consists of records. A record is a row in the table and contains the information about an OCAD object.
Field
A record consists of fields. Each field contains a single information of an OCAD object, which is described by the corresponding record. Normally this information is a number, but can also be text. For example the x-coordinate of the objects' position. Each record has a key field, which is used to identify the record. This is mostly a number.
Example
The following table contains three records. Each record describes an area object in OCAD which describes real estate and consists of six fields: ID, SIZE, OWNER and XCOOR, YCOOR, TYPE. The ID is the key field, which is used by OCAD to identify the record. The SIZE describes the magnitude of the area. In the OWNER field, there is a number which links to a Secondary Table. The fourth and the fifth field contain the coordinate and in the last field, the type of the area is indicated.
| ID | SIZE | OWNER | XCOOR | YCOOR | TYPE |
|---|---|---|---|---|---|
| 1 | 724 | 29 | 754870 | 233386 | Private Building Area |
| 2 | 702 | 12 | 754900 | 233442 | School |
| 3 | 422 | 13 | 754815 | 233505 | Private Building Area |
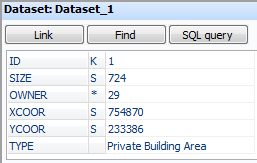
In OCAD a record is displayed as follows when the corresponding object is selected:
Dataset
To connect to a table OCAD uses a dataset. The dataset contains the link to the database, the name of the table, the name of the key field and information about other special fields. You can have several datasets for the same OCAD map.
Manage Database Connections 

Create a New Database Connection
You have to create a dataset, which can be done by following these steps:
- Choose the Manage Database Connections command in the Database menu.
- The Manage Database Connections dialog opens.
- Click the New button.
- The New Dataset dialog appears. Choose the Create new database file option and select a Database type or choose the Use existing datasource option. Note that the Access Database Engine has to be installed if one of the Mircosoft Access or Mircosoft Excel database type options is chosen. See at Map Information in the Map menu if the Access Database Engine is installed.
- If a new database file is created, the Save Database File dialog appears. If an existing datasource is used, the location of the datasource has to be specified by clicking the Browse button or connecting via ODBC in the Manage Database Connections dialog.
- The dataset is created. Your OCAD map is now connected to the database.
When a database connection is newly created, OCAD displays a dialog after closing the Manage Database Connections dialog. You can check two options in this dialog:
General Settings for the Selected Dataset
The first of the three tabs in the Manage Database Connections dialog is about general settings of the currently selected dataset. In the first part the source of the database is given. It can be either a Database file or an ODBC data source. Click the Edit Fields... button to edit the fields of the selected dataset (only available for dBase format).
In the lower part of this tab, the Table which contains the desired information can be chosen. Define a Key field so that OCAD can identify the record. This field is mostly named ID.
dBase
When OCAD is connected with a dBase table there are additional functions available. In dBase each table is a file. It is possible to edit field settings within OCAD. If a dBase table is loaded, the Edit fields button is enabled in the General tab of the Manage Database Connections dialog. Click it to open the dBase Table dialog.
 OCAD can only link dBase files in the 32 bit version. In 64 bit version a warning appears when opening the ocd file. The warning can be switched on/off in the Preferences in the submenu Warnings.
 You can convert these databases to Microsoft Access in the Manage Database Connections dialog with convert or open this ocd file in OCAD in 32 bit version.
This dialog box lists the fields of the dBase table. Each field is displayed in a line. There are several functions available:
- Name: Enter here the name for the field. The name must start with a letter and may contain up to 10 letters and numbers. Letters are converted to capital letters.
- Type: Choose either Character (C), Number (N) or Float (F) as a field type.
- Length: Enter here the number of characters for the field.
- Decimals: This filed is only active if the data type is Float. Enter the number of decimals.
- Move Up: Click this icon to move the selected field one line upwards.
- Move Down: Click this icon to move the selected field one line downwards.
- Insert: Click this button to add a field. After adding the new field, the dBase table is restructured. Existing information is preserved.
- Delete: Click this button to delete the selected field.
- Character encoding: A character encoding type can be chosen in the corresponding dropdown list.
![]() If you do not have installed the Borland Database Engine (BDE), only filenames with less than 8 characters are allowed (Example: 'test5678.dbf'). Click the Map Information command in the Map menu to see, if the Borland Database Engine is installed or not. It can be downloaded here.
If you do not have installed the Borland Database Engine (BDE), only filenames with less than 8 characters are allowed (Example: 'test5678.dbf'). Click the Map Information command in the Map menu to see, if the Borland Database Engine is installed or not. It can be downloaded here.
Remove
With this function, you can remove the selected dataset.
Rename
This function allows you to change the selected dataset name.
- Choose your dataset, which you want to rename.
- Click on the "Rename..." Button.
- Enter the new dataset name.
- Click on the "OK" Button.
Convert
It allows you to convert your datasets to Microsoft access either each as single file or all datasets in one file. This works only if your datasets are in dBase (*.dbf).
- Get to Manage Database Connections in Database.
- Click on the "Convert" Button and the Convert dBase to Microsoft Access dialog opens.
- Pick your datasets, which shall get converted and if each dataset shall be in a new file or all datasets in a single file.
- Click on "OK" to end the process.
Relink
This function allows you to change the directory of your datasets.
- All dataset pathes from the Old directory are relinked to the New directory.
- Dataset pathes that are different from the Old directory are not changed.
View and edit table
This function shows you the elements of the dataset and allows you to edit them.

ODBC
You can access to databases via ODBC (Open Manage Database Connection). This is an interface to connect to all kind of databases.
Click the ODBC button in the Manage Database Connections dialog to create a new ODBC data source or to modify an existing data source. The ODBC Data Source Administrator is started. This is a Microsoft program and contains its own online help. Here are just some hints: Normally you create a new User DNS.
- For a connection to an Excel file, you select the Excel driver and the Excel (*.xls) file.
- For a connection to an Access database, you select the Access driver and the Access (*.mdb) file.
- For a connection to a flat file database like dBase you do not select the dBase file. Instead you select the folder where the dBase file is.
Create and Edit Secondary Tables
Secondary tables are tables which are linked to a field in the primary table. This is especially useful, when additional information is added. For example, imagine a map with all real estates of a village. Then, each owner would get a number, which is stored in the primary table. The secondary table would be linked to this number and would contain all names, addresses and contact information of the owners. If an owner changed his contact information, you would update the changes in the secondary table, which would have an effect on all his real estates.
In OCAD, secondary tables can be managed in the Secondary Tables tab of the Manage Database Connections dialog. Click the Add button to add a new one. The Secondary Table dialog appears. First, you have to define the Reference field in the primary table, which is the field, the secondary table is linked to. Then, choose the secondary table which must be in the same dataset. Finally, define a Key field for the secondary table and click the OK button.
Click the Edit button to change the settings of the secondary table.
Click the Remove button to remove the selected secondary table.
Fields which are linked to a secondary table are indicated with an asterisk (see below).
Click the asterisk to display the secondary table:
Define Special Fields
Open this tab to define special fields. Special fields are automatically updated in the database when a modification to the object in the map is made. However, it does not work in the other direction. If you change such a field in the table, the object is not updated.
OCAD provides the following special fields:
- Symbol field: The symbol number of the object is automatically copied to the database field which you have chosen in the dropdown list. It is possible to let new symbols get assigned, when the field value is changed.
- Assign new symbol when changing field value: When changing the symbol number in the database field then OCAD change the symbol of the linked object.
- Example:
- Object is assigned to symbol number 900.002.
- When changing the symbol number to 900.003 in the database box then OCAD changes the symbol.
- Text field: For text and line text objects, the text of the objects is automatically copied to the database field which you have chosen in the dropdown list. For multiline text, only the first line is copied.
- Size field: The size of the object is automatically copied to the database field which you have chosen in the dropdown list. For line objects the length and for area objects the area is taken. Adjust the units in the corresponding fields as well as the number of decimals.
- Easting: For point objects the horizontal coordinate is copied to the chosen database field. For line, area and text objects it is the horizontal coordinate of the start point.
- Northing: For point objects the vertical coordinate is copied to the chosen database field. For line, area and text objects it is the vertical coordinate of the start point.
- Angle: For point and text objects the angle is copied to the chosen database field.
- Date: The date of the object is automatically copied to the database field which you have chosen in the dropdown list. It's value get's adjusted, whenever you change the object.
Database Box 

Link Object
When the map was connected to a database, the Database Box appears below the Symbol Box.
![]() The Database Box is shown right below the Symbol Box by default. Only one row of the Symbol Box is visible. To move the Database Box down, simply click and drag the grey bar between symbol and database box down.
The Database Box is shown right below the Symbol Box by default. Only one row of the Symbol Box is visible. To move the Database Box down, simply click and drag the grey bar between symbol and database box down.
To link an object:
- Select the object which you want to link to a record. (Note: To select an object, it must not be protected or hidden.)
- Click the Link button in the Database Box.
- The Link Object dialog appears.
- Select the dataset which contains the desired record.
- Enter a key. This number is used for the key field. Unless you make any changes, OCAD takes always the next free integer.
- Check the Create new record option. If the object is to be linked to a record which already exists, uncheck this option and enter the key of the record.
- Click the OK button.
- The Record is shown in the Database Box now.
To remove a link:
- Select the object which the link is to be removed from.
- Click the Link button in the Database Box.
- The Link Object dialog appears.
- Click the Remove button.
- The link is removed from the object but the record is not deleted from the table.
Learn how to link multiple objects to records in the Create and Update Records article.
Records in OCAD
This is how a record looks in the Database Box:
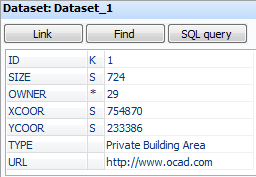
The Key field is indicated with a K behind the field name. A S means, that this is a Special Field. A link to a Secondary Table is indicated with an asterisk. If no sign appears in this column, it is just a normal field.
It is possible to open an URL directly from the Database Box. Press the Ctrl key and click the field. OCAD opens the URL in the web browser. This works for local files (for example a picture), too:
OCAD opens the file in the default program.
Find Object
Find an object with help of the key by clicking the Find button in the Database Box. The Find Object dialog appears.
Select a dataset and enter the key. Click the OK button. OCAD will display the record in the Dialog Box and will move the view to the corresponding object. Furthermore, the object will be selected.
SQL Query
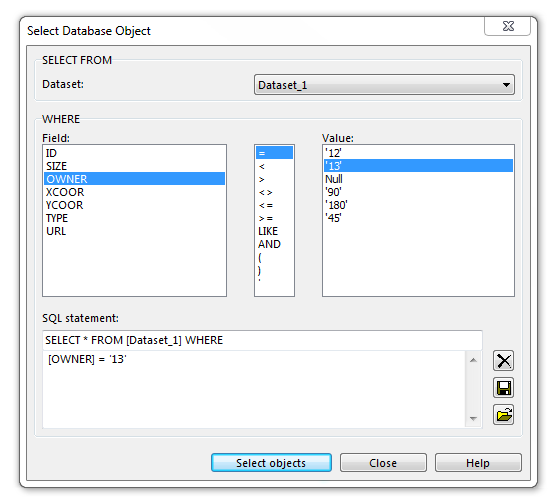
Click the SQL Query button to select database objects by a certain criteria. The Select Database Object dialog appears.
In the SELECT FROM part of the dialog, choose a dataset.
In the WHERE part you can give a condition:
- Field: Choose a field of the selected dataset. When you double-click a field name it is added to the SQL statement box.
- Operator: Select an operator. When you double-click an operator it is added to the SQL statement box.
- Value: Select a Value. When you double-click a value it is added to the SQL statement box.
The SQL statement should always contain the components FIELD - OPERATOR - VALUE (example: Length > 430). An SQL statement can be cleared, saved or loaded by clicking the corresponding button to the right of the SQL statement box.
Click the Select button to start the database query. The found objects are selected and the corresponding records are displayed in a table.
Create and Update Database Records 

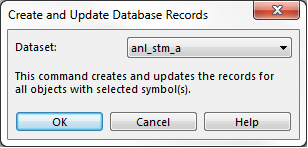
With this function, new records can be created or updated for all objects with the selected symbol:
- Choose the Create and Update Database Records command in the Database menu.
- The Create and Update Database Records dialog appears.
- Select the Dataset the records are to be created in and click the OK button.
- New records are created and linked to all objects with the selected symbol(s). The next free integers are used for the key fields. If they are already linked to records, the records are updated. Special Fields are updated automatically.
As an example, assume that you want to create an OCAD Internet Map with a street find function. All street names must be linked to the database. OCAD provides a simple way to create these links.
- Make sure you have enabled the Special Fields for text.
- Select all symbols which are used for street names.
- Choose the Create and Update Records command from the Database menu.
- Select the dataset and click OK.
Now all street names are linked to a record which contains the street name itself as a field.
Update Special Fields from Database Records 

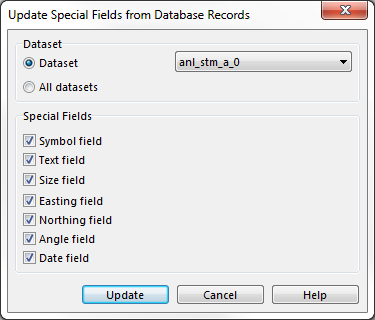
Special Fields are only updated automatically when the linked object is edited. When objects are linked to a database and the database is edited with another program, the Special Fields are not updated, until you use the Update Special Fields from Database Records function in the Database menu. The same applies for fields which were edited manually in OCAD.
- Choose in the database pannel Update Special Fields from Database Records and the dialog opens.
- Select a dataset or choose the All datasets option.
- Then, check all special fields you want to update and click the Update button.
Create Objects from Database Records 

With this option, objects can be created with location and text data from the database.
- Select the symbol the new objects shall get. This must be a point or a text symbol.
- Choose the Create Objects from Database Records command in the Database menu.
- The Create Objects from Database Records dialog appears.
- Select the dataset which contains the information the object is to be created with.
- Select the field for the Easting and Northing which determines the position of the new object.
If the dataset is a line text object with two points (P1,P2), P1 has the coordinates of the Easting and Northing fields. The length of the line text is added to the P2 easting coordinate.
- Choose between m, km and deg as a unit of measure.
- If a text symbol was selected in the beginning, you have to select a text field. The content of the text field is used as the text of the OCAD object.
- Enter a condition. This condition must be an SQL statement: FIELDNAME OPERATOR VALUE (Examples: SIZE > 500, City='Baar'). If this field is empty, all records in the table get an object on the map.
- You can give a horizontal and vertical offset. This is useful for example when you want to import city names. First create a point object for each city, then create a text object with the city name with an offset, so that the name does not overlap with the point object.
- Finally, click the OK button.
Assign Symbols from Database Records 

After importing for example a Shape file the objects have no symbol assigned and appear as Unsymbolized Objects. With this command you can use the information in the database table to assign OCAD symbols to the objects.
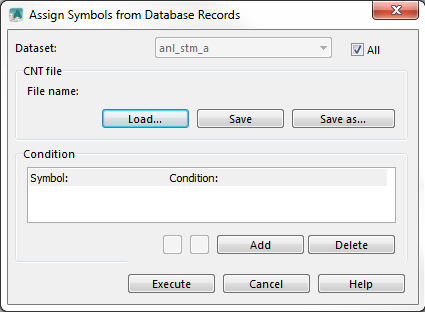
Choose the Assign Symbols from Database Records command in the Database menu. The Assign Symbols from Database Records dialog appears.
In this dialog box you can create a list of conditions. You can save the list to a condition file (*.cnt) for later use. You can load an existing condition file to modify or execute it. You have the following possibilities in the Assign Symbols by Records dialog:
- Dataset: Select here the dataset which should be used to assign symbols. Check All to execute the condition for all datasets.
- Load: Click this button to load an existing condition file (*.cnt).
- Save: Click this button to save the changes to a condition file (*.cnt).
- Save as: Click this button to save the changes to a different condition file (*.cnt).
- Symbol: Select here a symbol. For those objects the condition is true, the symbol number will be assigned.
- Condition: Enter the condition here. This must be a SQL statement: FIELDNAME OPERATOR VALUE (Example: TYPE = 'BUILDING').
- Move up: Click this button to move up the selected condition.
- Move down: Click this button to move down the selected condition.
- Add: Click this button to add a condition to the list.
- Delete: Click this button to delete the selected condition.
- Execute: Click this button to execute the assignment.
![]() Assign Symbols from Database Records might make slow progress for big datasets. There is an alternative for shape files by chosing the option Use layer information from field in the Import Shape File dialog and Convert Imported Layers to Symbols... afterwards.
Assign Symbols from Database Records might make slow progress for big datasets. There is an alternative for shape files by chosing the option Use layer information from field in the Import Shape File dialog and Convert Imported Layers to Symbols... afterwards.
![]() If there is an apostrophe in the value then you have to add an addition apostrophe.
For example: 'RIVERNAME LIKE l' 'Avançon'
If there is an apostrophe in the value then you have to add an addition apostrophe.
For example: 'RIVERNAME LIKE l' 'Avançon'
Add Texts from Database Records 

With this function it is possible to add a text which is written in a field of a record to an OCAD object.
- Choose the Add Texts from Database Records command in the Database menu.
- The Add Texts from Database Records dialog appears.
- Choose a Dataset or check the All option to take all datasets into consideration.
- Choose the field which contains the Text to be added.
It's possible to assign a parameter condition for the text. - Assign a text or line text symbol. If no symbol is assigned, the text appears as Unsymbolized Objects.
- You can either replace the existing objects or add new objects.
- Enter an Object offset if you want to have the text slightly displaced from the existing object.
- Click the OK button.
Set Object Direction from Database Records 

With this function the object direction can be defined by an angle (in degrees) from a field of the database.
Choose the Define Object Directions from Database Records command from the Database menu. A dialog appears. Choose a Dataset in the dropdown list or check the All option to take all datasets into consideration. The define the Angle field.
Mathematical function: Optionally you can define a mathematical function. To convert Radians to Degrees enter *180/3.14159.
Click the OK button when finished.
The following things are rotated according to the angle field:
- Text objects
- Point objects
- The pattern of area objects
OCAD does not rotate line or line text objects!
Merge Objects from Database Records 

With this function, objects with the same value on a specified database field are merged. They also must have the same symbol.
Choose the Merge Objects from Database Records command in the Database menu. A dialog appears. Choose a Dataset or check the All option to take all datasets into consideration. Then choose the field with the value to be used for merging the objects. Click the OK button when finished.
The merged objects have to be linked again to the database.
You have different river segments on a map. Each river segment have the same river name. With the Merge Objects from Database Records function, they can easily be merged to one object.
Select Linked Objects 

Select Objects with Good Database Record Links
Choose this function in the Database menu to select all objects with a link to an existing record.
Select Objects with Broken Database Record Links
Choose this function in the Database menu to select all objects which are linked to a record but the record was not found.
Select Objects without Database Record Link from Selected Symbols
Choose this function in the Database menu to select all objects which are not linked to a record. OCAD checks only if a record link exists. OCAD does not check if the record link is broken or not. To check if the record links are broken choose Select Objects with Broken Database Record Links.
Select Objects Linked to the same Database Records
Choose this function in the Database menu. By choosing this function, multiple objects which link to the same record are selected.
Delete Database Records without Linked Object 

Use this function to delete unused database records for example after using the Part of Map function.
Choose Delete Records without Linked Object in the Database menu. The Delete Records without Linked Object dialog appears.
Select the dataset and click the Find button. OCAD checks for
- records in the selected dataset
- links to OCAD objects found. OCAD does not check if the objects also exists.
- records in the selected dataset without a link to an OCAD object
The ids of the records without a link to an OCAD object are shown in the Records to delete field. Please note that only the first 100 ids are shown. For the complete list of ids please use the Copy report to Clipboard function.
Click the Copy report to Clipboard icon to copy a list with the record ids to the Windows Clipboard. You can paste this list into an text document.
Example of this report:
*** Records found in dataset: (35982)
198
199
200
...

*** Linked objects found: (818)
199
18421
202
...

*** Records without linked objects found: (35165)
49535
49536
49537
...
Click the Delete button to delete the records according the list from the Records to delete field. The number of the deleted records are shown in the left status bar during the deleting process. Press the ESC key to abort this process.
![]() Please note that is not possible to undo this process. So please backup your database before starting the deleting process.
Please note that is not possible to undo this process. So please backup your database before starting the deleting process.
Options 

Delete Database Record when Deleting Object
If this option is checked in the Database menu, the corresponding record is deleted when you delete a linked object in OCAD.
Create Database Record when Cutting Object
If this option is checked in the Database menu, a second database record is created when a linked object is cut.
Database Information 

Allows you to see all the information about each dataset.
OCAD checks for invalid database links and shows these in the Report field when opening the dialog.
All linked objects from all datasets: Shows all objects with have link to a database records. OCAD does not check if this record really exists (broken database record links).
Datasets: Shows all datasets. Click on a dataset to load the data for this dataset.
All keys in database: Shows all keys from the choosen dataset. This list shows also keys from database records which are not linked with OCAD objects.
All linked objects: Shows all objects which are linked with the choosen dataset. OCAD does not check if this record really exists (broken database record links).
Report: Shows a report about the choosen dataset.
Database Compatibility
OCAD checks the compatibility of the dataset. OCAD exists in a 32 bit and 64 bit version.
Mircosoft Excel/Access
OCAD 64 bit version cannot connect to Microsoft Excel/Access if the 32 bit version of Microsoft Access Database Engine is installed. The same with 64 bit Microsoft Access Database Engine and OCAD 32 bit version.
In this case use the same OCAD version as installed Microsoft Access Database Engine.
![]() You can switch on/off this warning in the Preferences in the submenu Warnings.
You can switch on/off this warning in the Preferences in the submenu Warnings.
Back to Main Page
