Create a New Line Symbol
You can create very complex line symbols with OCAD. In addition, the symbol editor can make use of nearly all the drawing modes and editing tools that are available for objects in the normal drawing window to make a line symbol even more unique.
Choose the New command in the Symbol menu. Then, choose the Line Symbol option in the New Symbol dialog to create a new line symbol.
Line Symbol Dialog
The Line Symbol dialog appears. This dialog consists of six tabs:
- Main Line: Use this tab to define the color, line thickness and line type, generally the appearance of the main line.
- Distances: Use this tab to define the length of dashed lines and the distance between the dashes.
- Symbols: Use this tab to define the start, main, corner and end points.
- Double Line: Use this tab to define the line width, filling color, line thickness and line type of a double line.
- Decrease: In this tab a decreasing line type can be defined.
- Framing: With this tab you can use framing to cover other map objects if you use complex line symbols.
Main Line
In the Main Line tab you can make the following adjustments:
Symbol Number
Type a symbol number between 0.001 and 999999.999 in this field.
Symbol Description
Enter a symbol description in this field (e.g. Railway).
Preferred Drawing Tool
Choose a preferred drawing tool in the corresponding dropdown list. When the symbol is selected in the Symbol Box the drawing mode changes automatically to the chosen one. If None was chosen, the drawing mode remains the same as it was before.
Line Color
Choose a line color for the main line. The dropdown list contains all colors from the Color Table. If a main line is not used, it is not necessary to define a line color.
Line Width
If the symbol has a main line (full or dashed), enter a line width here. Type in 0.00 if you do not want to use a main line (e.g to create dotted lines).
Line Style
Choose between three line styles. The line ends and corners appear in each case differently.
Line Length
In this part of the dialog you can define two distances:
- Distance from start: This value defines the distance from the beginning of the line to the start of the main line (the start of the visible line).
- Distance to the end: This value defines the distance from the end of the visible line (main line) to the actual line end.
If you activate the Pointed ends option, the line gets pointed ends over the above mentioned distances.
Course Setting for Orienteering Options
There is an additional option in course setting projects to use the symbol as a marked route. Visit the Add a Marked Route article for further information.
Examples
- This is an example for a full line.
![]() Example Dashed Line with Background
Example Dashed Line with Background
- This is an example for the Distances from start and Distances to the end asjustments.
- This is an example for the Distances from start and Distances to the end asjustments.
- This is an example for a line with Pointed ends.
Distances
Use this tab to define the dashes for a dashed line.
Distances
Main length a
This length defines the length of the main dash (see figure at the top of the dialog, the main dash is indicated with the letter a). For a dotted line, enter here the distance between the dots.
End length b
This length defines the length of the start and end dashes (see figure at the top of the dialog, the end dashes are indicated with the letter b). For a dotted line, enter 0 in this field to make sure, that the line starts with a dot and not a gap. For lines with dots on it, enter here the distance from the start of the line to the first dot on the line.
![]() The end length is also used before and after a corner of the line.
The end length is also used before and after a corner of the line.
at least X Gap(s)/Symbol(s)
Here you can define a minimum number (max 2) of gaps or symbols (if a main symbol is defined) that a line should contain. If you want a dashed line to always have a gap (regardless how short it is) then choose a 1 here.
Gaps
Main gap C
The value entered here defines the length of the main gap (see figure at the top of the dialog, the main gaps are indicated with the letter C).
Gap D
You can add an additional gap to the main dash. Define a length for it in this field (see also figure at the top of the dialog, the Gap D is indicated with the letter D).
Gap E
You can add an additional gap to the end dashes. Define a length for it in this field (see also figure at the top of the dialog, the Gap E is indicated with the letter E). This is used rarely.
Examples
- This is an example for a dashed line with a main length of 2.0mm, an end length of 1.0mm and a main gap of 0.5mm.
- This is an example of a dotted line with a main length of 1.0mm.
- This is an example for a dashed line with a dot in the middle of each dash.
Symbols
Add point symbols to your line symbol to make your symbol unique. This point symbol can be a simple dot, but it is also possible to add complex symbols.
Main Symbol
In the Main symbol A part of the dialog you can define a main symbol. The main symbol appears at every main gap defined in the Distances tab of this dialog.
No. of symbols
The main symbol may consist of more than one symbol. It can be formed of up to five equal symbols.
Edit button
To edit the symbols described in the paragraph above, click the Edit button. The Symbol Editor will appear, where you can draw a symbol with almost every drawing and editing function of OCAD. Visit the Symbol Editor article for more information. In this article, there is also a specific paragraph for drawing symbols of structured lines.
Distance
The value typed in the Distance field defines the distance between the individual symbols unless the number of symbols is 0 or 1.
Other Symbols
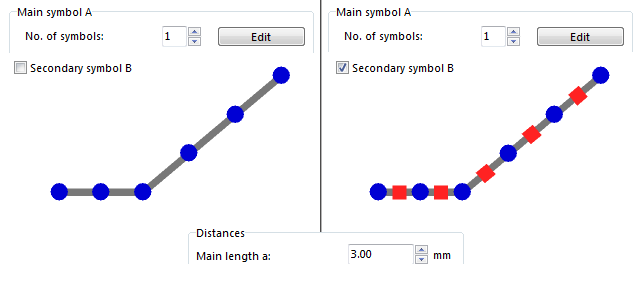
Secondary symbol B
A secondary symbol appears at the position of the Gap D defined in the Distances tab of this dialog, therefore exactly in the middle of two main symbols. Click the Edit button to edit the symbol with help of the Symbol Editor.
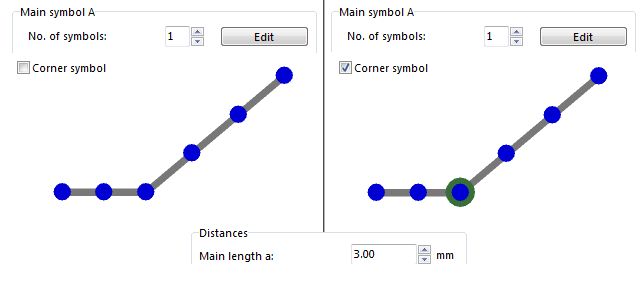
Corner symbol
A corner symbol appears at every Corner Vertex of the line. Click the Edit button to edit the symbol with help of the Symbol Editor.
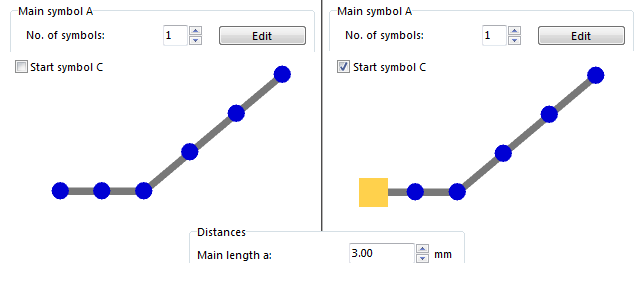
Start symbol C
The Start symbol C appears at the start point of a line. Click the Edit button to edit the symbol with help of the Symbol Editor.
End symbol D
The Start symbol C appears at the end point of a line. Click the Edit button to edit the symbol with help of the Symbol Editor.
Examples
- This is an example for a line symbol with corner symbols.
- This is an example for a line symbol with a main, a start and an end symbol.
- This is an example for a line symbol with a special main symbol.
- This is an example for a line symbol with a symbols between dashes.
![]() Example Geological Line Symbol
Example Geological Line Symbol
- This is an example for a line symbol with a main and a secondary symbol.
- This is an example for a dashed line with a dot in the middle of each dash.
Double Line
Double lines are primarily used for streets, where you have a left and a right border line filled or not filled with another color. If you need a center line (often used for highways) define a main line (note, that the color for the center line must be above the color for the infill in the Color Table).
Mode
Select the mode of the double line. You have the following options for a double line:
- Off: No double line is shown.
- Full lines: The two lines which form a double line are continuous.
- Left line dashed: The left line is dashed.
- Right line dashed: The right line is dashed.
- All dashed: Both lines are dashed.
Width
Enter the distance between the two double lines in this field. If you use a fill color, this is the width of the filling between the two border lines.
Fill Color
Check the On option, to activate the fill color. In the dropdown list a color of the Color Table can be chosen. The border of the filling is formed by the sidelines. The filling does not exceed those border lines, therefore there are often really small gaps between the sidelines and the filling. To avoid these gaps make use of the Framing which is described later on this page. The advantage of a fill color is that for example street crossings are automatically cleared. To get that effect you must choose a fill color which is above the color of the side lines in the Color Table. Otherwise the infill cannot erase the side lines in the street crossings.
Left and Right Line
Assign a color from the Color Table to the left respectively the right sideline. Those can be colored individually and the Line width can be chosen distinctly as well.
Dashed
If you chose the Left line dashed, Right line dashed or All dashed option as a double line mode, you can enter the dash and gap lengths in this part of the dialog. The value entered in the Distance a field defines the dash length and the value entered in the Gap field stands for the gap length.
Examples
- This is an example for a simple double lined symbol.
![]() Example National Park Boundary
Example National Park Boundary
- This is an example of a line symbol with activated double line in the Right line dashed mode and the left line set to 0.00.
- This is an example of a line symbol with dashed double line.
- This is an example of a line symbol with a double line, which does not appear as a borderline.
- This is an example of a quite complex line symbol with a dashed double line, which does not appear as a borderline.
- This is an example for a line symbol with a double line without filling.
Fill color: If Fill is checked select here the fill color. The advantage of a fill color is that street crossings are automatically cleared. To get that effect you must choose a fill color which is above the color of the side lines in the color table. Otherwise the infill cannot erase the side lines in the street crossings.
- Left line/Right line: Enter here a color and a line width for the side lines. Enter 0 if no side line should be drawn.
- Dashed: If you have chosen "Left line dashed" or "Both lines dashed" enter here the length of the dashes and the gap.
Define a framing line
Framing lines are normally used as a background to line objects. Often a framing line is used to block out (or cover) other objects. Note that the color of the framing line must be above the colors of the objects to be covered in the color table.
- Line color: Select the line color.
- Line width: Enter here the line width. Enter 0 here if no framing line should be drawn.
- Line style: Select one of the 3 line styles with different line ends and line joins.
Define a symbol witch decreases size
These features are primarily used for geological symbols with decreasing dots.
Decrease: Define here if the Symbols should decrease only towards one end or towards both ends.
Last symbol: Enter here how much the symbol size should decrease.
- Remark: The distance between the symbols is also decreased. However, the dashes of dashed lines are not decreased. Therefore you should not use the Decrease function together with dashed lines.
 Example Stone embankment top edge
Create special lines
 Example Railway
 Example National Park boundary
 Example Cable Car
 Example Dashed Minor Road
 Example Canton boundary
 Example Area boundary


