Course Setting for Orienteering: Difference between revisions
| Line 143: | Line 143: | ||
[[Course Setting Options]] | [[Course Setting Options]] | ||
Revision as of 17:15, 4 July 2012
(The Course Setting functions are only available in course setting projects!)
OCAD provides completely integrated functions for course setting in orienteering.
Start a New Course Setting Project
A course setting project is a special OCAD file. Like map files it has the extension .ocd, but it has a special internal mark to identify it as a course setting file. To create a course setting project, you must create a new map file.
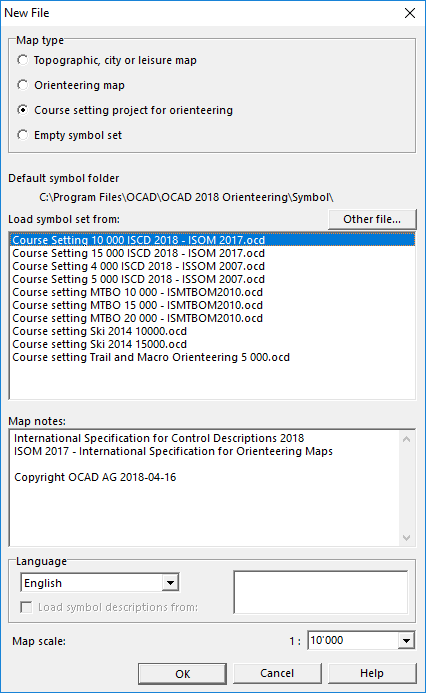
- Choose the New command from the File menu or click the New button. The New File dialog box is displayed.
- In the Map type box select the 'Course setting project for orienteering item.
- Select a symbol set from the Load symbol set from box. For a course setting project in a scale where no symbol set is available please choose one of the available symbol sets.
- Click the OK button.
- Choose the Set Scale and Coordinate System command from the Map menu. Set the map scale to the correct value . It is important to do this before starting with course setting because the calculation of the courses length depends on the map scale.
- Choose the Save command from the File menu or click the
Save button. The Save As dialog box appears. Enter a file name for the course setting file.
- Choose the Open command from the Background maps menu to open a map file as a background map.
- Choose the Entire Map command from the View menu to show the whole map on the screen.
The Course Setting Box is displayed on the right side of the OCAD window. This Course Setting Box provides a lot of functions and options. Visit the Edit Course Setting Objects page to get more information.
Add Course Setting Objects
To learn how to add course setting objects visit the Add Course Setting Objects page with the following articles:
- Add Start, Controls and Finish
- Add a Marked Route
- Add a Control Description
- Add a Course Title
- Add Variant for Relay Courses. Learn how to create relay courses on the Create Relay Courses page.
- Add Start Numbers for Relay Courses. Learn how to create relay courses on the Create Relay Courses page.
- Add Other Objects, like the event title, logos, corrections on the map etc.
- Course Setting Dialog Box
Edit Course Setting Objects
Information about all functions which are provided by the course setting box on the right side of the window can be found on the Edit Course Setting Objects page.
Most important functions:
Change Code of Course Objects
Insert a Text Block
Lock or Unlock Course Objects
Edit Control Description
Add, Edit or Remove Course Objects
Preview Mode
Controls
The following two functions can be found in the Controls submenu of the Course Setting menu:
Renumber all Controls
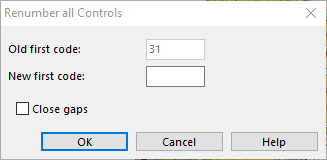
Choose the Renumber all Controls command in the Controls submenu of the Course Setting menu to display the following dialog:
Enter a New first code to shift all control codes. All codes are shifted with the difference between the New first code and the Old first code. Click the OK button when finished.
This function can be useful if you come to know the available control numbers not before setting the courses.
Control Elevation
Visit the Control Elevation page to find more information about this function.
Courses
As a next step you can Create a New Course. A course is basically a list of the start, controls, marked route(s) and the finish. You may want to Insert Other Course Objects like mandatory crossing point, mandatory passage through out of bound area, map exchange, relay team or leg variation.
OCAD supports:
- Individual Courses with symbol sets for foot-o, ski-o, mtb-o and trail-o
- Relay Courses
- One-Man Relay Courses
- Score Orienteering
All information about courses can be found on the Create a New Course page.
Classes
In OCAD you can either work with courses only or you can use classes and courses. Different classes may use the same course. Visit the Create a New Class page for more information.
Insert Course Object to Courses
Choose this function from the Course Setting menu. Learn more about this function on the Add a Course Object to Courses page.
Delete Course Object from Courses
This is the inverse function of the Insert Course Object to Courses function.
Read more about this function on the Delete Course Object from Courses page.
Make Graphic Modifications
Often it is necessary to Make Graphic Modifications to the courses generated by OCAD.
Move Control Number for All Courses
To move the control number for all courses (for example if it covers important map information):
- Change to Preview mode.
- Move a control number and keep it selected.
- Choose the Move Control Number for all Courses command from the Course Setting menu.
- The control number is moved for all other courses, too.
Edit Connection Line for All Courses
To edit a connection line for all courses (for example if it covers important map information):
- Change to Preview mode.
- Edit the connection line and keep it selected.
- Choose the Edit Connection Line for all Courses command from the Course Setting menu.
- The connection line is edited in all other courses which use it, too.
Edit Text Control Description
Choose the Edit Text Control Description command in the Course Setting menu to edit the text control description. Visit the Edit Text Control Description page for more information.
Auto Control Description
OCAD provides an auto control description tool that recognizes map objects where controls are placed and sets the corresponding IOF symbol to the control description.
Course Statistic and Event Statistic
Choose Course Statistics and Event Statistics from the Course Setting menu to optimize courses.
Choose Print, Courses from the Course Setting menu to print courses. Courses can be printed together with the map or on an already printed map. OCAD provides adjustment functions to adjust the course to the already printed map. In addition EPS files can be created to make films for offset printing.
Choose Print control descriptions from the Course Setting menu to print control descriptions only.
Control descriptions can printed together with the course on the map: add a control description object.
Import
Import courses
Export
OCAD provides different exports of course data for event software, courses as gpx file, course maps etc.
Options
Previous Chapter: XML Script
Next Chapter: Server Client
Back to Main Page


