Course Setting Printing: Difference between revisions
No edit summary |
|||
| Line 56: | Line 56: | ||
[[File:Hint.jpg]] Choose the '''[[Canvases]]''' command from the Course Setting menu to export courses and classes of the same course setting project as PDFs in different scales and layouts. | [[File:Hint.jpg]] Choose the '''[[Canvases]]''' command from the Course Setting menu to export courses and classes of the same course setting project as PDFs in different scales and layouts. | ||
[[File:Canvases Blog.png]] | |||
===Print directly in OCAD === | ===Print directly in OCAD === | ||
Latest revision as of 16:36, 21 November 2023
This page provides an overview of how orienteering courses can be printed.
Print Preparation
Normal Printing
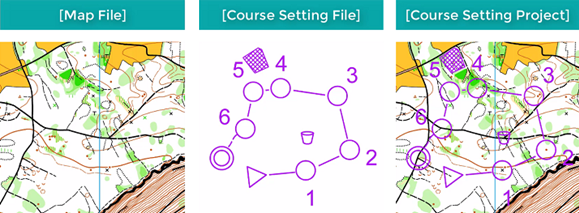
Normally, your course setting project consists of a course setting file, in which you load the map file as a background map.
Nowadays, most maps for orienteering trainings and smaller competitions are printed with laser printers in one single step with a satisfactory result.
To avoid that the course setting objects covers important map details, the Blend Mode simulates an overprint effect. By default, the blend mode for OCAD course setting symbols is set correctly and no further action is required.

Map file loaded as background map in course setting project, no blend mode set for any color.

Map file loaded as background map in course setting project, blend mode set for course setting objects.
Also, you can cut control circles and connection lines to make map details visible below.

Map file loaded as background map in course setting project, blend mode set for course setting objects, control circle cut.
![]() In offset printing (a printing technology used by professional printing companies), the courses and other additional course information can be over-printed by an extra print with purple color after the actual map is printed. In this case, an overprint effect will appear making important symbols visible through the course symbols.
In offset printing (a printing technology used by professional printing companies), the courses and other additional course information can be over-printed by an extra print with purple color after the actual map is printed. In this case, an overprint effect will appear making important symbols visible through the course symbols.
Import an OCAD Map
An approach other than the loading the map file as background map is to import the map file into the course setting project.
However, the following process requires a good knowledge of OCAD and is more time consuming.
With this method, you can place the purple color for course setting in the color order below the colors for black, brown and blue point and line symbols. This way, important map features like paths, contours, streams and stones are above the course setting objects. This gives a similar effect as the Blend mode.
This is how it works:
- In your course setting project, make sure that no background map is loaded.
- Choose the Import command from the File menu.
- Select the OCAD map (which you would use as background map) in the browser and click the Open button.
- The Import OCAD Map dialog appears. Read the Import OCAD Map article if you do not know how to deal with this dialog.
- Click the OK button to finish.
Also, you can use this process for example to import ski or bike orienteering maps, where control circles and connection lines are not printed over all map objects.
For more information, see this video on YouTube by IOF FootO Commission member Christer Carlsson.

Map imported into course setting project, no blend mode set for any color.
Printing Process
There are basically two ways to print maps in OCAD.
Export and print PDF
Due to the colour display, we recommend that you always create a PDF from OCAD first and then print this PDF, e.g. in Adobe Acrobat Reader. See also this blog post for more information.
![]() Choose the Canvases command from the Course Setting menu to export courses and classes of the same course setting project as PDFs in different scales and layouts.
Choose the Canvases command from the Course Setting menu to export courses and classes of the same course setting project as PDFs in different scales and layouts.
Print directly in OCAD
Choose the Courses command in the Print submenu of the Course Setting menu to print courses directly out of OCAD or to print only courses on already printed map.
Alternatively, you can also use the Print command in the File menu.
Please note that we do not recommend printing maps and courses directly, but creating a PDF first.
Adapt colors
Test prints from OCAD shows, that the colors defined in the OCAD symbol sets also works satisfactorily for laser printers. However, it's recommended to make test prints and compare the colors to a reference print sheet, as every single laser printer gives its 'own colors'.
Please also note that the colors you see in the OCAD Window will not correspond exactly to the colors you see in a PDF or in the printout. OCAD works with CMYK colors, but what you see on your screen are RGB-Colors from the Windows Graphics Device Interface (GDI). The color conversion (mostly) leads to slightly different colors.
You can adjust colors in the Color dialog box.
Print Control Descriptions
Please see the Print Control Descriptions page for more information.

